


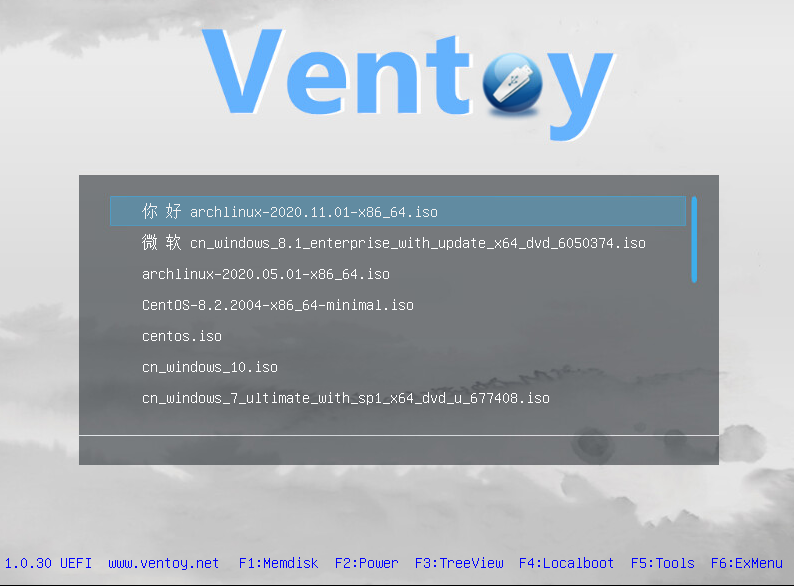
Ventoy is an open source tool to create bootable USB drive for ISO/WIM/IMG/VHD(x)/EFI files.
With ventoy, you don’t need to format the disk over and over, you just need to copy the image files to the USB drive and boot it. You can copy many image files at a time and ventoy will give you a boot menu to select them.
x86 Legacy BIOS, IA32 UEFI, x86_64 UEFI, ARM64 UEFI and MIPS64EL UEFI are supported in the same way.
Both MBR and GPT partition style are supported in the same way.
Most type of OS supported(Windows/WinPE/Linux/Unix/Vmware/Xen…)
700+ ISO files are tested (List). 90%+ distros in distrowatch.com supported.
Features
- 100% open source
- Simple to use
- Fast (limited only by the speed of copying iso file)
- Can be installed in USB/Local Disk/SSD/NVMe/SD Card
- Directly boot from ISO/WIM/IMG/VHD(x)/EFI files, no extraction needed
- No need to be continuous in disk for ISO/IMG files
- MBR and GPT partition style supported (1.0.15+)
- x86 Legacy BIOS, IA32 UEFI, x86_64 UEFI, ARM64 UEFI, MIPS64EL UEFI supported
- IA32/x86_64 UEFI Secure Boot supported (1.0.07+)
- Persistence supported (1.0.11+)
- Windows auto installation supported (1.0.09+)
- RHEL7/8/CentOS/7/8/SUSE/Ubuntu Server/Debian … auto installation supported (1.0.09+)
- FAT32/exFAT/NTFS/UDF/XFS/Ext2(3)(4) supported for main partition
- ISO files larger than 4GB supported
- Native boot menu style for Legacy & UEFI
- Most type of OS supported, 700+ iso files tested
- Linux vDisk boot supported
- Not only boot but also complete installation process
- Menu dynamically switchable between List/TreeView mode
- “Ventoy Compatible” concept
- Plugin Framework
- Injection files to runtime environment
- Boot configuration file dynamically replacement
- Highly customizable theme and menu
- USB drive write-protected support
- USB normal use unaffected
- Data nondestructive during version upgrade
- No need to update Ventoy when a new distro is released
Installation Instructions
Install Ventoy To USB Drive
For Windows
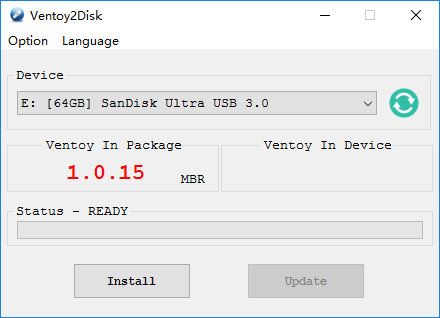
Download the installation package, like ventoy-x.x.xx-windows.zip and decompress it.
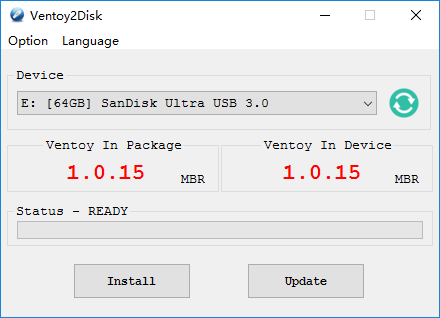
Run Ventoy2Disk.exe , select the device and click Install or Update button.
Notes
- if Ventoy2Disk.exe always fail, you can use Ventoy LiveCD, refer notes
- Ventoy can be installed on USB drive or local disk. To prevent misoperation, Ventoy2Disk.exe only lists USB drives by default.
You can toggle theShow all devicesoption then all the disks will be listed. But at this time, you must be very careful and don’t choose the wrong disk. - MBR/GPT partition style option is used only during install and will be ignored during update.
- After install, the 1st partition will be formated in exFAT, and you can manually reformat it with FAT32/NTFS/UDF/XFS/Ext2/3/4
For Linux – GUI mode
Background
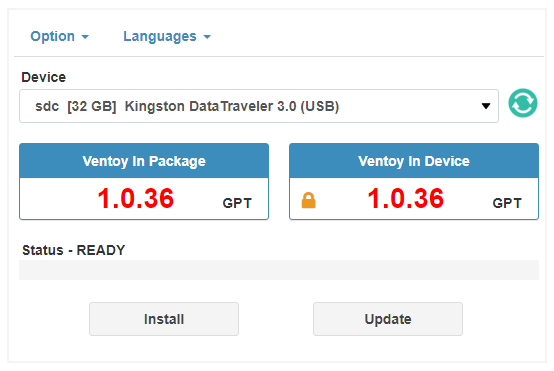
For convenience, Ventoy has provided a web browser-based GUI in Linux system since 1.0.36.
The UI layout and usage have no difference with Ventoy2Disk.exe in Windows.
Notes: If you run into problem in the GUI, you can use Ventoy2Disk.sh to install or update Ventoy. Refer usage
Screenshot
Usage for Deepin/UOS
You can also use the method for generic linux if you run into problems with this method.
- How to use
Just run sudo sh VentoyWebDeepin.sh in the terminal.
- How to close
Close the pop-up window or press Ctrl + c in the terminal.
Usage for Generic Linux
- How to use
1. run sudo sh VentoyWeb.sh in the terminal
2. open browser and visit http://127.0.0.1:24680
Tip: Step 1 will print the http address in the terminal. In many distros you can just press Ctrl and click the link with your mouse meanwhile.
By default, VentoyWeb.sh listen on 127.0.0.1:24680, and you can only visit it on the localhost.
You can also specify the IP and port like this sudo sh VentoyWeb.sh -H 192.168.0.100 -P 8080
Then you can visit the WebUI from another computer. This is very convenient in some cases.
For example, you have a computer with Linux in it, but it doesn’t have a GUI environment. You can run the script as above, and visit the WebUI from another computer (e.g. Windows) as long as they are connected on the internet.
- How to close
- Close the web browser
- In the terminal, press
Ctrl + cto exit
For Linux – CLI mode
Download the installation package, like ventoy-x.x.xx-linux.tar.gz and decompress it.
Run the shell script as root sh Ventoy2Disk.sh { -i | -I | -u } /dev/XXX XXX is the USB device, for example /dev/sdb.
Ventoy2Disk.sh CMD [ OPTION ] /dev/sdX
CMD:
-i install ventoy to sdX (fail if disk already installed with ventoy)
-I force install ventoy to sdX (no matter installed or not)
-u update ventoy in sdX
-l list Ventoy information in sdX
OPTION: (optional)
-r SIZE_MB preserve some space at the bottom of the disk (only for install)
-s enable secure boot support (default is disabled)
-g use GPT partition style, default is MBR style (only for install)
-L Label of the 1st exfat partition (default is ventoy)
Attention that the USB drive will be formatted and all the data will be lost after install.
You just need to install Ventoy once, after that all the things needed is to copy the iso files to the USB.
You can also use it as a plain USB drive to store files and this will not affact Ventoy’s function.
Copy Image files
After the installation is complete, the USB drive will be divided into 2 partitions. The 1st partition was formated with exFAT filesystem (You can also reformat it manually with NTFS/FAT32/UDF/XFS/Ext2/3/4 … See Notes). You just need to copy iso files to this partition. You can place the iso/wim/img/vhd(x) files any where. Ventoy will search all the directories and subdirectories recursively to find all the image files and list them in the boot menu alphabetically. Also you use plugin configuration to tell Ventoy only to search for image files in a fixed directory (and its subdirectories).
Update Ventoy
If a new version of Ventoy is released, you can update it to the USB drive.
It should be noted that the upgrade operation is safe, all the files in the first partition will be unchanged.
Upgrade operation is in the same way with installation. Ventoy2Disk.exe and Ventoy2Disk.sh will prompt you for update if the USB drive already installed with Ventoy.
Compile Instructions
- Compile Enviroment
My build envrioment is CentOS 7.8 x86_64. So here I first explain how to create the build environment from scratch.
Because Ventoy is based on many open source projects, so the environment is important. I suggest you test it on a virtual machine firstly.
1.1 Install CentOS 7.8
I use CentOS-7-x86_64-Everything-2003.iso and select Minimal install
1.2 Install Packages
yum install \
libXpm net-tools bzip2 wget vim gcc gcc-c++ samba dos2unix glibc-devel glibc.i686 glibc-devel.i686 \
mpfr.i686 mpfr-devel.i686 zlib.i686 rsync autogen autoconf automake libtool gettext* bison binutils \
flex device-mapper-devel SDL libpciaccess libusb freetype freetype-devel gnu-free-* qemu-* virt-* \
libvirt* vte* NetworkManager-bluetooth brlapi fuse-devel dejavu* gnu-efi* pesign shim \
iscsi-initiator-utils grub2-tools zip nasm acpica-tools glibc-static zlib-static xorriso - Download Source Code
2.1 Download Ventoy source code from github and decompress it.
Next I assume that you have unzipped the code into the /home directory (check /home/Ventoy-master/README.md file for the directory layout).
2.2 Download third-part source code and tool
https://www.fefe.de/dietlibc/dietlibc-0.34.tar.xz ===> /home/Ventoy-master/DOC/dietlibc-0.34.tar.xz
https://musl.libc.org/releases/musl-1.2.1.tar.gz ===> /home/Ventoy-master/DOC/musl-1.2.1.tar.gz
https://ftp.gnu.org/gnu/grub/grub-2.04.tar.xz ===> /home/Ventoy-master/GRUB2/grub-2.04.tar.xz
https://codeload.github.com/tianocore/edk2/zip/edk2-stable201911 ===> /home/Ventoy-master/EDK2/edk2-edk2-stable201911.zip
https://codeload.github.com/relan/exfat/zip/v1.3.0 ===> /home/Ventoy-master/ExFAT/exfat-1.3.0.zip
https://codeload.github.com/libfuse/libfuse/zip/fuse-2.9.9 ===> /home/Ventoy-master/ExFAT/libfuse-fuse-2.9.9.zip
https://releases.linaro.org/components/toolchain/binaries/7.4-2019.02/aarch64-linux-gnu/gcc-linaro-7.4.1-2019.02-x86_64_aarch64-linux-gnu.tar.xz ===> /opt/gcc-linaro-7.4.1-2019.02-x86_64_aarch64-linux-gnu.tar.xz
https://toolchains.bootlin.com/downloads/releases/toolchains/aarch64/tarballs/aarch64–uclibc–stable-2020.08-1.tar.bz2 ===> /opt/aarch64–uclibc–stable-2020.08-1.tar.bz2
http://ftp.loongnix.org/toolchain/gcc/release/mips-loongson-gcc7.3-2019.06-29-linux-gnu.tar.gz ===> /opt/mips-loongson-gcc7.3-2019.06-29-linux-gnu.tar.gz
https://github.com/ventoy/musl-cross-make/releases/download/latest/output.tar.bz2 ===> /opt/output.tar.bz2
http://www.tinycorelinux.net/11.x/x86_64/release/distribution_files/vmlinuz64 ===> /home/Ventoy-master/LiveCD/ISO/EFI/boot/vmlinuz64
http://www.tinycorelinux.net/11.x/x86_64/release/distribution_files/corepure64.gz ===> /home/Ventoy-master/LiveCD/ISO/EFI/boot/corepure64.gz
http://www.tinycorelinux.net/11.x/x86_64/release/distribution_files/modules64.gz ===> /home/Ventoy-master/LiveCD/ISO/EFI/boot/modules64.gz
2.3 Prepare third-part tools
cd /home/Ventoy-master/DOC/
tar xf musl-1.2.1.tar.gz
cd musl-1.2.1
./configure && make install
tar xf /opt/gcc-linaro-7.4.1-2019.02-x86_64_aarch64-linux-gnu.tar.xz -C /opt
tar xf /opt/aarch64–uclibc–stable-2020.08-1.tar.bz2 -C /opt
tar xf /opt/output.tar.bz2 -C /opt
mv /opt/output /opt/mips64el-linux-musl-gcc730
2.4 Set PATH envrioment
export PATH=$PATH:/opt/gcc-linaro-7.4.1-2019.02-x86_64_aarch64-linux-gnu/bin:/opt/aarch64–uclibc–stable-2020.08-1/bin:/opt/mips64el-linux-musl-gcc730/bin
better to add this line to /root/.bashrc and relogin as root - All in one script I have made a all_in_one.sh, you can run this script to build and pack ventoy. If you want to compile a certain part separately, you can continue to refer to the later chapters of this text. cd /home/Ventoy-master/INSTALL sh all_in_one.sh It should be noted that:
- Only grub2/EDK2/IPXE will be recompiled in all_in_one.sh. Other part contains the binaries and are few modified, so will no be recompiled everytime.
You can rebuild these parts separately if you want. - some part of Ventoy has 32bit&64bit version (like 4.9 4.10 4.11 follows)
all_in_one.sh only build 64bit version of them, if you want to rebuild the 32bit verison. You should create a 32bit CentOS environment and build them.
Fortunately these parts are few modified, you only need to build once or you can directly use the binary I have built.
Besides, after a fully compile and pack, you can only build the part you modified (for example grub2) and run ventoy_pack.sh to generate the package.
- Only grub2/EDK2/IPXE will be recompiled in all_in_one.sh. Other part contains the binaries and are few modified, so will no be recompiled everytime.
- Build every part of Ventoy
4.1 == Build grub2 ==
cd /home/Ventoy-master/GRUB2
sh buildgrub.sh
4.2 == Build ipxe.krn ==
cd /home/Ventoy-master/IPXE
sh buildipxe.sh
4.3 == Build Ventoy2Disk.exe ==
Ventoy2Disk.exe is the installer in Windows platform. And it must be built in Windows with Microsoft Visual Studio (2013+).
Open /home/Ventoy-master/Ventoy2Disk/Ventoy2Disk.sln with Visual Studio and build it.
4.4 == Build vtoyjump64.exe/vtoyjump32.exe ==
vtoyjump64.exe/vtoyjump32.exe is used to mount iso file in windows PE. You should install Microsoft Visual Studio (2013+) to build it.
Open /home/Ventoy-master/vtoyjump/vtoyjump.sln with Visual Studio and build it (64&32).
4.5 == Build dmsetup ==
Please refer to DMSETUP/build.txt
4.6 == Build ventoy_x64.efi ==
cd /home/Ventoy-master/EDK2
sh buildedk.sh
4.7 == Build VtoyTool ==
cd /home/Ventoy-master/VtoyTool
sh build.sh
4.8 == Build vtoyfat ==
cd /home/Ventoy-master/vtoyfat/fat_io_lib
sh buildlib.sh
cd /home/Ventoy-master/vtoyfat
sh build.sh
4.9 == Build exfat-util ==
cd /home/Ventoy-master/ExFAT
sh buidlibfuse.sh
sh buidexfat.sh
After that, copy EXFAT/shared/mkexfatfs ===> /home/Ventoy-master/INSTALL/tool/mkexfatfs_64
After that, copy EXFAT/shared/mount.exfat-fuse ===> /home/Ventoy-master/INSTALL/tool/mount.exfat-fuse_64
Use the same build step to build exfat-util 32bit in a 32bit CentOS system and get mkexfatfs_32 and mount.exfat-fuse_32
4.10 == Build vtoy_fuse_iso_64/vtoy_fuse_iso_32 ==
cd /home/Ventoy-master/FUSEISO
sh build_libfuse.sh
sh build.sh
Use the same build step to build in a 32bit CentOS system and get vtoy_fuse_iso_32
4.11 == Build unsquashfs_64/unsquashfs_32 ==
cd /home/Ventoy-master/SQUASHFS/SRC
sh build_lz4.sh
sh build_lzma.sh
sh build_lzo.sh
sh build_zstd.sh
cd /home/Ventoy-master/SQUASHFS/squashfs-tools-4.4/squashfs-tools
sh build.sh
Use the same build step to build in a 32bit CentOS system and get unsquashfs_32
4.12 == Build vblade_64/vblade_32 ==
cd /home/Ventoy-master/VBLADE/vblade-master
sh build.sh
4.13 == Build zstdcat ==
Please refer to ZSTD/build.txt
4.14 == Build vtoy_gen_uuid ==
cd /home/Ventoy-master/GenUUID
sh build.sh
4.15 == Build xzminidec32 ==
cd /home/Ventoy-master/Ventoy2Disk/Ventoy2Disk/xz-embedded-20130513/userspace
make -f ventoy_makefile
strip –strip-all xzminidec
4.16 == Build xzminidec64 ==
cd /home/Ventoy-master/Ventoy2Disk/Ventoy2Disk/xz-embedded-20130513/userspace
make -f ventoy_makefile64
strip –strip-all xzminidec
4.17 == Build iso9660_x64.efi ==
This efi driver is from https://github.com/pbatard/efifs
Follow all the build instructions in this project. I modified 3 files (the original and modified source are at /home/Ventoy-master/EDK2/efiffs)
4.18 IMG/cpio/ventoy/busybox/64h
https://www.uclibc.org/downloads/binaries/0.9.30.1/mini-native-x86_64.tar.bz2
https://busybox.net/downloads/busybox-1.32.0.tar.bz2
use BUSYBOX/x86_64_ash.config and uclibc to build busybox-1.32
4.19 == Build lunzip32/lunzip64 ==
http://mirror.yongbok.net/nongnu/lzip/lunzip/lunzip-1.11.tar.gz
PATH=$PATH:/opt/diet/bin
./configure –disable-nls CC=’diet gcc -nostdinc’
make
strip –strip-all lunzip
#aarch64
./configure –disable-nls CC=’aarch64-buildroot-linux-uclibc-gcc -static’
make
aarch64-buildroot-linux-uclibc-strip –strip-all lunzip - Binaries
There some binaries in Ventoy install package. These files are downloaded from other open source project’s website, such as busybox.
Here is the list of the binaries, their SHA-256 and the download urls:
5.1 IMG/cpio/ventoy/tool/lz4cat
https://create.stephan-brumme.com/smallz4 smallz4cat-x32-v1.4
SHA-256: 13d293ddeedb469f51da41167f79b2cbdb904e681716f6e6191b233dbb162438
5.2 IMG/cpio/ventoy/tool/ar
https://busybox.net/downloads/binaries/1.30.0-i686 busybox_AR
SHA-256: f29b7d81a983c0c85d22496f4a833c18f2528a1b666eb7d47c93084c1ed66ae0
5.3 IMG/cpio/ventoy/tool/inotifyd
https://busybox.net/downloads/binaries/1.30.0-i686 busybox_INOTIFYD
SHA-256: 3532162a8695e91a1ed9ddea28b2cb22259a90e93d5d9c4a517b6c36842c686f
5.4 IMG/cpio/ventoy/busybox/ash
https://busybox.net/downloads/binaries/1.27.1-i686 busybox_ASH
SHA-256: 44a6274bca580c2758ffc173fc76d18bb855b1fe8dcf70efd9ee75cbd57dee97
5.5 IMG/cpio/ventoy/busybox/tmpxz
https://busybox.net/downloads/binaries/1.27.1-i686 busybox_XZ
SHA-256: f6cdb6293680424c29b89bde0685ca27f455166c9b302cd6082ef90681456291
5.6 INSTALL/tool/i386/xzcat
https://busybox.net/downloads/binaries/1.30.0-i686/ busybox_XZCAT
SHA-256: 7399db642c2beaf52a16ab5264ffc55cfd1ff5699a524f63e5d48edf84e20f44
5.7 INSTALL/tool/i386/hexdump
https://busybox.net/downloads/binaries/1.30.0-i686/ busybox_HEXDUMP
SHA-256: cde08b6a2cf5ad914f05203e18e3f7c2ed6060a63604e3d75536f19b55e8e0af
5.8 imdisk
download http://www.ltr-data.se/files/imdiskinst.exe and extract it by 7zip.
INSTALL/ventoy/imdisk/64/imdisk.sys –> sys/amd64/imdisk.sys SHA-256: 6702202220268787e361f5a82dae53362c8e6c6dcd240bb01b44dd77ae0788da
INSTALL/ventoy/imdisk/64/imdisk.exe –> cli/amd64/imdisk.exe SHA-256: 9759175380af836869443e5f21ce2e33022125d154bc6b3d1c04dc36b190de04
INSTALL/ventoy/imdisk/64/imdisk.cpl –> cpl/amd64/imdisk.cpl SHA-256: aea2ebbea2b073c947263744962af8a3eab025ff4c9d825c543e380e738a4c99
INSTALL/ventoy/imdisk/32/imdisk.sys –> sys/i386/imdisk.sys SHA-256: a94caec2f71a924d6a914c093ad4b905d7cfdea3f515ed48aaa8c3950b2dc191
INSTALL/ventoy/imdisk/32/imdisk.exe –> cli/i386/imdisk.exe SHA-256: 33b53858e2139704cf603b115a3e5e1dfd4daeaaed4d3e03c633f2df3b55dbaa
INSTALL/ventoy/imdisk/32/imdisk.cpl –> cpl/i386/imdisk.cpl SHA-256: b781d3e2d286ac8bf548f44e50cbbb3fe78203296e41e4d2e73b407668f88f2d
5.9 INSTALL/ventoy/memdisk
https://mirrors.edge.kernel.org/pub/linux/utils/boot/syslinux/syslinux-6.03.tar.gz
decompress it and memdisk is at syslinux-6.03/bios/memdisk/memdisk
SHA-256: 3f6cd656b8a14109cd3f906fee2dd2e75418f983a5e1bfdb64f44f7765588cbb
5.10 UEFIinSecureBoot
https://github.com/ValdikSS/Super-UEFIinSecureBoot-Disk/releases Super-UEFIinSecureBoot-Disk_minimal_v3.zip
unzip it and get Super-UEFIinSecureBoot-Disk_minimal.img, extract the img by 7zip.
INSTALL/EFI/BOOT/BOOTX64.EFI –> EFI/BOOT/BOOTX64.EFI SHA-256: 475552c7476ad45e42344eee8b30d44c264d200ac2468428aa86fc8795fb6e34
INSTALL/EFI/BOOT/grubx64.efi –> EFI/BOOT/grubx64.efi SHA-256: 25d858157349dc52fa70f3cdf5c62fe1e0bae37ddfc3a6b6528af9a3c745775f
INSTALL/EFI/BOOT/MokManager.efi –> EFI/BOOT/MokManager.efi SHA-256: 3bf1f46cee0832355c7dd1dba880dea9bcaa78cc44375a1559d43bc9db18933b
5.11 INSTALL/tool/ash
https://busybox.net/downloads/binaries/1.31.0-i686-uclibc/ busybox_ASH
SHA-256: 2943f02f85fee0c9551aec47110a558a73f919c032b3c51e56d6f197b5ec4d7b
5.12 7za.exe
download from https://www.7-zip.org/a/7z1900-extra.7z
ISNTALL/ventoy/7z/64/7za.exe SHA-256: 8117e40ee7f824f63373a4f5625bb62749f69159d0c449b3ce2f35aad3b83549
ISNTALL/ventoy/7z/32/7za.exe SHA-256: ea308c76a2f927b160a143d94072b0dce232e04b751f0c6432a94e05164e716d


/EFI files. With ventoy, you don't need to format the disk.)