


PowerShell Armoury is meant for pentesters, “insert-color-here”-teamers and everyone else who uses a variety of PowerShell tools during their engagements. It allows you to download and store all of your favourite PowerShell scripts in a single, encrypted file.
You do not have to hassle with updating Rubeus, PowerView, manually. Just create a configuration file once or use the default one included with the tool. From now on, you just have to run “New-PSArmoury” before you head to the next engagement. In addition, your new and shiny armoury is encrypted and includes a bypass for AMSI, so you dont have to worry about AV.
Note: you have to provide a valid github account as well as a personal access token, so the script can properly use the github API. Do not use username/password since this will not work anyway if you have MFA enabled (and you should enable MFA). Also accessing the API with basic username/password is deprecated. Follow this guide to create a personal access token.
The config file needs to be a valid json that consists of a single array with one or more objects, where every object is interpreted as a single script source. Every object has the following attributes
Name (Mandatory)
A name of your choice to identify the script included in this object. This is just meant as a reference for yourself.
URL (Mandatory)
The location to get the script content from. This can be a URL to a web resource (https://) or a local path (C:) or a network resource (\…). The URL is thrown into Net.Webclient or Powershells Get-Item respectively. So basically every format that one of those two can handle by default should work.
Type (Mandatory)
This gives a hint about the script location to the armoury creator. There are three valid types:
- GitHub
- Will prompt for credentials so we can authenticate against the github API. Will also try to distinguish between a “raw” URL that directly poins to a file or a URL that points to a repository. If the URL points to a repository, the script will automatically search all Powershell files in that repository and include them. Like “https://github.com/cfalta/PoshRandom”
- WebDownloadSimple
- Means a file that can be downloaded without authentication or stuff using an HTTP GET. Like “http://mywebserver.com/file.ps1”
- LocalFile
- A file on disk like “C:\temp\test.ps1”. If the path points to a directory, all files (recursive) with the extension “.ps1” will be included.
FileInclusionFilter (Optional)
Will only be interpreted in an object of type “GitHub”. Will be matched with Powershells “like” comparison operator against the whole filename so keep in mind that you need to include the wildcards yourself. Don’t forget to include a star (*) if you want to match part of a filename. “*.ps1” means all files that end with “.ps1” but “.ps1” just means “.ps1”.
You don’t have to include a filter but if you do, you have to use it. An empty InclusionFilter means no files.
FileExclusionFilter (Optional)
Like the InclusionFilter but obviously the other way round. Exclusion takes precedence.
See inline Powershell help (man -full New-PSArmoury) for more details.
-Path
The path to your new armoury file. The default ist “.\MyArmoury.ps1”
-FromFile
Load your Powershell scripts directly from a local folder or file and you don’t have to provide a config file.
-Config
The path to your JSON-config file. Have a look at the sample that comes with this script for ideas.
-Password
The password that will be used to encrypt your armoury. If you do not provide a password, the script will generate a random one.
Please note: the main goal of encryption in this script is to circumvent anti-virus. If confidentiality is important to you, use the “-OmitPassword” switch. Otherwise your password and salt will be stored in your armoury in PLAINTEXT!
-Salt
The salt that will be used together with your password to generate an AES encryption key. If you do not provide a salt, the script will generate a random one.
Please note: the main goal of encryption in this script is to circumvent anti-virus. If confidentiality is important to you, use the “-OmitPassword” switch. Otherwise your password and salt will be stored in your armoury in PLAINTEXT!
-OmitPassword
This switch will remove the plaintext password from the final armoury script. Use this if confidentiality is important to you.
-ValidateOnly
Use this together with “-Config” to let the script validate the basic syntax of your JSON config file without executing it.
-Use3DES
Encrypts with 3DES instead of AES.
-EnhancedArmour
Instructs your armoury to require a protectecd PowerShell process. Therefore on first execution, your armoury will not load but spawn a new PowerShell that is set to run with BLOCK_NON_MICROSOFT_BINARIES_ALWAYS_ON process mitigation. This prevents non-microsoft DLLs (e.g. AV/EDR products) to load into PowerShell. Shamelessly copied from the great @_rastamouse: https://gist.github.com/rasta-mouse/af009f49229c856dc26e3a243db185ec
You can find a very brief introduction below. Also have a look a these two blog posts here and here.
Evading Aniti virus With Powershell Armoury
TL;DR;
PSArmoury is a PowerShell script that allows you to easily get the newest versions of all your favourite offensive PowerShell craft and automatically put it together in a single, encrypted .ps1-file. Think of it like a “yum update” that pipes the result in an encrypted container to take it with you. AMSI and EDR bypass included 🙂
PSArmoury
I wrote my “Powershell Armoury” script a while ago to tackle two issues I often encountered during engagements:
- First, I’m a huge fan of PowerShell and if possible, I do everything in PowerShell. So after some time I got a pretty big list of already existing tools and self-made scripts that I want to take with me when doing a Windows or Active Directory assessment. However all these different scripts (even my own ;-)) get updated frequently and I usually ended up with some out-dated software in the field.
- Second, most of the existing well-known PowerShell tools like PowerView or Inveigh will be detected instantly by any anti-virus solution – at least on disk.

So I created PSArmoury, which allows me to do the following:
- Create a simple json config file containing links to all my favourite tools on the internet. You only have to do this once.
- Then, everytime before an engagement you just run New-PSArmoury and it will automatically fetch the newest version of all those PowerShell scripts and put them together in a single, encrypted ps1-file. This is your Armoury.
Let’s have a look at that. You can find PSArmoury on Github. Just download or clone and you’re ready to go. First, let’s have a look at the config. PSArmoury comes with a sample configuration file called PSArmoury.json that already references some well-known tools like PowerSploit or Inveigh. You can use this for inspiration. The configuration file is just a JSON array containing the different script files you want to include. An array member looks like this.
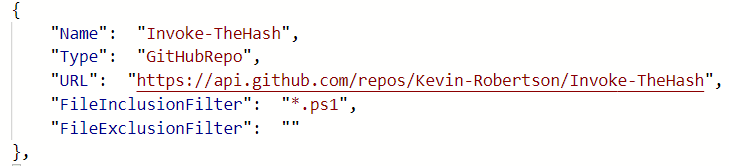
Every config item consists of a name, an URL, a type and optional inclusion/exclusion filter. The major difference here is the type and there are three differen types available.
- GitHubRepo: this instructs PSArmoury to automatically include all files in the Github Repo (that matches the Inclusion/Exclusion filter). It will ask for a Github username and personal access token since we use the Github API here.
- GitHubItem: this instructs PSArmoury to download a single file from Github. It will ask for a Github username and personal access token since we use the Github API here.
- WebDownloadSimple: this instructs PSArmoury to download a single file from an arbitrary webserver. No credentials needed.
So in the example above, the configuration instructs PSArmoury to download all files from Kevin Robertsons repostory “Invoke-TheHash” that match the inclusion filter “*.ps1”.
Once you have created your configuration, you can simply run
. .\New-PSArmoury.ps1
New-PSArmoury -Path .\MyShinyNewArmoury.ps1 -Config .\PSArmoury.json
Note that it will require you to enter credentials to use the GitHub API. You have to enter your username and a personal access token.
Here’s a screenshot using the sample config that comes with PSArmoury.
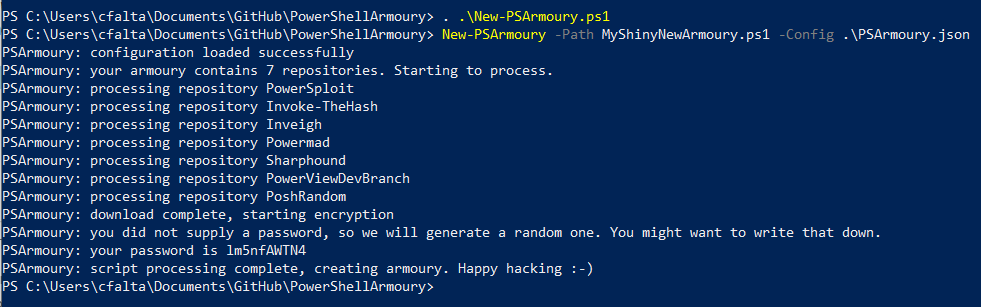
The output above mentions a password. This has been generated randomly and is included in cleartext in the resulting armoury file. This is not a problem since we use encryption only as a means of obfuscation here and not for confidentiality. Still, if you want to remove the password from your armoury you can use the -OmitPassword switch to do so. If you want to use a custom password or salt you can do this too by using the -Password and -Salt parameters.
Now, how do you use your new and shiny armoury? It’s actually very simple, just open powershell on the host of your choice and load the .ps1 file like this.
cat -raw .\MyShinyNewArmoury.ps1 | iex
And that’s it. This will disable AMSI, load all encrypted blobs into powershell and then decrypt and load them in memory. Happy Hacking.
PS Armoury 1.4 – Now With Even More Armour
TL;DR;
I recently added some improvements to PSArmoury, which I like to share with you in this post
- Support for BlockDLL process mitigation to protect your armoury
- New config parameter that lets you choose the branch in github
- Simple way to create an armoury from a local file
- Automatic inventory function
Still reading? Great, let’s go.
Introducing BlockDLL process mitigation
Thanks to the great C# port of @_RastaMouse it was very easy to implement a process mitigation, that was actually meant to protect processes from malicious injections. By setting a special flag in the extended startup info of a new process, we can prevent any non-microsoft DLL from loading into that process. This can prevent certain EDR solutions from detecting well-known tools inside powershell.
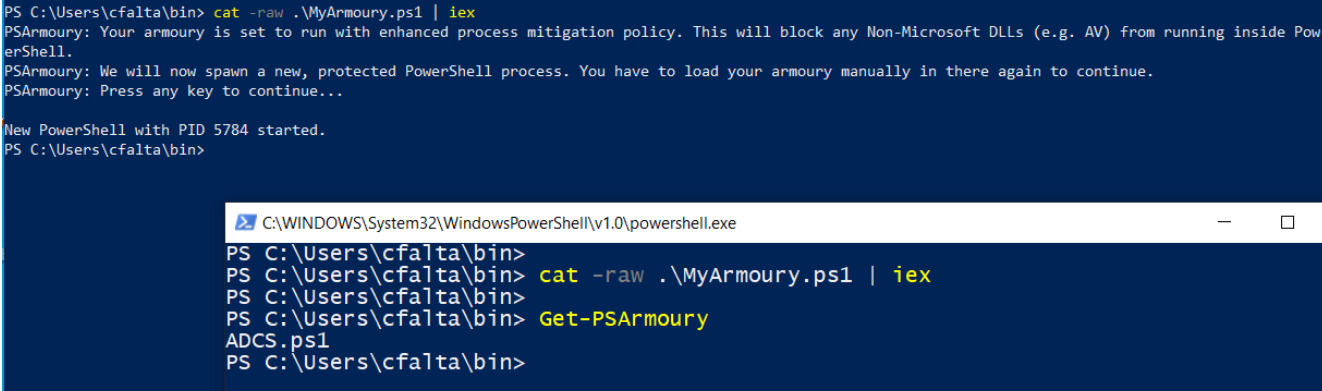
To use this with PSArmoury, just create your armoury with the -EnhancedArmour switch like shown below.

Note that this will change your user experience a bit. If you try to load an enhanced Armoury it will not decrypt it’s content but start a new, protected powershell process and ask you to run it in there manually again. This might seem a bit cumbersome at first but the reasons are simple:
- We could also apply the process mitigation policy to the first powershell process we run in (just use Set-ProcessMitigation) but at that point, the process already started and any EDR/AV DLL already runs in that process. Therefore, we need to create a new, clean process.
- There are various ways to automatically run your armoury in the second powershell process, but then again this might raise a red flag itself so I went for the manual approach.
So to use it, just run your armoury as usual and it will guide you through the rest of the process as shown below.
Choose github branch
Every item of type “GitHubRepo” in your configuration file can now contain an attribute called “Branch”. If it exists, PSArmoury will try to use the branch name supplied in this attribute. If it does not exist, it will use the default branch as before. In the sample config you find on github, we use this attribute to download the dev branch of PowerSploit instead of the master.
{
“Name”: “PowerSploit”,
“Type”: “GitHubRepo”,
“URL”: “https://api.github.com/repos/PowerShellMafia/PowerSploit”,
“Branch”: “dev”,
“FileInclusionFilter”: “.ps1″, “FileExclusionFilter”: [“.tests.ps1″]
}
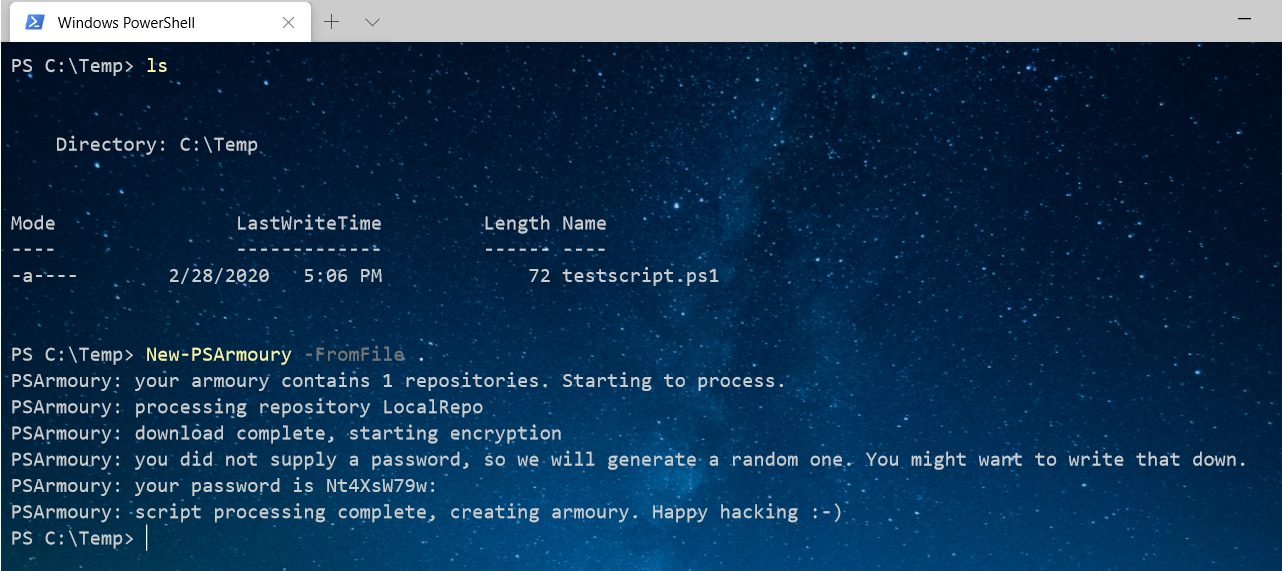
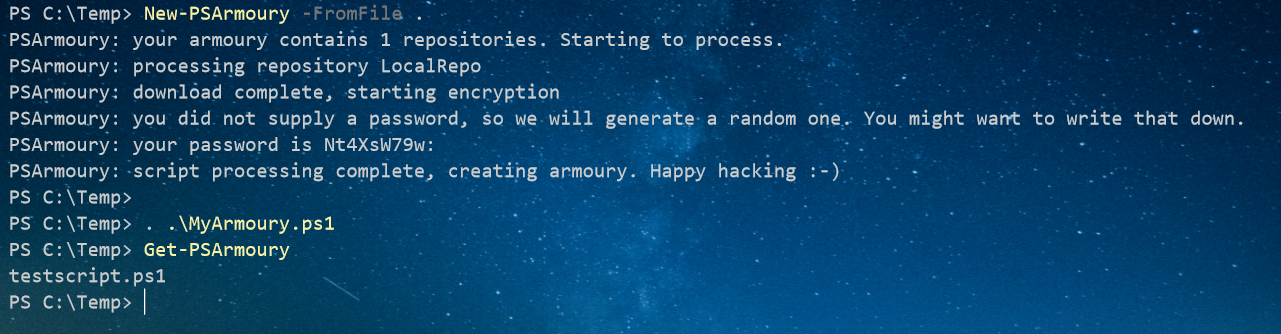
Create armoury from file
PSArmoury now offers a simple way to create an armoury from a local file. This comes in handy if you just want to quickly protect one (or many) powershell scripts you have on your disk without the need to create a config file. Just run PSArmoury with the -FromFile switch and pass it the path to a file or folder containing powershell scripts. You can omit the -Config-switch but note that only files with an extension of *.ps1 will be included.
Inventory
I occassionally find myself in the situation where I don’t remember what scripts I put inside an armoury, espescially when it’s been some time since I created it. Since everything of relevance is encrypted in the file on disk, it is not so easy to get that information. Therefore every armoury now contains an inventory function called Get-PSArmoury, which will print the names of all files included to stdout. This function is built dynamically during creation of the armoury.
That’s it for now. If you are using PSArmoury and experience any issues or have ideas for new features, I would be happy to hear from you. Just send me a mail or open an issue on github.
Use the following commands to create an armoury with all default settings. You can start with the sample config file in this repository for inspiration.
. .\New-PSArmoury.ps1
New-PSArmoury -Config .\PSArmoury.json
This will create an encrypted .ps1 file called “MyArmoury.ps1” in the current working directory. Password and salt for encryption are randomly generated and included in cleartext in the file. (note that we use encryption only to prevent detection on disk and not for confidentiality)
You can load the armoury into your current session by using
cat -raw .\MyArmoury.ps1 | iex
Loading your armoury invokes the following steps:
- Load all encrypted powershell functions into the current session as part of an array
- Disable AMSI
- Disable console history (can help prevent detection)
- Decrypt everything and pipe into iex
After that, all powershell code you put in the armoury will be available. Just invoke the cmdlets as usual like this
Invoke-Rubeus -Command “kerberoast /stats”
Invoke-Bloodhound
Get-DomainGroupMember -Identity “Domain Admins” -Recurse
If it happens that you don’t remember what you put inside the armoury, just load it and call the inventory 🙂
Get-PSArmoury


