


AutomatedLab (AL) enables you to setup test and lab environments on Hyper-v or Azure with multiple products or just a single VM in a very short time. There are only two requirements you need to make sure: You need the DVD ISO images and a Hyper-V host or an Azure subscription.
Apart from the module itself your system needs to meet the following requirements:
- Windows Management Framework 5+ (Windows)
- .NET 4.7.1 (Windows PowerShell) or .NET Core 2.x (PowerShell 6+)
- Windows Server 2012 R2+/Windows 8.1+ (Hyper-V, Azure) or Linux (Azure)
- Recommended OS language is en-us
- Admin privileges are required
- ISO files for all operating systems and roles to be deployed
- Intel VT-x or AMD/V capable CPU
- A decent amount of RAM
- Low-Latency high-throughput storage (No spinning disks please, as there are issues related to them)
- Windows Management Framework 5+
- Windows Server 2012 R2+/Windows 8.1+
- Recommended OS language is en-us
- Admin privileges are required
- WSL supported, Azure Cloud Shell supported
- Tested on Fedora and Ubuntu, should run on any system capable of running PowerShell
- PowerShell 6+
- gss-ntlmssp to enable remoting (mandatory – no remoting, no way for AutomatedLab to do its thing)
- ip and route commands available
- Azure subscription – At the moment, AutomatedLab only works using Azure. KVM is planned for a later date.
There are two options installing AutomatedLab:
- You can use the MSI installer published on GitHub.
- Or you install from the PowerShell Gallery using the cmdlet Install-Module. Please refer to the wiki for some details.
Installation
Raimund Andée [MSFT] edited this page on Feb 11, 2018 · 5 revisions
AutomatedLab (AL) is a bunch of PowerShell modules. For an easy installation, you can use the provided MSI or the PowerShell Gallery.
Download Link: https://github.com/AutomatedLab/AutomatedLab/releases
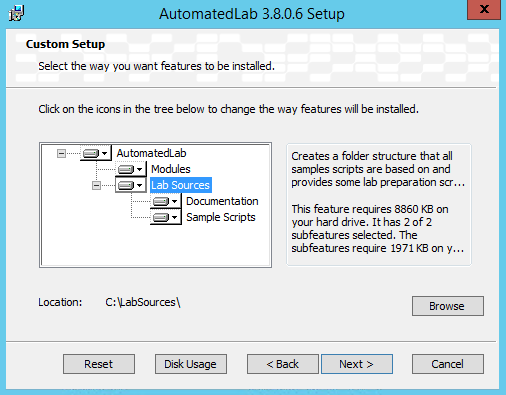
There are not many choices when installing AL.

The options Typical and Complete are actually doing the same and install AL to the default locations. The PowerShell modules go to “C:\Program Files\WindowsPowerShell\Modules”, the rest to “C:\LabSources”.
As LabSources can grow quite big, you should go for a custom installation and put this component on a disk with enough free space to store the ISO files. This disk does not have to be an SSD. Do not change the location of the modules unless you really know what you are doing.
Very important to AL is the LabSources folder that should look like this:
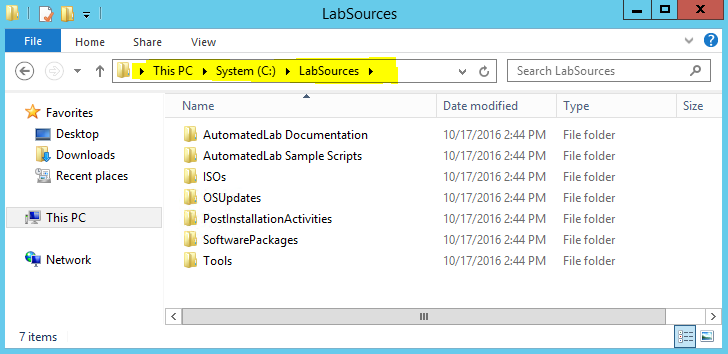
If all that worked you are ready to go for Getting Started.
AutomatedLab is provided on the PowerShell Gallery and updated on a regular basis. All the dependancies will be taken into account and some other modules are installed.
One important part of AutomatedLab is the LabSources folder that cannot be provided on the PowerShell Gallery. A new Cmdlet (New-LabSourcesFolder) has been introduced that downloads the AutomatedLab sources, extracts just the LabSources folder and puts it on the given drive.
There are only two commands that you need to run:
Install-Module -Name AutomatedLab -AllowClobber
New-LabSourcesFolder
Getting Started
Raimund Andée [MSFT] edited this page on Dec 23, 2017 · 16 revisions
After completed the Installation it is time to test installing the first lab fully automated.
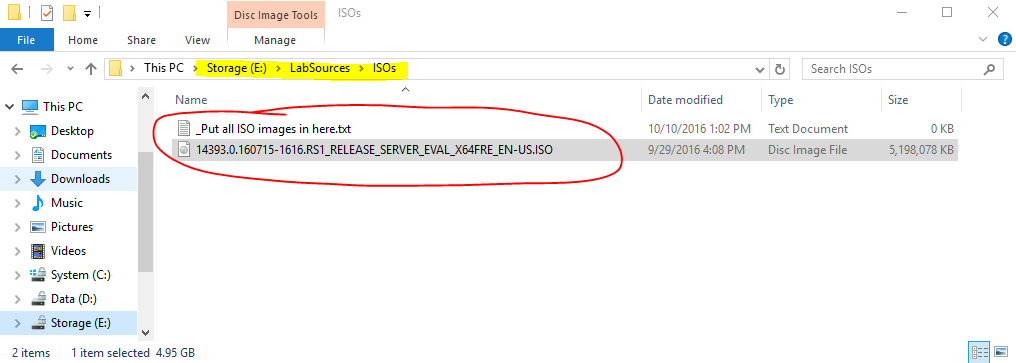
Of course AutomatedLab (AL) cannot install an operating system without actually having the bits. Hence you need to download an ISO file from MSDN, TechNet Evaluation Center or somewhere else. These files need to go to your folder “ISOs” located in the “LabSoures” folder.
The “ISOs” folder contains only one file after the installation of AL: “_Put all ISO images in here.txt”. I have downloaded Windows Server 2016 from the TechNet Evaluation Center and put the file like shown below.
Testing the ISO files
To make sure that AL can read the file, try to get a list of available operating systems. Open an elevated PowerShell ISE and call the following command (make sure you point to the right location for the LabSources folder:
Get-LabAvailableOperatingSystem -Path E:\LabSources
This returns a list of all operating system images found on the ISO file (of course this works also if there are a bunch of different OS ISOS in the folder).

Install the first lab
Plesae open an elevated PowerShell ISE and create a new empty document (CTRL+N) if not already open.
Copy and paste the following lines into the ISE:
New-LabDefinition -Name GettingStarted -DefaultVirtualizationEngine HyperV
Add-LabMachineDefinition -Name FirstServer -OperatingSystem ‘Windows Server 2016 SERVERSTANDARD’
Install-Lab
Show-LabDeploymentSummary
The just press the run button or hit F5 to start the deployment.
This is what is going to happen. Many things happen automatically but can be customized:
- AutomatedLab starts a new lab named “GettingStarted”. The lab defininition will be stored in C:\Users%username%\Documents\AutomatedLab-Labs\GettingStarted. The location can be customized.
- AL will update download the SysInternals tools and put them into the LabSources folder.
- AL looks for an ISO file that contains the specified OS. If the ISO file cannot be found, the deployment stops.
- AL adds the one and only machine to the lab and recognizes that no network was defined. In this case, AL creates a virtual switch automatically and uses an free IP range.
- The AL measures the disk speed and chooses the fastet drive for the lab, as no location is defined in the call to “New-LabDefinition”. In my case, it chooses D. Measuring is done only once and the result is cached.
- Then the actual deployment starts. AL creates
- The virtual switch
- Then it creates the a base image for the operating system that is shared among all machines with the same OS.
- Afterwards the VM is created and started
- AL waits for the machine to become ready and shows the overall installation time.
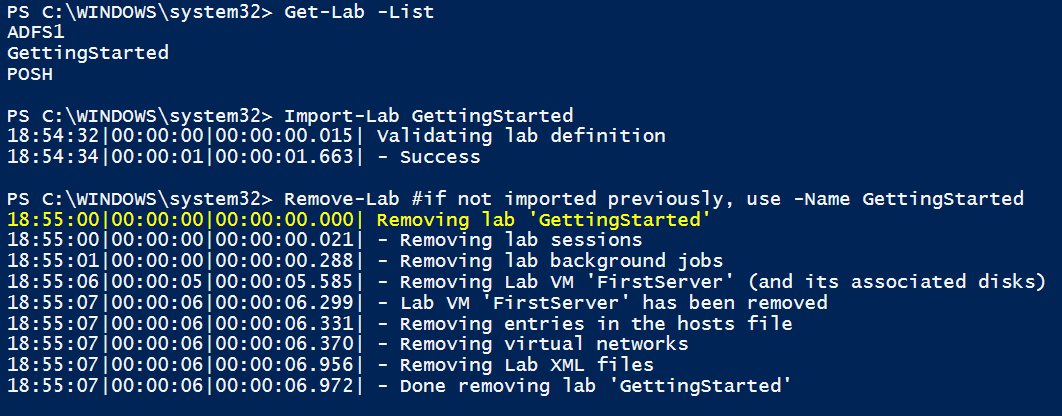
I have uploaded the log of the deloyment. Your output should look pretty similar. In my case the deployment took about 10 minutes. It gets much faster if the base disk does already exist.
If you want to get rid of the lab, just call Remove-Lab. The cmdlet removes the VMs including the disks and the virtual switches. It dies not touch the base disks.
If you have closed the ISE in the meantime, either specify the lab name or import it first.
Summary
With AutomatedLab it is extremely easy to create various kinds of labs. The more you define your lab by code, the easier it is to re-deploy it and the less time you invest in the long term.
If you like what you have seen, take a look at the folder “LabSources\Sample Scripts\Introduction”. These scripts demo how to create domains, internet facing labs, PKI, etc.
Please provide feedback if something does not work as expected. If you are missing a feature or have some great ideas, please open an issue.
Supported products
This solution supports setting up virtual machines with the following products
- Windows 7, 2008 R2, 8 / 8.1 and 2012 / 2012 R2, 10 / 2016, 2019
- SQL Server 2008, 2008R2, 2012, 2014, 2016, 2017, 2019
- Visual Studio 2012, 2013, 2015
- Team Foundation Services 2018, Azure DevOps Server
- Exchange 2013, 2016, 2019
- System Center Orchestrator 2012
- System Center Operations Manager 2019
- System Center Service Manager 2019
- Microsoft Endpoint Manager Configuration Manager 1902 (and newer)
- MDT
- ProGet (Private PowerShell Gallery)
- Office 2013, 2016, 2019
- DSC Pull Server (with SQL Reporting)
- AutomatedLab (AL) makes the setup of labs extremely easy. Setting up a lab with just a single machine is only 3 lines. And even complex labs can be defined with about 100 lines (see sample scripts).
- Labs on Azure can be connected to each other or connected to a Hyper-V lab using a single command.
- AL can be used to setup scenarios to demo a PowerShell Gallery using Inedo ProGet, PowerShell DSC Pull Server scenarios, ADFS or a lab with 3 Active Directory forests trusting each other.
- Create, restore and remove snapshots of some or all lab machines with one cmdlet (Checkpoint-LabVM, Restore-LabVMSnapshot, Remove-LabVMSnapshot).
- Install Windows Features on one, some or all lab machines with one line of code (Install-LabWindowsFeature).
- Install software to a bunch of lab machines with just one cmdlet (Install-LabSoftwarePackages). You only need to know the argument to make the MSI or EXE go into silent installation mode. This can also work in parallel thanks to PowerShell workflows.
- Run any custom activity (Script or ScriptBlock) on a number of lab machines (Invoke-LabCommand). You do not have to care about credentials or double-hop authentication issues as CredSsp is always enabled and can be used with the UseCredSsp switch.
- Creating a virtual environment that is connected to the internet was never easier. The only requirements are defining an external facing virtual switch and a machine with two network cards that acts as the router. AL takes care about all the configuration details like setting the gateway on all machines and also the DNS settings (see introduction script 05 Single domain-joined server (internet facing).ps1).
- AL offers offline patching with a single command. As all machines a based on one disk per OS, it is much more efficient to patch the ISO files that are used to create the base images (Update-LabIsoImage). See script 11 ISO Offline Patching.ps1 for more details.
- If a lab is no longer required, one command is enough to remove everything to be ready to start from scratch (Remove-Lab)


 enables you to setup test and lab environments on Hyper-v or Azure with multiple products or just a single VM.)