


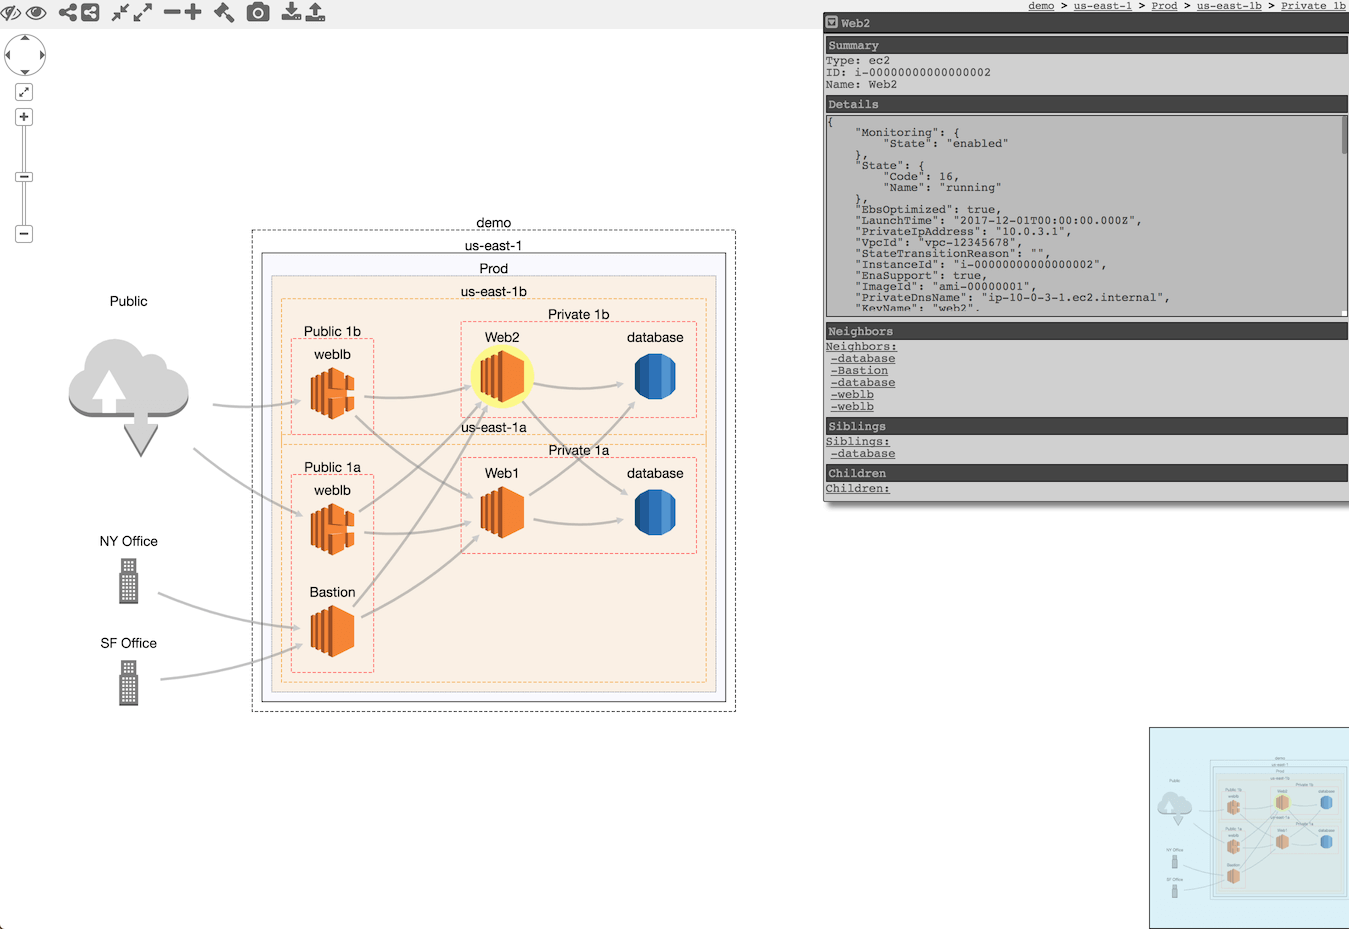
CloudMapper helps you analyze your Amazon Web Services (AWS) environments. The original purpose was to generate network diagrams and display them in your browser. It now contains more functionality. Click here for the demo.
Also Read Frisky – Tools To Assist Binary App Reversing & Augmentation
Installation
Requirements:
pipandvirtualenv- You will also need
jqand the librarypyjq, which require some additional tools installed that will be shown.
On macOS:
# clone the repo
git clone git@github.com:duo-labs/cloudmapper.git
# Install pre-reqs for pyjq
brew install autoconf automake libtool jq awscli python3
cd cloudmapper/
python3 -m venv ./venv
source venv/bin/activate
pip install -r requirements.txt
On Linux:
# clone the repo
git clone git@github.com:duo-labs/cloudmapper.git
# (Centos, Fedora, RedHat etc.):
# sudo yum install autoconf automake libtool python34-devel jq awscli
# (Debian, Ubuntu etc.):
# You may additionally need "build-essential"
sudo apt-get install autoconf automake libtool python3-dev jq awscli
cd cloudmapper/
python3 -m venv ./venv
source venv/bin/activate
pip install -r requirements.txt
Setup Cloudmapper
1. Configure your account
- Edit config file manually
Copy the config.json.demo to config.json and edit it to include your account ID and name (ex. “prod”), along with any external CIDR names. A CIDR is an IP range such as 1.2.3.4/32 which means only the IP 1.2.3.4.
- Generate config file
CloudMapper has commands to configure your account:
python cloudmapper.py configure {add-account|remove-account} --config-file CONFIG_FILE --name NAME --id ID [--default DEFAULT]
python cloudmapper.py configure {add-cidr|remove-cidr} --config-file CONFIG_FILE --cidr CIDR --name NAME
This will allow you to define the different AWS accounts you use in your environment and the known CIDR IPs.
2. Collect data about the account
This step uses the CLI to make describe and list calls and records the json in the folder specified by the account name under account-data.
Locally, AWS CLI must be configured with proper access key and region information. Generate new access keys in AWS Console and input the generated keys to aws configure if you have not done so yet.
You must have AWS credentials configured that can be used by the CLI with read permissions for the different metadata to collect. If you plan to use all the features of CloudMapper, grant the SecurityAudit policy. If you only plan to use the network visualization, this can be reduced to an even more minimal set of permissions:
{
  "Version": "2012-10-17",
  "Statement": [
    {
      "Effect": "Allow",
      "Resource": "*",
      "Action": [
        "ec2:DescribeRegions",
        "ec2:DescribeAvailabilityZones",
        "ec2:DescribeVpcs",
        "ec2:DescribeSubnets",
        "ec2:DescribeSecurityGroups",
        "ec2:DescribeVpcPeeringConnections",
        "ec2:DescribeInstances",
        "ec2:DescribeNetworkInterfaces",
        "rds:DescribeDBInstances",
        "elasticloadbalancing:DescribeLoadBalancers"
      ]
    }
  ]
}
Collecting the data can be performed with a bash script or via the python code base. Both options support a --profile to specify the AWS account profile to use.
- Bash script
Using the script is helpful if you need someone else to get this data for you without fiddling with setting up the python environment.
NOTE : The script will collect a small subset of available data. It is preferable to use Option 2 below whenever possible.
./collect_data.sh --account my_account
my_account is just a name for your account (ex. “prod”). You can also pass a --profile option if you have multiple AWS profiles configured. You should now have a directory with .json files describing your account in a directory named after account name.
- Python code
python cloudmapper.py collect --account my_account
![]()


.png "KubeStalk : Discovers Kubernetes Attack Surface From A Black-Box Perspective")

