


HuskyCI is an open source tool that orchestrates security tests and centralizes all results into a database for further analysis and metrics. It can perform static security analysis in Python (Bandit and Safety), Ruby (Brakeman), JavaScript (Npm Audit and Yarn Audit), Golang (Gosec), and Java (SpotBugs plus Find Sec Bugs). It can also audit repositories for secrets like AWS Secret Keys, Private SSH Keys, and many others using GitLeaks.
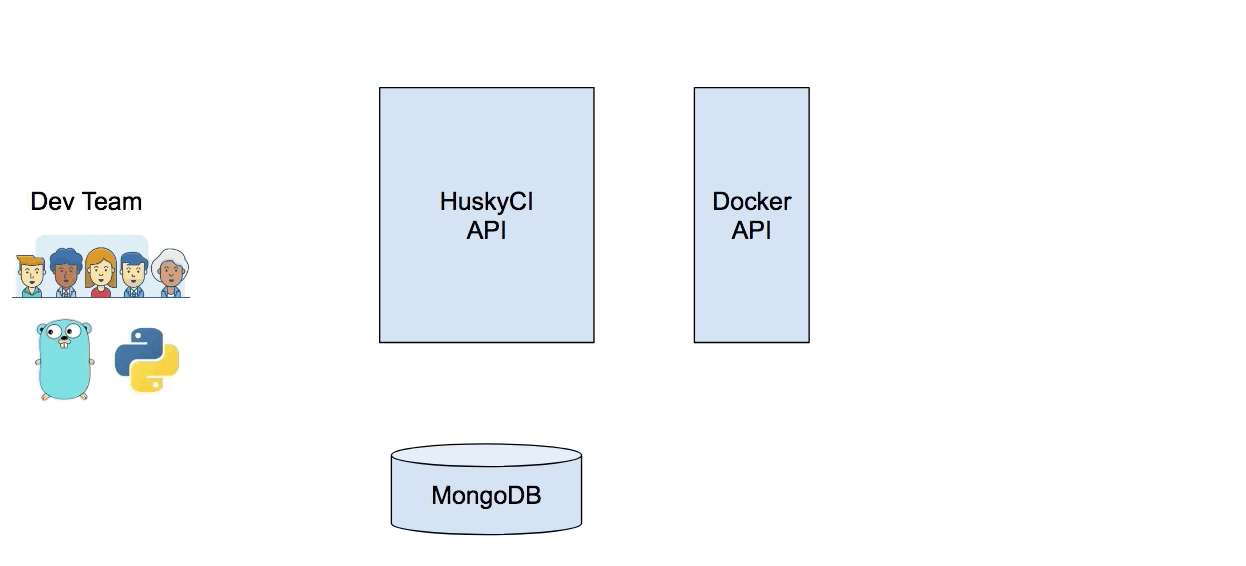
How does it work?
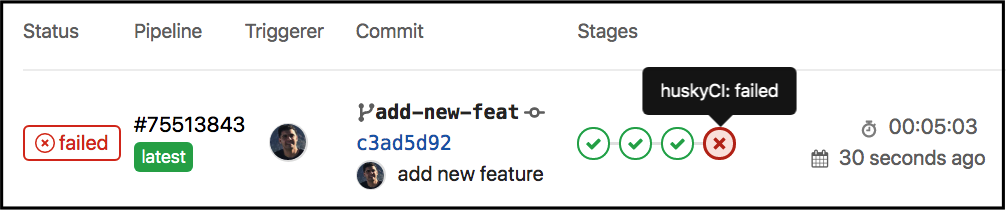
Developers can set up a new stage into their CI pipelines to check for vulnerabilities:
Also Read – Automatic API Attack Tool 2019
Installation
MongoDB
Set up a MongoDB using your desired OS/configuration (preferably secure).
Docker API (CentOS instructions)
Install docker API:
- Install
docker-engine:
yum install docker-engine
- Create a docker service folder:
mkdir /etc/systemd/system/docker.service.d
- Set these configuration into override.conf:
vim /etc/systemd/system/docker.service.d/override.conf
- Add this content to override.conf:
[Service]ExecStart=ExecStart=/usr/bin/dockerd -H fd:// -H tcp://0.0.0.0:2376
- Reload daemon:
systemctl daemon-reload
- Restart docker:
systemctl restart docker.service
- Test docker API locally:
curl localhost:2376/v1.24/version
Securing your Docker API (recommended):
- Create certificates folder:
mkdir /data/certs && cd /data/certs
Download create-certs.sh script from it:
wget https://raw.githubusercontent.com/globocom/huskyCI/master/deployments/scripts/create-certs.sh
Set environment variables with certificate’s information:
echo ‘export CERT_PASSPHRASE=”mypassword$RANDOM”‘ > .env
echo ‘export CERT_DOCKER_API_HOST=”address.to.dockerapi.host”‘ >> .env
echo ‘export CERT_HUSKYCI_HOST=”address.to.huskyci.host”‘ >> .env
. .env
- Create CA certificate:
./create-certs.sh -m ca -pw $CERT_PASSPHRASE -t . -e 900
- Create docker API server certificate:
./create-certs.sh -m server -h $CERT_DOCKER_API_HOST -pw $CERT_PASSPHRASE -t . -e 365
- Create docker API client certificate:
./create-certs.sh -m client -h $CERT_HUSKYCI_HOST -pw $CERT_PASSPHRASE -t . -e 365
- Update override.conf configuration:
vim /etc/systemd/system/docker.service.d/override.conf
- Add this new content to override.conf:
[Service]ExecStart=/usr/bin/dockerd –tlsverify –tlscacert=/data/certs/ca.pem –tlscert=/data/certs/server-cert.pem –tlskey=/data/certs/server-key.pem -H fd:// -H tcp://0.0.0.0:2376
- Reload daemon:
systemctl daemon-reload
- Restart docker:
systemctl restart docker.service
- Test secure docker API locally:
curl -k https://localhost:2376/v1.24/version –cert /data/certs/client-cert.pem –key /data/certs/client-key.pem –cacert /data/certs/ca.pem
You need now to save ca.pem, client-key.pem and client-cert.pem to be used in its host so it can connect to docker API securely! 🔒
Pulling images
After setting up the Docker API, you can pull huskyCI images into this host or let it do this automatically when receiving first requests (may take some time). If you prefer the first strategy, use the following commands:
docker pull huskyci/enry
docker pull huskyci/bandit
docker pull huskyci/safety
docker pull huskyci/brakeman
docker pull huskyci/gosec
docker pull huskyci/spotbugs
docker pull huskyci/npmaudit
docker pull huskyci/yarnaudit
docker pull huskyci/gitauthors
docker pull huskyci/gitleaks
API (tsuru PaaS instructions)
- Go to tool folder:
cd $GOPATH/src/github.com/globocom/huskyCI
- Copy certificates generated into
apifolder:
cp $MYCERTFOLDER/{ca.pem,client-key.pem,client-cert.pem} api/
Rename client-key.pem and client-cert.pem so it can read the right files when deploying:
mv client-key.pem key.pem
mv client-cert.pem cert.pem
- Build it:
make build
- Create a new Tsuru app:
tsuru app-create huskyCI go
- Set all environment variables needed (complete list):
tsuru env-set MONGO_HOST=urlto.mongo.com -p
If you want it to use HTTPS, generate api-tls-cert.pem and api-tls-key.pem before deploying. Also, you should set HUSKY_API_ENABLE_HTTPS environment variable to true.
- If you’ve decided to use the Docker API secure method mentioned above, you need to set these environment variables with the commands below:
tsuru env-set -p -a <my-app’s-name> HUSKYCI_DOCKERAPI_CERT_FILE_VALUE=”$(cat /path/to/my/file)”
tsuru env-set -p -a <my-app’s-name> HUSKYCI_DOCKERAPI_CERT_KEY_VALUE =”$(cat /path/to/my/file)”
tsuru env-set -p -a <my-app’s-name> HUSKYCI_DOCKERAPI_CERT_CA_VALUE =”$(cat /path/to/my/file)”
- Deploy it in tsuru (HTTP):
tsuru app-deploy -a huskyCI api/huskyci api/config.yaml Procfile
- Deploy it in Tsuru (HTTPS enabled):
tsuru env-set -p -a <my-app’s-name> HUSKYCI_DOCKERAPI_API_TLS_CERT_VALUE =”$(cat /path/to/my/file)”
tsuru env-set -p -a <my-app’s-name> HUSKYCI_DOCKERAPI_API_TLS_KEY_VALUE =”$(cat /path/to/my/file)”
tsuru app-deploy -a huskyCI api/huskyci api/config.yaml Procfile
Client (tsuru PaaS instructions)
- Build client locally (Linux binary):
make build-client-linux
- Create a static Tsuru app:
tsuru app-create huskyCI-client static
- Deploy it client in Tsuru:
tsuru app-deploy -a huskyCI-client huskyci-client
Developer’s CI
Ask kindly your development team to add a new stage into their project’s CI (.gitlab-ci.yml example):
stages:
– huskyCI
huskyCI:
stage: huskyCI
variables:
HUSKYCI_CLIENT_URL: http://urlto.huskyci-client
HUSKYCI_CLIENT_API_ADDR: http://urlto.huskyci-API
HUSKYCI_CLIENT_REPO_URL: gitlab@gitlab.YOURORG.com:$CI_PROJECT_PATH.git
HUSKYCI_CLIENT_REPO_BRANCH: $CI_COMMIT_REF_NAME
HUSKYCI_CLIENT_API_USE_HTTPS: “false”
script:
– wget $HUSKYCI_CLIENT_URL/huskyci-client
– chmod +x huskyci-client
– ./huskyci-client


