


Welcome to the Microsoft Defender Advanced Threat Protection PowerShell module: PSMDATP
This module is a collection of easy-to-use cmdlets and functions designed to make it easy to interface with the Microsoft Defender Advanced Threat Protection API.
Motivation
I created this PowerShell module for MDATP for the following reasons:
- Advance my PowerShell skills
- Provide an easy way to interact with MDATP through PowerShell because I prefer automation over manual tasks
Prerequisites
- Windows PowerShell 5.1 (Testing for PowerShell 7 is in progress)
- have configured authorization for access by registering an application in AzureAD
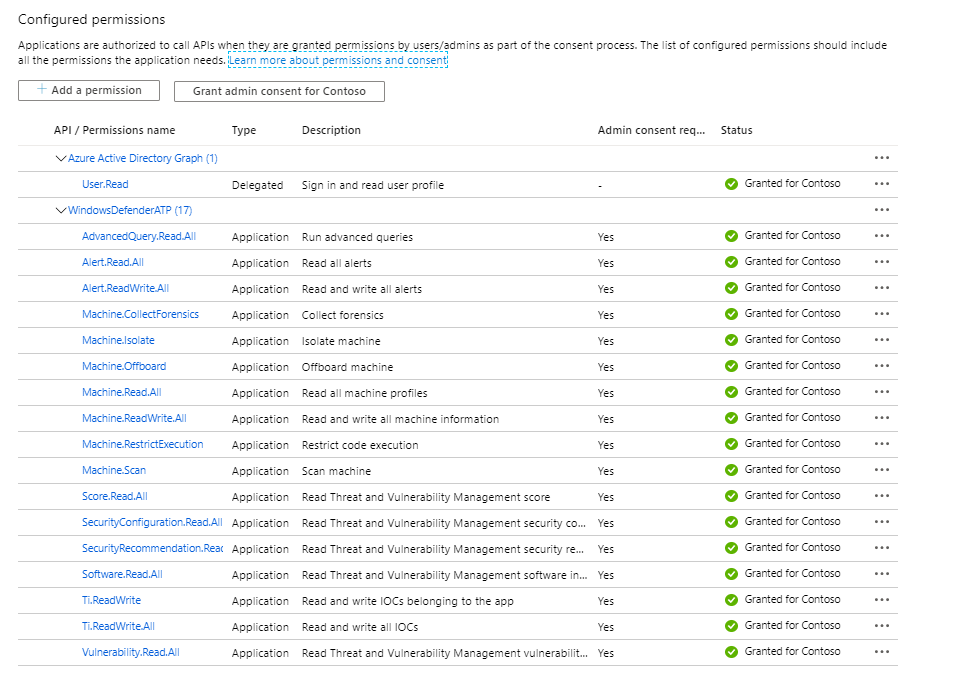
App Permissions
Below is an example of the App Permissions that you must grant. I will provide more details soon about the individual cmdlets and the permissions required
Getting Started
To get started with the module, open your PowerShell terminal and install the module from the PSGallery by running this simple command:
Install-Module PSMDATP -Scope CurrentUser
App Registration
Initial Configuration
When you have installed the module and registered the App in AzureAD, you will find a file TEMPLATE_PoshMTPconfig.json in the Module folder. Rename this file to PoshMTPConfig.json and enter your API settings. Then copy the file in the root of the Module folder.
- Example:
"C:\Users\User1\Documents\WindowsPowerShell\Modules\PSMDATP"
───PSMDATP
│   │   PoshMTPconfig.json
│   │
│   └───0.0.2
│           PSMDATP.psd1
│           PSMDATP.psm1
│           TEMPLATE_PoshMTPconfig.json
At present the PSMDATP PowerShell module only requires the API_MDATP information
{
    "API_MDATP":  {
                      "AppName":  "WindowsDefenderATPPSMDATP",
                      "OAuthUri":  "https://login.windows.net/<YOUR TENANT ID>/oauth2/token",
                      "ClientID":  "CLIENT ID",
                      "ClientSecret":  "<CLIENT SECRET>"
                  },
    "API_MSGRAPH":  {
                        "AppName":  "xMSGraph",
                        "OAuthUri":  "https://login.windows.net/<YOUR TENANT ID>/oauth2/token",
                        "ClientID":  "<CLIENT ID>",
                        "ClientSecret":  "<CLIENT SECRET>"
                    }
}
Important
I am going to assume that you are familiar with MDATP as such and understand the consequences of triggering actions on devices. Where applicable the cmdlets support the use the -whatif parameter. Think before pressing the key!
Running Your First Commands
- List included cmdlets
Let’s first take a look at the cmdlets included in the PSMDATP Module
get-command -Module PSMDATP | Select Name
You will see something like this
Add-MDATPDeviceTag
Add-MDATPIndicator{
Get-MDATPAlert
Get-MDATPCollectionPackageUri
Get-MDATPDevice
Get-MDATPDeviceAction
Get-MDATPDeviceTag
Get-MDATPIndicator
Get-MDATPInvestigation
Get-MDATPQuery
Get-MDATPTvmRecommendation
Get-MDATPTvmVulnerability
Remove-MDATPDevice
Remove-MDATPDeviceTag
Remove-MDATPIndicator
Start-MDATPAppRestriction
Start-MDATPAVScan
Start-MDATPInvestigation
Start-MDATPInvestigationPackageCollection
Start-MDATPIsolation
Stop-MDATPAppRestriction
Stop-MDATPIsolation
For more details about the cmdlets included in this module check out the cmdlets documentation page
- Retrieve MDATP Alerts
Run the following command to retrieve alerts from the past 30 days
Get-MDATPAlert -PastHours 720
- List MDATP Devices
Run the following command to list all MDATP registered devices
Get-MDATPDevice -All


