


Bastions are a cluster of machines used as the unique entry point by operational teams (such as sysadmins, developers, database admins, to securely connect to devices (servers, virtual machines, cloud instances, network equipment, …), usually using ssh.
Bastions provides mechanisms for authentication, authorization, traceability and auditability for the whole infrastructure.
Learn more by reading the blog post series that announced the release:
- Part 1 – Genesis
- Part 2 – Delegation Dizziness
- Part 3 – Security at the Core
- Part 4 – A new era
The OVHcloud Bastion – Part 1
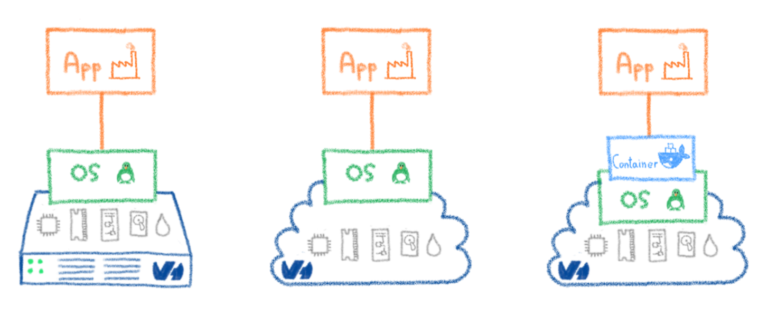
At OVHcloud, a fair amount of our infrastructures are built on top of Linux boxes. We have a lot of different flavours; such as Debian, Ubuntu, Red Hat… and the list goes on. We even had good old Gentoos once! These are all stored on bare metal servers, on VMs, and in containers everywhere. As long as it has a CPU (or vCPU), we probably booted some kind of Linux distro on it. But that’s not the whole story. We also had Solaris boxes, that later turned into OmniOS boxes, that have now turned into shiny FreeBSD boxes. We also have a lot of network devices, split against different constructors, spanning a wide range of model generations.

As you’ve probably guessed, we have heterogeneous systems that are running to provide a handful of different services. But regardless of this heterogeneity, do you know what they all have in common? Yes, they all ping, but there’s something more interesting: they can all be administered through ssh.
The problem
SSH has been the de-facto admin standard for quite some time now – replacing obsolete programs such as rlogin, that were happily transferring your password in plaintext over the network – so we use it all the time, as most of the industry does.
There are two regular ways of using it: either you just type your account password when the remote server asks for it, which is more or less like rlogin (without your password transmitted in plaintext over the wire); or you use a public key authentication, by generating a so-called “keypair”, with the private key sitting on your desk (or in a smartcard), and the corresponding public key sitting on a remote server.
The issue is that none of these two ways are really satisfactory in an enterprise context.
Password authentication
First, the password way. Well, we all already know that passwords suck. Either you pick one that is too easy to crack, or you pick some very complex one that you’ll never remember. This forces you to use a password manager that is protected by… a master password. Even strong passphrases such as “Correct Horse Battery Staple“, are nothing more than an elaborate password in the end. They bring a whole range of problems, such as the fact that they’re always subject to brute force attacks, and some users might get hit by the password reuse plague. As a sysadmin, you never really sleep well when you know that the security of your systems are just one password away. Of course there are ways to mitigate the risk, such as forcing a periodic password renew, a minimum password length and/or complexity, or disabling an account after several failures, etc. But you’re just putting additional burden on your users and still not achieving a satisfactory level of security.
Public key authentication
Second, the pubkey way. It goes a long way to fixing password issues, but then the problem becomes scalability. Pushing your public key to your home server is easy, but when you have tens of thousands of servers/devices, as well as thousands of employees, administering some always-changing subset of said servers/devices, it quickly becomes complicated. Indeed, doing it properly and maintaining it in the long-term in an enterprise context is a real challenge.
PKI-based authentication
For the sake of completeness – because I can hear you from here SSH gurus! – there is a third way in recent versions of SSH servers, namely authentication based on a PKI with a trusted Certificate Authority (CA). You install the public certificate of your CA on all your servers, and they’ll accept any connection authenticated by a certificate delivered by said CA, relying on the subjectName of the certificate. This specifies which account can be accessed on the server, among other things. This is a very centralized way of managing your accesses, with all the power in the hands of whoever controls your CA. It can be a highly successful if done very carefully, with a lot of security and processes around the certificates delivery workflows. Managing a CA correctly is no joke and can bite you quite hard if done improperly. This also happens to be a somewhat recent addition to OpenSSH, and given the heterogeneity we outlined above, it would have left a lot of systems on the side. There is also another reason why we haven’t chosen this method, but before diving into it, let’s talk about our needs.
What we needed
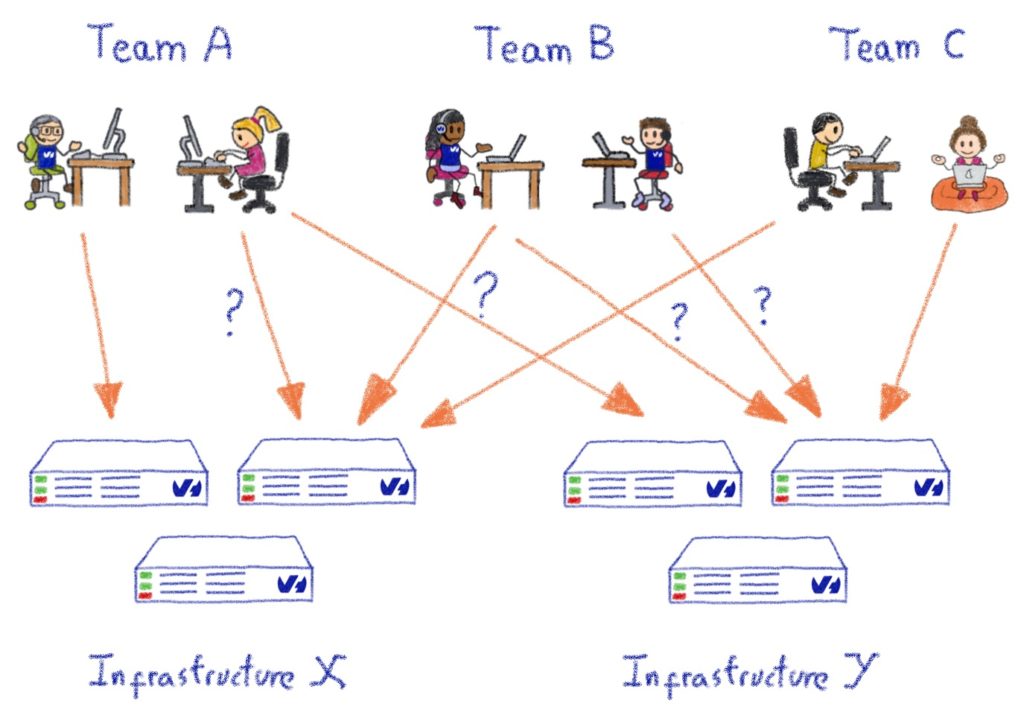
At OVHcloud, we have various technical teams that manage their own infrastructure, rather than relying on a generic internal IT department. This principle is part of the company culture and DNA. It does have its drawbacks; such as the added complexity in maintaining an exhaustive and up-to-date inventory of our own assets, but its advantages far outweigh them: multiple teams can iterate faster, as they can use existing OVHcloud products as building blocks to create new, innovative products. This must not, however, come at the cost of security, which is fundamental to everything we do at OVHcloud.
But how did we manage to develop security systems around the SSH management of all these servers without getting in the way of various operational teams?
A few important items are required:
DELEGATION
- Any kind of centralized “security team” responsible for handling access clearances for the whole company is a no-go. It doesn’t scale, no matter how you do it.
- Managers or technical leads should be completely autonomous in managing their own perimeter, in terms of servers/systems/devices, and regarding those persons who are granted access within their perimeter.
- A member from a team moving to another team or out of the company should be a completely seamless process, regardless of the kind of systems this person had access to (remember the heterogeneity above?).
- Giving access to a new team member must also be seamless, so they can get their hands dirty as fast as possible.
- Temporarily granting access to somebody outside of the team (or company) to a given asset for a limited amount of time should be easy.
- All of these actions should be easy to do autonomously.
AUDITABILITY & TRACEABILITY
- Every action must be logged with a lot of details; be it a clearance modification, or a connection to a system; whether it’s successful or not. We also want it to be pushable to some SIEM.
- Every terminal session should be recorded. Yup, you read correctly. This is the kind of feature you don’t ever need.. until you do.
- It must be easy to generate reports for conducting access reviews.
SECURITY & RESILIENCE
- We must bring more security than a bare direct SSH access, with no additional cost.
- Any component that we have to add to answer those needs must be up and running at all times, even (and especially) when the rest of your infrastructure is falling apart, because that’s exactly when you’ll need SSH.
So what is the other reason we didn’t choose the PKI way? Well, this would have limited the autonomy of the team leads: only the CA would be able to deliver or revoke certificates, but we want this power in the hands of our team leads. With the PKI way, if we wanted to give some power to them, we would have had to implement a complex logic around the CA to make this possible, and we didn’t want to go down this route.
Enter the bastion
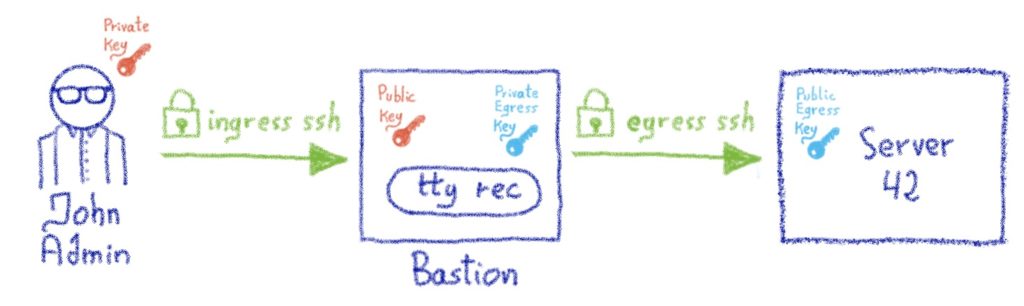
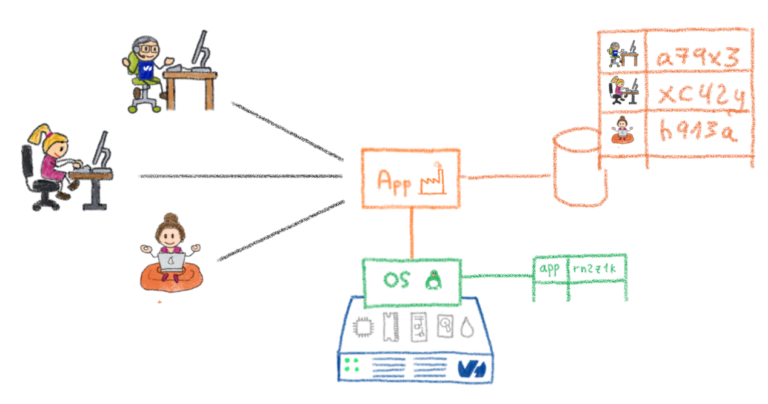
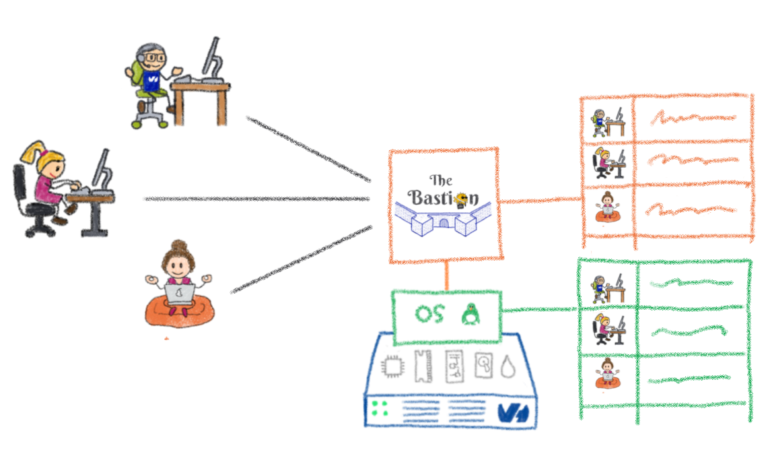
To respond to our complex requirements, we have a specialized machine that sits between the admins and the infrastructures – a bastion – whose job it is to handle all the important items above, in addition to the decoupling of the authentication and the authorization phases. We’ll use public key authentication on both sides. Let’s take a moment to see a simple example of a connection workflow using this design:
- An admin wants to connect to a machine named server42
- He can’t SSH directly from his company laptop to server42 because server42 is firewalled, and only allows incoming SSH connections from the company’s bastion clusters
- The admin starts an SSH session to the bastion instead, using his nominative account on it. His laptop negotiates the SSH session using his private key. This is the authentication phase: the bastion ensures that the admin presenting himself as John Admin is indeed this person, which is possible thanks to the fact that the public key of John Admin sits inside his bastion account. We call this the *ingress* connection.
- Once John Admin is authenticated, he asks the bastion to open a connection to the root account on server42.
- The bastion verifies whether John Admin is allowed to access the root account on server42, this is the authorization part. Let’s say for the sake of this example that John Admin is indeed allowed to connect to this server, using his team’s bastion private key (more details about this later).
- The bastion initiates an SSH connection to server42, on John Admin’s behalf, using his team’s bastion private key.
- The firewall of server42 allows incoming SSH connections from the bastion, and the connection is negotiated successfully as the John Admin team’s bastion public key is installed on server42’s root account. We call this the *egress* connection.
We now have two established SSH connections: the ingress connection, between John Admin and the bastion, and the egress connection, between the bastion and server42.
Now, some magic happens, and the bastion “plugs” these two connections together, using a pseudo-terminal (a pty) in between. John Admin is now under the impression that he’s directly connected to server42, and can interact with it as if this were the case.
Meanwhile, the bastion can record everything that is typed by John Admin (or, more accurately, everything that is *seen* by John Admin, we won’t record passwords he types on no echo terminals!), this is handled by the ovh-ttyrec program.
To be perfectly clear, server42 doesn’t know who John Admin is, and doesn’t need to: we’ve decoupled the authentication and authorization part. Only the bastion needs to know and authenticate the admin, the remote server only knows and trusts the bastion (or, more accurately, John Admin’s team existence on the bastion). This opens up a whole range of possibilities… but more about that in the next post!
This post is the first of a series of posts regarding the bastion. In the next posts, we’ll dig into the authorization part, namely the personal keys and accesses, the groups, and everything that goes along with those. We will also look at the different roles that exist on the bastion to make it so versatile. We’ll talk about some design choices, and how we want security to be at the centre of these choices – with some gory technical details.
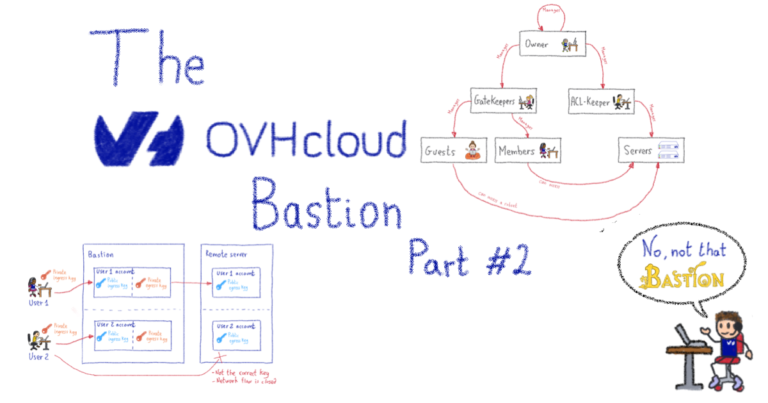
The OVHcloud SSH Bastion – Part 2: Delegation Dizziness
This is the second part of a blog series, here is part one. We’ve previously found that the bastion is not your usual SSH jumphost (in fact, we found it is not a jumphost at all) and we discussed how the delegation was one of the core features we’d originally needed. So, let’s dive into these concepts. There are two compatible accesses models on the bastion: personal and group-based.
Personal Accesses – Piece of Cake
On the bastion, each account has (at least) one set of personal egress keys. These beasts are generated when the account is first created. The personal egress private key sits in the bastion account home. The account user has no way to see it, or export it out of the bastion, but they can use it through the bastion’s code logic. The user can retrieve the corresponding public key at any time, and install it – or get it installed – on the remote servers he needs to access. Depending on your use case – and the level of autonomy you want to give to the teams – there are two ways of managing these personal accesses.
Help yourself
The first way mimics how you would manage accesses if you weren’t using an SSH bastion at all. This is a perfectly valid way to handle accesses on a simple level, without too many users and a limited number of machines. This allows anyone to grant themselves personal accesses on the bastion, without having to ask anyone else to do it. It sounds like a security hole, but it’s not. If someone adds themself a personal access to the remote server, it will only work if his personal egress public key has already been installed on the remote server. In other words, he either already had access to the remote server to do this – using means other than the bastion – or somebody who had access to the remote server accepted the addition of his key. Either way, he cannot magically grant himself personal access without the admins of the remote server first permitting his key.
Ask the IT crowd
Another way to handle this can be to grant a limited number of people, such as security teams, the right to add personal accesses to others. This way people are less autonomous, but it might be useful if adding accesses has to be enacted via normalized processes. It also has some nice effects: as a sysadmin, one of the pros is that you can create 3 separate accounts on the remote machine, and map them to each bastion account you’re adding. This is a good method for achieving end-to-end traceability; including on the remote server; where you might want to install auditd or similar tools. It’s also doable in the help yourself mode, but it may be harder to enforce.
To be clear, this access model doesn’t scale so efficiently when we’re dealing with whole teams, or big infrastructures – this is where group-based access comes handy.
Group Accesses – Let’s Rock
A group has three components:
- A list of members (accounts, representing individual people)
- At least one set of group egress keys
- A list of servers (actually IPs)

Servers list
The servers list is actually a list of IPs, or IP blocks. They map to your servers, network devices, or anything else with SSH capability that has an IP (on which the egress group key has been installed). Technically, this list is actually composed of 3-tuple items: remote user, remote IP (or IP block), remote port. That which applies to the personal accesses, also applies here: adding a server to the list doesn’t magically give access to it, it is first necessary to install the egress group public key. Of course, managing the installation of these keys manually quickly becomes impractical, but you can consider these part of the configuration of the servers, hence they should be managed with whichever centralized configuration system you already use (Puppet, Chef, Ansible, /bin/cp… wait, no, strike this last one).
Members list
The members are people who can connect to any server listed in the group server list. They’ll be using the private egress group key they have access to, as members of said group. Of course, they have no way to extract this private key for their own use outside of the bastion, they can only use it through the bastion’s code logic.
Got a new team member? Just add them as a member of your group, and they instantly get access to all the group servers. Somebody leaves the company? Just delete there account on the bastion, and all the accesses are instantly gone. This is the case because all your servers should have incoming SSH sessions limited to your bastions. This way, any rogue SSH key that would have been added, is no longer of any use.
And some more
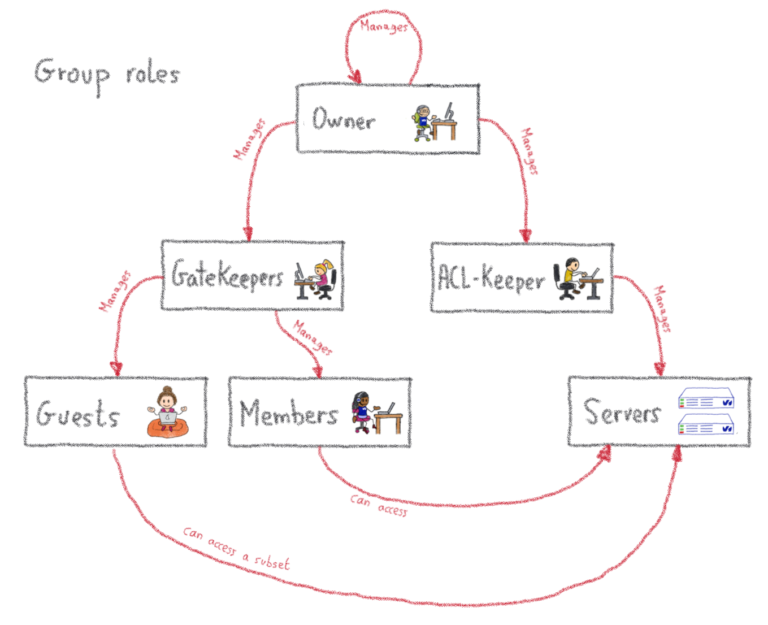
We’ve covered the basics of the group-based approach, but as we need a lot of flexibility and delegation, there is a little more to cover. Remember when I said a group had 3 components? Well, I lied. A group has more than just members. Additional group roles include:
- Guests
- Gatekeepers
- Aclkeepers
- Owners
All of these are lists of accounts that have a specific role in the group.
First, guests. These are a bit like members, but with less privileges: they can connect to remote machines using the group key, but not to all the machines of the group, only to a subset. This is useful when somebody outside of the team needs a specific access to a specific server, potentially for a limited amount of time (as such accesses can be set to expire).
Then, gatekeepers. Those guys manage the list of members and guests of the group. In other terms, they have the right to give the right to get access. Nothing too complicated here. Then, there are the aclkeepers. As you may have guessed, they manage the list of servers that are part of the group. If you happen to have some automation managing the provisioning of servers of your infrastructure, this role could be granted to a robot account whose sole purpose would be to update the servers list on the bastion, in a completely integrated way with your provisioning. You can even tag such accounts so that they’ll never be able to use SSH through the bastion, even if somebody grants them by mistake!
Last but not least, the owners have the highest privilege level on the group, which means they can manage the gatekeepers, aclkeepers and owners list. They are permitted to give the right to give the right to get access. Moreover, users can accumulate these roles, which means some accounts may be a member and a gatekeeper at the same time, for example.
Global roles – Come Get Some
Beyond the roles we have just described – which are all scoped to a group – there are two additional roles, which are scoped to the whole bastion: the ‘superowner’ and the ‘bastion admin’.
In a nutshell, a superowner is the implicit owner of all groups present on the bastion. This comes in handy if the group becomes ownerless, as superowners are able to nominate a brand new owner. See where I’m going? Superowners are permittedto give the right to give the right to give the right to get access.
Dizzy yet? Now, for the most powerful role: the bastion admin. This role should only be given to a few individuals, as they can impersonate anyone (even if, of course, when they do, this is logged, and makes our SIEM go red), and in practice should not be given to anyone who is not already root on the bastion’s operating system itself. Among other things, they manage the configuration of the bastion, where the superowners are declared. Hold your breath. Ready? They are permitted to give the right to give the right to give the right to give the right to get access. This is why delegation is at the core of the system: everybody has their own set of responsibilities, and potential action, without having to ask the bastion admin.
Wrapping up
All the access management concepts we’ve talked about are mapped to actual commands. These can be run on the bastion after the user has authenticated himself (the famous ingress connection). They’re called osh commands in bastion jargon. There are no egress connections in this case, as these commands interact with the bastion itself:

As you may notice in the above screenshot, the version of the bastion software seems to be very close to 3.00.00! Perhaps, an interesting milestone is coming up?
In the next part of this blog series, we dig into some implementation details of one of those osh plugins and, more precisely, on our security and defense-programming approach.
The Bastion – Part 3 – Security at the core
In previous parts, we’ve covered the basic principles of the bastion. We then explained how delegation was at the core of the system. This time, we’ll dig into some governing principles of how The Bastion is written.
In a nutshell, the main purpose of the bastion is to ensure security, auditability and reliability in all cases. To this end, the bastion is engineered in a very specific way, with some principles that must be respected when implementing new features. Today we’re going to zoom in on how one of the functionalities of the bastion has been implemented to ensure an in-depth security. There are technical details ahead, so viewer discretion is advised!
The operating system is not just a scheduler
One of the engineering principles of the bastion is to leverage the underlying operating system’s security features, as additional guards on top of the code’s logic itself.
Usually, when developing a program, one doesn’t really need to think about the OS it’ll be running on, because all the business logic goes directly into the code. At its basic level, the OS’s job is to ensure the program runs on top of the hardware it has in charge, by abstracting it, along with the other pieces of software that might be sharing this hardware. In other words, most of the time the OS is mainly a scheduler, whose job is to ensure all the programs are running properly, and don’t step on each other’s toes.
To this end, an OS has the notion of user (or “account”), who may be the owner of some running programs and some files on the filesystem, alongside the notion of group (of users), so that e.g. a folder can be written to by several users. We’ll go back to this in a few minutes.
Now, let’s talk about applications. Most of the time, applications needing to handle users have a database with a “users” table, detailing the information about each user. In that case, the application’s code logic handles all the behaviour the program must have with respect to its users. For example, to authenticate a user, it stores a hash of each user password in the database, and checks whether the entered password’s hash matches what is stored in the database. If it does, then it deems the user to be successfully logged in. All this logic is entirely expressed in the code, the operating system plays no role in the process whatsoever.
There is then, only one operating system user dedicated to the application, regardless of how many users exist in the application’s database. The application will run under this OS user, and all files logically pertaining to different users in the application’s functional view, will be owned by this same OS user. It works because the segregation between the functional users is done entirely by the code: even if the application can technically access all its users files, it will only allow, through its code logic, access to the proper files for the proper user.
Code has bugs, but it shouldn’t matter
Now, let’s imagine we’re talking about a program – let’s name it MySuperCloudApp – whose job is to store files for its users, so that they can later fetch them from the cloud. Let’s imagine there is a flaw in the code (of course, this never happens), which doesn’t properly escape the user’s requested file name. If, once logged in as my user, I request a download of the file named myfile.txt, the application will allow it because I’m logged in.
But what happens if I request ../somebodyelse/herfile.txt, instead? If the code hasn’t been engineered to detect and filter out this weird request, it’ll just pass the read command to the underlying filesystems, which will allow it because, remember, the application runs under one OS user and all the actual user logic is handled by the application itself. All the application files are owned by the same OS user, so the request seems completely legitimate from an OS standpoint. I’ve just found a way to steal all the other users files. This type of flaw is called a path traversal, and is, unfortunately, pretty common.
For the bastion, the OS is more than a scheduler: every bastion user is actually mapped to an operating system user underneath. Likewise, every bastion group is mapped to an operating system group underneath. So are all the group roles we’ve talked about in the previous post. This is a strong design choice: we end up with an application that is deeply intertwined with the OS it’s running on, and this comes with some cons. However, for a security asset, which the bastion is, the pros vastly outgrow them.
Had MySuperCloudApp have adopted this design, mapping its application users to actual OS users, then the attack we’ve talked about before wouldn’t have worked. Even if the application’s code was flawed, and passed the read request to the OS below, the OS would have denied it, because down at the OS level, ../somebodyelse/herfile.txt is not owned by the same user. This is where the OS comes to rescue a flawed portion of code (which still needs to be corrected in all cases, of course!).
To take a more Bastion-y example, if a user pertains to groupA, and tricks the code into thinking it also pertains to groupB (because of a flaw in the bastion’s code logic), then it doesn’t matter too much because the OS will deny this user access to groupB‘s keys, as he won’t have access to read the file down to the OS level. So he still won’t be able to access any of groupB‘s servers. Technically, this is done by offloading the authentication part to sshd, which is well-known and does it quite well. When this phase succeeds, sshd creates a session under the proper OS user, and starts the bastion code entry point under this session.
We use the OS as an additional safety net in case there is a logic error or a vulnerability in the code: even if the code is tricked into taking bad decisions, the underlying OS will be there to deny the action, hence nullifying the impact.
In other words, all the OS bastion users have the bastion code declared as their system shell (instead of the usual /bin/sh). We’re even going further than that: the code is engineered in such a way that if a user succeeded in getting a real shell on the bastion, i.e. being able to run any command he’d like on the OS itself, completely bypassing all of the bastion code’s logic and checks, then he shouldn’t be able to do much more that what the normal bastion code logic allows him to. That’s another strong design principle, but helps to drastically reduce the impact of a security vulnerability, should it happen.
Trust no one
For some features to work correctly, the design choices we’ve outlined above implies that the bastion must sometimes create and delete users on the OS level. This can’t be done using unprivileged accounts, hence some parts of the code need to run under elevated privileges.
In The Bastion jargon, those portions of the code are called helpers, and are separated from the other portions of the code, normally running under the OS user corresponding to the functional bastion user who’s running them.
The helpers don’t trust the rest of the bastion code, so they never blindly trust what is passed as input to them, even if theoretically, this input has already been validated by the bastion code launching the helper. Their higher privilege is granted using the sudo command, with a very strict sudoers configuration which ensures that the caller can only run the helpers it’s supposed to run, and with the parameters it’s supposed to be allowed to specify. Once the helper has finished working, it communicates back information to its caller using JSON.
Let’s take the example of the groupAddServer command. As its name implies, this command is used by a group aclkeeper to add a new server to a bastion group. Let’s say the user guybrush is a gatekeeper of the bastion group island. On the OS level, the OS user guybrush will be a member of the island-aclkeeper system group. One part of the sudoers configuration will say this:
%island-aclkeeper ALL=(island) NOPASSWD: /usr/bin/env perl -T /opt/bastion/bin/helper/osh-groupAddServer –group island *
This line translates to:
all the members of the
island-aclkeepersystem group (i.e. all the aclkeepers of theislandbastion group) can run, as theislandsystem user, theosh-groupAddServerperl script, in tainted mode, but with the command line options forced to start with--group island
The island system user is not mapped to a logical user of the bastion, this is a technical account representing the island bastion group. The file listing the servers of the island bastion group is owned by this system user, and only the aclkeepers, through this sudo rule, can impersonate this system user to add a server to their group. Also note, that the Perl taint mode is used here (-T). This is a special mode that instructs Perl to immediately halt execution of the program (here, the helper) if an attempt is made to use a variable influenced (tainted) by the outside environment, without checking for its validity first. This is an additional protection to ensure that an improperly sanitized input can’t make it through the program’s execution flow.

Going down the rabbit hole with minijail
For some plugins, we even went one level deeper. For example, we have a plugin to allow users to connect to a PostgreSQL database, using the classic psql client, but directly from the bastion. The idea is that the password to access the database is known to the bastion, not to the user, so the password can be extremely complex, and change every day if necessary. This is completely transparent to the user, who just connects to the bastion and asks to run the database plugin. This scheme is the same than when using SSH on both sides: as seen in the first post of this series, the ingress connection is between the user and the bastion (SSH), and the egress connection is between the bastion and the remote server. The only difference is that, in this case, the egress connection is not SSH, but SQL.
But how to secure psql so that, when running on the bastion, the user can’t escape from it? The problem is the same with the mysql client. Those programs are engineered to be run from the local computer, where the user can already run any command, so there’s no real reason to add a configuration option to those programs that forbids local execution of arbitrary commands (shell escape). However on the bastion, we don’t want to allow that. Of course maintaining a forked version of these SQL clients is a complete no-no, because the time we would allocate to maintaining these forks would be of better use in other projects. Instead, we’ve used a tool named minijail, whose purpose is to make readily available, to any program, the (not so) recent features from the Linux Kernel – such as namespaces, capabilities, seccomp, the no_new_privs prctl() flag, etc. We’re not going to detail each and every one of these features, there’s a lot of material online about these, but rather zoom in on how we’ve used them in the context of The Bastion.
Let’s start with the conclusion: here is how it looks on the bastion system itself, while somebody is using the database plugin:
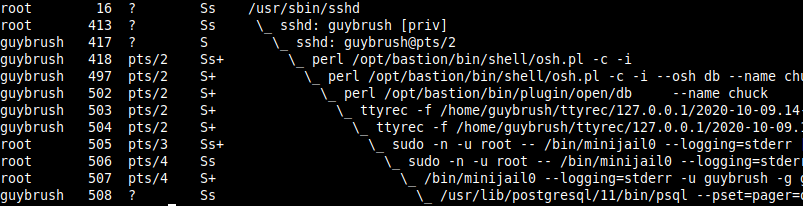
Don’t Panic yet, let’s go through this line by line.
The first line (PID 16) is the sshd system daemon. Nothing fancy here, this is your usual friendly daemon, listening on port 22 for incoming SSH connections.
The second line (PID 413) is the privileged process specially spawned when guybrush logged in successfully on the server. This is also completely standard SSH behavior: when somebody logs in, two sshd processes are spawned by the daemon, a privileged one, and an unprivileged one. Both are dedicated to handling the user, while the parent (the daemon) continues listening for new connections.
The third line (PID 417) is the corresponding unprivileged sshd process for guybrush. This one is responsible for starting up guybrush‘s shell as soon as he’s logged in. Note that from now on, and until further notice, all code is executed under the own user’s (absence of) privileges.
The fourth line (PID 418) is guybrush‘s shell. This is where it’s starting to differ from your usual server. In this case, the shell is not /bin/bash or /bin/zsh, but a portion of the code of the Bastion. As explained above, the bastion is declared as the user’s shell, so when somebody logs in, this is what gets executed instead of a more regular POSIX shell. This portion of the code is responsible for parsing the command-line the user specified, and executing the corresponding action, if this action is allowed. In this case, the user passed the -i parameter, which asks the bastion to start in interactive mode. This is a special mode where it’s easier to launch several bastion commands without having to re-authenticate oneself each time. So, this process is listening for commands from the user. Note that, at this stage, the user has already been authenticated by the system – as this is completely delegated to sshd. If the authentication fails, the user’s shell (here, the bastion code) is never executed.
The fifth line (PID 497) is the child of the interactive process, re-executing the users shell (osh.pl) with new parameters: --osh db, which will instruct this instance of the shell that the user wants to run the db bastion command.
The sixth line (PID 502) is the current bastion command the user is executing. This is the db plugin, and we can see part of the command line: --name lechuck, this tells the plugin that the users wants to connect to the database named lechuck.
The seventh line (PID 503) is the ttyrec parent process, as explained in the first post series, the entire console output of the session is being recorded by the bastion – this process is in charge of doing it.
The eighth line (PID 504) is the ttyrec child process, needed for pseudo-tty support, which in turn is needed for the recording. If you really want to know more about pseudo-ttys, head on to man openpty and/or the ttyrec code itself.
The ninth line (PID 505) is the sudo call to start minijail. This is needed because minijail needs to be root for a proper setup of the jail, before downgrading itself to an unprivileged account
The tenth line (PID 506) is sudo‘s child, this one is in charge of starting the subcommand (minijail in that case)
The eleventh line (PID 507) is the invocation of minijail. The complete command line we’re launching is:
LOGNAME=guybrush — /usr/lib/postgresql/11/bin/psql –pset=pager=off -h dbserver.example.org -p 5432 -U lechuck — lechuck
Quite a beast. But let’s go through this step by step.
This tells minijail to setup a new IPC namespace (--uts), and to set the no_new_privs flag (-n), so that any part of the process it creates (and those processes own children) will never ever be able to be root again, no matter what. Under a no_new_privs process, even having a wildcard sudoers file, or knowing the root password and attempting to use su, is not enough to get back to UID 0. You just can’t.
We also ask minijail to create a new mount namespace (-v) then pivot_root (-P) to a temporary empty directory, /tmp/chroot-guybrush-psql-wsvhp4, so that the whole filesystem becomes completely inaccessible. As we still need to be able to run an SQL client in this environment, we bind-mount a few important directories in this new namespace, such as /lib64, /lib and such, and also just one directory in read-write, located into the users’s own home directory, so that from inside this jail, it can still have its .psql_history and .psqlrc files from past sessions.
We also set a few environments variables, so that the SQL CLI is not lost (HOME, USER, LOGNAME), then setup a seccomp policy on top of all that, to limit which syscalls can be made from this environment. For example, the execve() syscall is forbidden: the SQL CLI can not create any other process, or it’ll get terminated. Last but not least, when all of this has been set up by minijail, it drops its privileges to the guybrush user (-u) and guybrush group (-g), before executing the psql binary.
The twelfth line (PID 508) is the psql process itself, running inside the jail we’ve built above. This way, it is extremely difficult to escape the psql binary and get out of the jail. The whole setup instantly disappears when the user disconnects. The only remains will be his .psql_history and .psqlrc files. Of course, the ttyrec session record of his SQL usage will remain, too (as executed outside of the jail).
This concludes the post, where we’ve been detailing how some design principles help in delivering a resilient and secure system. Next week, in the final post of this series, we’ll be announcing something special. Stay tuned!
The Bastion – Part 4 – A new era
This is the last article in the series about The Bastion. In the previous parts, we covered the principles of The Bastion, and talked about how delegation was at the core of the system. Then we explained how Security was at the heart of the design principles, in a detailed but hopefully not too-long article.
Today, we’re announcing something special. You might have guessed it already, thanks to the (not so) little breadcrumbs trail we left in the previous articles. Without further ado, and because pictures can say a thousand words on their own.

We’re going open-source! We’re very excited to share this news with you, and to mark this new milestone in the lifecycle of The Bastion. We think it’s a perfect reason to bump to the next major version: v3.00.00! Obviously, all previous versions were internal-only.
The code is available at GitHub, and we’re also moving all the non-OVHcloud-specific development there from now on.

The documentation is also available online (as well as offline as reStructuredText files), we encourage you to read it. For the most impatient, there is also a docker image available on Docker hub if you want to give it a try: the TL;DR section of the README.md on GitHub will get you started.
Many of the more advanced features (such as PIV support, 2FA/MFA support, the notion of realms, the HTTPS proxy, etc.) are not yet fully documented, but all the basics are already there. We will enhance this during the next few weeks/months. A few features are not yet open-sourced either, such as the db plugin we talked about in the previous post. But it’ll make it to the open-source version eventually.

We hope it’ll be of use to the community, as much as it is to us, and we can’t wait to hear from you! The GitHub page is over here.
Quick Connection And Replay Example

Installing, Upgrading, Using The Bastion
Please see the online documentation, or the corresponding text-based version found in the doc/ folder.
Welcome to The Bastion documentation!
Wait, what’s a bastion exactly? (in 140-ish characters)
A so-called bastion is a machine used as a single entry point by operational teams (such as sysadmins, developers, devops, database admins, etc.) to securely connect to other machines of an infrastructure, usually using ssh.
The bastion provides mechanisms for authentication, authorization, traceability and auditability for the whole infrastructure.
Just yet another SSH relayhost/jumphost/gateway?
No, The Bastion is an entirely different beast.
The key technical difference between those and The Bastion is that it strictly stands between you and the remote server, operating a protocol break in the process, which enables unique features such as tty recording, proper access auditability, builtin access and groups management commands, delegation of responsibilities all the way through, etc.
Advanced uses even include doing other things than just SSHing to a remote server.
Those wouldn’t be possible with a “simple” jumphost. More technical details on the difference here.
OK, tell me more!
This documentation is organized in several sections. The first one is a presentation of the main functionalities, principles, and use cases of the bastion.
Presentation
- Principles
- Features
- Security
- Security principles at the core
- Auditability
Principles
Note
Most of the principles of The Bastion are well explained in the Part 2 of the blog post that announced the release. The links are below.
- Part 1 – Genesis
- Part 2 – Delegation Dizziness
- Part 3 – Security at the Core
- Part 4 – A new era
Features
- Personal and group access schemes with group roles delegation to ensure teams autonomy without security trade-offs
- SSH protocol break between the ingress and egress connections (see other security measures)
- Self-reliance achieved through virtually no external dependencies (see other security measures)
- Interactive session recording (in standard
ttyrecfiles) - Non-interactive session recording (stdout and stderr through
ttyrec) - Extensive logging support through syslog for easy SIEM consumption
- Supports MOSH on the ingress connection side
- Supports
scppassthrough, to upload and/or download files from/to remote servers - Supports
netconfSSH subsystem passthrough - Supports Yubico PIV keys attestation checking and enforcement on the ingress connection side
- Supports realms, to create a trust between two bastions of possibly two different companies, splitting the authentication and authorization phases while still enforcing local policies
- Supports SSH password autologin on the egress side for legacy devices not supporting pubkey authentication, while still forcing proper pubkey authentication on the ingress side
- Supports telnet password autologin on the egress side for ancient devices not supporting SSH, while still forcing proper SSH pubkey authentication on the ingress side
- Supports HTTPS proxying with man-in-the-middle authentication and authorization handling, for ingress and egress password decoupling (mainly useful for network device APIs)
Security
Security principles at the core
Even with the most conservative, precautionous and paranoid coding process, code has bugs, so it shouldn’t be trusted blindly. Hence the bastion doesn’t trust its own code. It leverages the operating system security primitives to get additional security, as seen below.
- Uses the well-known and trusted UNIX Discretionary Access Control:
- Bastion users are mapped to actual system users
- Bastion groups are mapped to actual system groups
- All the code is constantly checking rights before allowing any action
- UNIX DAC is used as a safety belt to prevent an action from succeeding even if the code is tricked into allowing it
- The bastion main script is declared as the bastion user’s system shell:
- No user has real (
bash-like) shell access on the system - All code is ran under the unprivileged user’s system account rights
- Even if a user could escape to a real shell, he wouldn’t be able to connect to machines he doesn’t have access to, because he doesn’t have filesystem-level read access to the SSH keys
- No user has real (
- The code is modular
- The main code mainly checks rights, logs actions, and enable
sshaccess to other machines - All side commands, called plugins, are in modules separated from the main code
- The modules can either be open or restricted
- Only accounts that have been specifically granted on a need-to-use basis can run a specific restricted plugin
- This is checked by the code, and also enforced by UNIX DAC (the plugin is only readable and executable by the system group specific to the plugin)
- The main code mainly checks rights, logs actions, and enable
- All the code needing extended system privileges is separated from the main code, in modules called helpers
- Helpers are run exclusively under
sudo - The
sudoersconfiguration is attached to a system group specific to the command, which is granted to accounts on a need-to-use basis - The helpers are only readable and executable by the system group specific to the command
- The helpers path and some of their immutable parameters are hardcoded in the
sudoersconfiguration - Perl tainted mode (
-T) is used for all code running undersudo, preventing any user-input to interfere with the logic, by halting execution immediately - Code running under
sudodoesn’t trust its caller and re-checks every input - Communication between unprivileged and privileged-code are done using JSON
- Helpers are run exclusively under
Auditability
- Bastion administrators must use the bastion’s logic to connect to itself to administer it (or better, use another bastion to do so), this ensures auditability in all cases
- Every access and action (whether allowed or denied) is logged with:
syslog, which should also be sent to a remote syslog server to ensure even bastion administrators can’t tamper their tracks, and/or- local
sqlite3databases for easy searching
- This code is used in production in several PCI-DSS, ISO 27001, SOC1 and SOC2 certified environments
The second section explains how to get the bastion running, including how to set up a quick playground using Docker if you want to get your hands dirty quickly.
Installation & Setup
If you are just upgrading from a previous version, please read upgrading instead.
Got Puppet?
We published a Puppet module to handle The Bastion configuration and prerequisites. The GitHub repo is here and our module has been published to the Puppet forge. Of course, its usage is completely optional, but if you choose to use it, some of the below steps will be done by Puppet. Hence, you might want to only consider the following steps:
- Operating system
- Get the code
- Encrypt /home
- (Run Puppet)
- Manually create our first bastion account
Operating system
The following Linux distros are tested with each release, but as this is a security product, you are warmly advised to run it on the latest up-to-date stable version of your favorite OS:
- Debian 10 (Buster), 9 (Stretch)
- RHEL/CentOS 8.x (8.3.2011, 8.2.2004, 8.1.1911), 7.x (7.9.2009, 7.8.2003, 7.7.1908)
- Ubuntu LTS 20.04, 18.04, 16.04
- OpenSUSE Leap 15.3*, 15.2*
*: Note that these versions have no out-of-the-box MFA support, as they lack packaged versions of pamtester, pam-google-authenticator, or both. Of course, you may compile those yourself. Any other so-called modern Linux version are not tested with each release, but should work with no or minor adjustments.
The following OS are also tested with each release:
- FreeBSD/HardenedBSD 12.1**
**: Note that these have partial MFA support, due to their reduced set of available pam plugins. Support for either an additional password or TOTP factor can be configured, but not both at the same time. The code is actually known to work on FreeBSD/HardenedBSD 10+, but it’s only regularly tested under 12.1.
Other BSD variants partially work but are unsupported and discouraged as they have a severe limitation over the maximum number of supplementary groups (causing problems for group membership and restricted commands checks), no filesystem-level ACL support and missing MFA:
- OpenBSD 5.4+
- NetBSD 7+
In any case, you are expected to install this on a properly secured machine (including, but not limited to: iptables/pf, reduced-set of installed software and daemons, general system hardening, etc.). If you use Debian, following the CIS Hardening guidelines is a good start. We have a tool to check for compliance against these guidelines. If you use Debian and don’t yet have your own hardened template, this script should help you getting up to speed, and ensuring your hardened host stays hardened over time, through a daily audit you might want to setup through cron.
Great care has been taken to write secure, tested code, but of course this is worthless if your machine is a hacker highway. Ensuring that all the layers below the bastion code (the operating system and the hardware it’s running on) is your job.
Get the code
The bastion code usually lives under /opt/bastion. You can either use git clone directly, or get the tarball of the latest release.
- Using git:
git clone https://github.com/ovh/the-bastion /opt/bastion
git -C /opt/bastion checkout $(git -C /opt/bastion tag | tail -1)
- Using the tarball:
Get the tarball of the latest release, which can be found there, then untar it:
mkdir -p /opt/bastion
tar -C /opt/bastion -zxf v3.04.00.tar.gz
The code supports being hosted somewhere else on the filesystem hierarchy, but this is discouraged as you might need to adjust a lot of configuration files (notably sudoers.d, cron.d, init.d) that needs an absolute path. You should end up with directories such as bin, lib, etc. directly under /opt/bastion.
Install the needed packages
For the supported Linux distros (see above), you can simply run:
/opt/bastion/bin/admin/packages-check.sh -i
You can add other parameters to install optional packages, depending on your environment:
-sto installsyslog-ng(advised, we have templates files for it)-dto install packages needed for developing the software (useless in production)-tto installovh-ttyrec
Note that -t makes the assumption that you have compiled and made available ovh-ttyrec to your distro repositories. If you haven’t, you can use the following helper:
/opt/bastion/bin/admin/install-ttyrec.sh -a
This will detect your distro, then download and either install the .deb or .rpm package for ovh-ttyrec. If your distro doesn’t handle those package types, it’ll fallback to installing precompiled static binaries. Of course you can package it yourself and make it available to your own internal repositories instead of installing it this way.
If you plan to use the PIV functionalities of The Bastion, you’ll also need to install the yubico-piv-checker helper tool:
/opt/bastion/bin/admin/install-yubico-piv-checker.sh -a
Encrypt /home
Strictly speaking, this step is optional, but if you skip it, know that all the SSH private keys and session recordings will be stored unencrypted on the /home partition. Of course, if partition encryption is already handled by the OS template you use, or if the storage layer of your OS is encrypted by some other mean, you may skip this section.
First, generate a secure password on your desk (but not too complicated so it can be typed on a console over your hypervisor over a VDI over VPN over 4G in the dark at 3am on a Sunday) and save it to a secure location: pwgen -s 10.
Then you can use the helper script to do this, it’ll guide you through the process: When prompted for a passphrase, enter the one chosen just before.
/opt/bastion/bin/admin/setup-encryption.sh
If you get a cryptsetup error, you might need to add --type luks1 to the cryptsetup luksFormat command in the script. It can happen if your kernel doesn’t have the necessary features enabled for LUKS2.
Setup bastion and system configuration
The following script will do that for you. There are several possibilities here.
- If you’re installing a new machine (nobody is using it as a bastion yet), then you can regenerate brand new host keys and directly harden the ssh configuration without any side effect:
/opt/bastion/bin/admin/install –new-install
- If you’re upgrading an existing machine (from a previous version of this software), and there are already some people using it as a bastion, then if you change the host keys, they’ll have to acknowledge the change when connecting, i.e. this is not transparent at all. To avoid doing that and not touching either the ssh config or the host keys, use this:
/opt/bastion/bin/admin/install –upgrade
If you used --upgrade, then you are warmly advised to harden the configuration yourself, using our templates as a basis. For example, if you’re under Debian 10:
vimdiff /opt/bastion/etc/ssh/ssh_config.debian10 /etc/ssh/ssh_config
vimdiff /opt/bastion/etc/ssh/sshd_config.debian10 /etc/ssh/sshd_config
There are other templates available in the same directory, for the other supported distros.
- If you want to have a fine-grained control of what is managed by the installation script, and what is managed by yourself (or any configuration automation system you may have), you can review all the fine-grained options:
/opt/bastion/bin/admin/install –help
Review the configuration
Base configuration files have been copied, you should review the main configuration and modify it to your needs:
vim /etc/bastion/bastion.conf
Check that the code works on your machine
This script will verify that all required modules are installed:
/opt/bastion/bin/dev/perl-check.sh
Manually create our first bastion account
Just launch this script, replacing USERNAME by the username you want to use:
/opt/bastion/bin/admin/setup-first-admin-account.sh USERNAME auto
You’ll just need to specify the public SSH key to add to this new account. It’ll be created as a bastion admin, and all the restricted commands will be granted.
Note
This command will also give you a so-called bastion alias, this is the command you’ll routinely use to connect to the bastion, and to your infrastructures through it, replacing in effect your previous usage of the ssh command. The alias name advertised on account creation is configurable in bastion.conf, and of course the users can rename it as they see fit, but it’s advised to keep this command short, as people will use it a lot.
If you want to create other admin accounts, you can repeat the operation. All the other accounts should be created by a bastion admin (or more precisely, by somebody granted to the accountCreate command), using the bastion own commands. But more about this in the section Using the bastion.
Now that your bastion is installed, you can either check the advanced installation documentation, or head over to the using the bastion section.
Advanced Installation
This section goes further in explaining how to setup your bastion. You should have completed the basic installation first.
Encryption & signature GPG keys
There are 2 pairs of GPG keys being used by the bastion:
- The bastion GPG key
- The private key is used by the bastion to sign the ttyrec files
- The public key is used by the admins to verify the signature and prove non-repudiation and non-tampering of the ttyrec files
- The admins GPG key
- The public key is used by the bastion to encrypt the backups and the ttyrec files
- The private key is used by the admins to decrypt the backups when a restore operation is needed, and the ttyrec files
Generating the bastion GPG key
Generate a GPG key that will be used by the bastion to sign files, this might take a while especially if the server is idle:
/opt/bastion/bin/admin/setup-gpg.sh –generate
gpg: directory `/root/.gnupg’ created
gpg: Generating GPG key, it’ll take some time.
Not enough random bytes available. Please do some other work to give
the OS a chance to collect more entropy! (Need 39 more bytes)
……….+++++
gpg: /root/.gnupg/trustdb.gpg: trustdb created
gpg: key A4480F26 marked as ultimately trusted
gpg: done
gpg: checking the trustdb
gpg: 3 marginal(s) needed, 1 complete(s) needed, PGP trust model
gpg: depth: 0 valid: 1 signed: 0 trust: 0-, 0q, 0n, 0m, 0f, 1u
Configuration file /etc/bastion/osh-encrypt-rsync.conf.d/50-gpg-bastion-key.conf updated:
8<—8<—8<—8<—8<—8<– # autogenerated with /opt/bastion/bin/admin/setup-gpg.sh at Wed Mar 21 10:03:08 CET 2018 { “signing_key_passphrase”: “************”, “signing_key”: “5D3CFDFFA4480F26” } —>8—>8—>8—>8—>8—>8
Done.
While it’s working, you can proceed to the section below.
Generating and importing the admins GPG key
You should import on the bastion one or more public GPG keys that’ll be used for encryption. If you don’t already have a GPG key for this, you can generate one. As this is the admin GPG key, don’t generate it on the bastion itself. On the desk of the administrator (you?), you can run for example:
myname=’John Doe’
email=’jd@example.org’
bastion=’mybastion4.example.org’
pass=pwgen -sy 12 1
echo “The passphrase for the key will be: $pass”
printf “Key-Type: RSA\nKey-Length: 4096\nSubkey-Type: RSA\nSubkey-Length: 4096\n” \
“Name-Real: %s\nName-Comment: %s\nName-Email: %s\nExpire-Date: 0\n” \
“Passphrase: %s\n%%echo Generating GPG key\n%%commit\n%%echo done\n” \
“$myname ($bastion)” $(date +%Y) “$email” “$pass” | gpg –gen-key –batch
The passphrase for the key will be:
gpg: Generating GPG key
Not enough random bytes available. Please do some other work to give
the OS a chance to collect more entropy! (Need 119 more bytes)
…..+++++
gpg: key D2BDF9B5 marked as ultimately trusted
gpg: done
Of course, adjust the myname, email and bastion variables accordingly. Write down the passphrase in a secure vault. All bastions admins will need it if they are to decrypt ttyrec files later for inspection, and also decrypt the backup should a restore be needed. When the key is done being generated, get the public key with gpg -a --export D2BDF9B5, using the proper key ID that you just generated. Copy it to your clipboard, then back to the bastion, paste it at the following prompt:
/opt/bastion/bin/admin/setup-gpg.sh –import
Also export the private admins GPG key to a secure vault (if you want the same key to be shared by the admins):
gpg –export-secret-keys –armor D2BDF9B5
Rotation, encryption & backup of ttyrec files
You should already have all the needed GPG keys at the proper places, by following “Setup the encryption & signature GPG keys” section above.
The configuration file is located in /etc/bastion/osh-encrypt-rsync.conf. You can ignore the signing_key, signing_key_passphrase and recipients options, as these have been auto-filled when you generated the GPG keys, by dropping configuration files in the /etc/bastion/osh-encrypt-rsync.conf.d directory. Any file there takes precedence over the global configuration file.
Once you are done with you configuration, you might want to test it by running:
/opt/bastion/bin/admin/osh-encrypt-rsync.pl –config-test
Or even go further by starting the script in dry-run mode:
/opt/bastion/bin/admin/osh-encrypt-rsync.pl –dry-run
Configuring keys, accounts & groups remote backup
Everything that is needed to restore a bastion from backup (keys, accounts, groups, etc.) is backed up daily in /root/backups by default. If you followed the “Setup the encryption & signature GPG keys” section above, these backups will be encrypted automatically.
If you want to push these backups to a remote location, which is warmly advised, you have to specify the remote location to scp the backup archives to. The configuration file is /etc/bastion/osh-backup-acl-keys.conf, and you should specify the PUSH_REMOTE and PUSH_OPTIONS.
To verify that the script is correctly able to connect remotely (and also validate the remote hostkey), start the script manually:
/opt/bastion/bin/admin/osh-backup-acl-keys.sh
Pushing backup file (/root/backups/backup-2020-05-25.tar.gz.gpg) remotely…
backup-2020-05-25.tar.gz.gpg
100% 21MB 20.8MB/s 00:00
Also verify that the extension is .gpg, as seen above, which indicates that the script successfully encrypted the backup.
Logs/Syslog
It is advised to use syslog for The Bastion application logs. This can be configured in /etc/bastion/bastion.conf with the parameter enableSyslog.
There is a default syslog-ng configuration provided, if you happen to use it. The file can be found as etc/syslog-ng/conf.d/20-bastion.conf.dist in the repository. Please read the comments in the file to know how to integrate it properly in your system.
Clustering (High Availability)
The bastions can work in a cluster, with N instances. In that case, there is one master instance, where any modification command can be used (creating accounts, deleting groups, granting accesses), and N-1 slave instances, where only readonly actions are permitted. Note that any instance can be used to connect to infrastructures, so in effect all instances can always be used at the same time. You may set up a DNS round-robin hostname, with all the instances IPs declared, so that clients automatically choose a random instance, without having to rely on another external component such as a load-balancer. Note that if you do this, you’ll need all the instances to share the same SSH host keys.
Setting up a slave bastion
Before, setting up the slave bastion, you should have the two bastions up and running (follow the normal installation documentation).
On the slave
The sync of the passwd and group files can have adverse effects on a newly installed machine where the packages where not installed in the same order than on the master, hence having different UIDs for the same users. The following commands are known to fix all the problems that could arise in that case, on an classic Debian machine, that has puppet, postfix, ossec and bind installed (disregard any file or directory not found message):
chown -R puppet:puppet /var/lib/puppet /var/log/puppet /run/puppet
chgrp puppet /etc/puppet
chown -R postfix /var/spool/postfix /var/lib/postfix
chown root:root /var/spool/postfix
chown -R root:root /var/spool/postfix/{pid,etc,lib,dev,usr}
chgrp -R postdrop /var/spool/postfix/{public,maildrop}
chown root:postdrop /usr/sbin/postdrop /usr/sbin/postqueue
chmod g+s /usr/sbin/postdrop /usr/sbin/postqueue
chown -R ossec /var/ossec/logs /var/ossec/queue /var/ossec/stats /var/ossec/var
chgrp -R ossec /var/ossec
chown ossecr /var/ossec/queue/agent-info /var/ossec/queue/rids
chown root /var/ossec/queue/ /var/ossec/queue/alerts/execq /var/ossec/var /var/ossec/var/run
chgrp bind /var/cache/bind /var/lib/bind /etc/bind /etc/bind/named.conf.default-zones /run/named
chown -R bind:bind /etc/bind/rndc.key /run/named
chgrp allowkeeper /var/log/bastion
Then, on the slave, set the readOnlySlaveMode option in the /etc/bastion/bastion.conf file to 1:
vim /etc/bastion/bastion.conf
This will instruct the bastion to deny any modification plugin, so that changes can only be done through the master instance.
Then, append the master bastion synchronization public SSH keyfile, found in ~root/.ssh/id_master2slave.pub on the master instance, to ~bastionsync/.ssh/authorized_keys on the slave, with the following prefix: from="IP.OF.THE.MASTER",restrict
Hence the file should look like this:from="198.51.100.42",restrict ssh-ed25519 AAA[...]
Note that if you’re using an old OpenSSH before version 7.2, the prefix should be instead: from="IP.OF.THE.MASTER",no-port-forwarding,no-agent-forwarding,no-X11-forwarding,no-pty,no-user-rc.
On the master
- Check that the key setup works correctly by launching the following command under the
rootaccount:
rsync -vaA –numeric-ids –dry-run –delete –filter “merge /etc/bastion/osh-sync-watcher.rsyncfilter” –rsh “ssh -i /root/.ssh/id_master2slave” / bastionsync@IP.OF.THE.SLAVE:/
- Check that it’s not trying to rsync too much stuff (if you have weird things in your
/home, you might want to edit/etc/bastion/osh-sync-watcher.rsyncfilterto exclude that stuff) - Once you’re happy with the output, retry without the
--dry-run - When it’s done, run it immediately again to ensure it still work, because
/etc/passwdand/etc/groupwill have been overwritten on the slave - Then, edit the configuration on the master:
vim /etc/bastion/osh-sync-watcher.sh
- Then, configure the script to start on boot and start it manually:
systemctl enable osh-sync-watcher
systemctl start osh-sync-watcher
- You can check the logs (if you configured
sysloginstead, which is encouraged, then the logfile depends on your syslog daemon configuration)
tail -F /var/log/bastion/osh-sync-watcher.log
Misc
Create SSHFP records
If you want to use SSHFP (for a bastion, you should), generate the records and publish them in the DNS:
awk ‘tolower($1)~/^hostkey$/ {system(“ssh-keygen -r bastion.name -f “$2)}’ /etc/ssh/sshd_config
Harden the SSH configuration
You can use this script:
/opt/bastion/bin/admin/check-ssh-hardening.pl
Note that this script doesn’t check everything, just a few items. If you want a complete audit of your SSH configuration, there are other tools available. Using our SSH templates is also a good start.
The script also supports generating custom moduli for your installation. The following command will generate moduli of 8192 bits size. Note that it’ll take several hours:
/opt/bastion/bin/admin/check-ssh-hardening.pl –generate-moduli 8192
2FA root authentication
The bastion supports TOTP (Time-based One Time Password), to further secure high profile accesses. This section covers the configuration of 2FA root authentication on the bastion itself. TOTP can also be enabled for regular bastion users, but this is covered in another section. To enable 2FA root authentication, run on the bastion:
script -c “google-authenticator -t -Q UTF8 -r 3 -R 15 -s /var/otp/root -w 2 -e 4 -D” /root/qrcode
Of course, you can check the --help and adjust the options accordingly. The example given above has sane defaults, but you might want to adjust if needed. Now, flash this QR code with your phone, using a TOTP application. You might want to copy the QR code somewhere safe in case you need to flash it on some other phone, by exporting the base64 version of it:
gzip -c /root/qrcode | base64 -w150
Copy this in your password manager (for example). You can then delete the /root/qrcode file.
You have then two configuration adjustments to do.
- First, ensure you have installed the provided
/etc/pam.d/sshdfile, or at least the corresponding line to enable the TOTP pam plugin in your configuration. - Second, ensure that your
/etc/ssh/sshd_configfile calls PAM for root authentication. In the provided templates, there is a commented snippet to do it. The uncommented snippet looks like this:
#2FA has been configured for root, so we force pubkey+PAM for it
Match User root
AuthenticationMethods publickey,keyboard-interactive:pam
Note that first, the usual publickey method will be used, then control will be passed to PAM. This is where the /etc/pam.d/sshd configuration will apply.
Now, you should be asked for the TOTP the next time you try to login through ssh as root. In case something goes wrong with the new configuration, be sure to keep your already opened existing connection to be able to fix the problem without falling back to console access.
Once this has been tested, you can (and probably should) also protect the direct root console access to your machine with TOTP, including a snippet similar to this one:
#TOTP config
auth [success=1 default=ignore] pam_google_authenticator.so secret=/var/otp/${USER}
auth requisite pam_deny.so
#End of TOTP Config
inside your /etc/pam.d/login file.
Of course, when using TOTP, this is paramount to ensure your server is properly synchronized through NTP
Upgrading
General upgrade instructions
- First, check below if there are specific upgrade instructions for your version.
- When you’re ready, update the code, if you’re using
git, you can checkout the latest tag:
( umask 0022 && cd /opt/bastion && git fetch && git checkout $(git tag | tail -1) )
- Run the install script in upgrade mode, so it can make adjustments to the system needed for the new version:
/opt/bastion/bin/admin/install –upgrade
Note that if you’re using an infrastructure automation tool such as Puppet, Ansible, Chef, and don’t want the update script to touch some files that you manage yourself, you can use --managed-upgrade instead of --upgrade. See the --help for a more fine-grained upgrade path if needed.
Version-specific upgrade instructions
v3.04.00 – 2021/07/02
The upgrade path from the preceding version is straightforward, however there are a few changes that you might want to be aware of before hitting the upgrade button:
- Some EOL OSes have been dropped: Debian 8, Ubuntu 14.04, OpenSUSE 15.0 and 15.1. This means that while the software might still work, theses OSes are no longer part of the tests and might break in any future upgrade.
- The default logging level of the HTTPS Proxy has been decreased. If you want to keep full requests and responses logging, check the log_request_response and log_request_response_max_size configuration options.
v3.03.01 – 2021/03/25
No specific upgrade instructions.
v3.03.00 – 2021/02/22
No specific upgrade instructions.
v3.02.00 – 2021/02/01
The upgrade path from the preceding version is straightforward, however there are a few changes that you might want to be aware of before hitting the upgrade button:
The main configuration file now supports proper booleans
For a lot of configuration options, previously you would specify “1” to enable a feature, and “0” to disable it. This has been changed to use proper true and false json values in /etc/bastion/bastion.conf. Of course, backward compatibility with “0” and “1” will always be kept, so no breakage is to be expected for this version or future ones even if you keep your configuration untouched.
Logs have been enhanced
All connections and plugin executions emit two logs, an open and a close log. We now add all the details of the connection to the close logs, those that were previously only available in the corresponding open log. This way, it is no longer required to correlate both logs with their uniqid to have all the data: the close log should suffice. The open log is still there if for some reason the close log can’t be emitted (kill -9, system crash, etc.), or if the open and the close log are several hours, days or months appart.
An additional field duration has been added to the close logs, this represents the number of seconds (with millisecond precision) the connection lasted.
Two new fields globalsql and accountsql have been added to the open-type logs. These will contain either ok if we successfully logged to the corresponding log database, no if it is disabled, or error $aDetailedMessage if we got an error trying to insert the row. The close-type log also has the new accountsql_close field, but misses the globalsql_close field as we never update the global database on this event. On the close log, we can also have the value missing, indicating that we couldn’t update the access log row in the database, as the corresponding open log couldn’t insert it.
The ttyrecsize log field for the close-type logs has been removed, as it was never completely implemented, and contains bogus data if ttyrec log rotation occurs. It has also been removed from the sqlite log databases.
The open and close events are now pushed to our own log files, in addition to syslog, if logging to those files is enabled (see enableGlobalAccessLog and enableAccountAccessLog), previously the close events were only pushed to syslog.
The /home/osh.log file is no longer used for enableGlobalAccessLog, the global log is instead written to /home/logkeeper/global-log-YYYYMM.log.
The global sql file, enabled with enableGlobalSqlLog, is now split by year-month instead of by year, to /home/logkeeper/global-log-YYYYMM.sqlite.
v3.01.03 – 2020/12/15
No specific upgrade instructions.
v3.01.02 – 2020/12/08
No specific upgrade instructions.
v3.01.01 – 2020/12/04
No specific upgrade instructions.
v3.01.00 – 2020/11/20
A new bastion.conf option was introduced: interactiveModeByDefault. If not present in your config file, its value defaults to 1 (true), which changes the behavior of The Bastion when a user connects without specifying any command. When this happens, it’ll now display the help then drop the user into interactive mode (if this mode is enabled), instead of displaying the help and aborting with an error message. Set it to 0 (false) if you want to keep the previous behavior.
An SELinux module has been added in this version, to ensure TOTP MFA works correctly under systems where SELinux is on enforcing mode. This module will be installed automatically whenever SELinux is detected on the system. If you don’t want to use this module, specify –no-install-selinux-module on your /opt/bastion/bin/admin/install upgrade call (please refer to the generic upgrade instructions for more details).
v3.00.02 – 2020/11/16
No specific upgrade instructions.
v3.00.01 – 2020/11/06
If you previously installed ttyrec using the now deprecated build-and-install-ttyrec.sh script, you might want to know that since this version, the script has been replaced by install-ttyrec.sh, which no longer builds in-place, but prefers downloading and installing prebuild rpm or deb packages.
If you previously built and installed ttyrec manually, and want to use the new packages instead, you might want to manually uninstall your previously built ttyrec program (remove the binaries that were installed in /usr/local/bin), and call install-ttyrec.sh -a to download and install the proper package instead.
This is not mandatory and doesn’t change anything from the software point of view.
v3.00.00 – 2020/10/30
Initial public version, no specific upgrade instructions.
Sandbox using Docker
This is a good way to test The Bastion within seconds, but read the FAQ if you’re serious about using containerization in production.
The sandbox image is available for the following architectures: linux/386, linux/amd64, linux/arm/v6, linux/arm/v7, linux/arm64, linux/ppc64le, linux/s390x.
- Let’s run the docker image:
docker run -d -p 22 –name bastiontest ovhcom/the-bastion:sandbox
Or, if you prefer building the docker image yourself, you can: use the two commands below. Of course, if you already typed the docker run command above, you can skip the following commands:
docker build -f docker/Dockerfile.debian10 -t bastion:debian10 .
docker run -d -p 22 –name bastiontest bastion:debian10
Configure the first administrator account (get your public SSH key ready)
docker exec -it bastiontest /opt/bastion/bin/admin/setup-first-admin-account.sh poweruser auto
We’re now up and running with the default configuration! Let’s setup a handy bastion alias, and test the info command:
PORT=$(docker port bastiontest | cut -d: -f2)
alias bastion=”ssh poweruser@127.0.0.1 -tp $PORT — “
bastion –osh info
It should greet you as being a bastion admin, which means you have access to all commands. Let’s enter interactive mode:
bastion -i
This is useful to call several --osh plugins in a row. Now we can ask for help to see all plugins:
$> help
The third section focuses on how to use the bastion, from the perspective of the different roles, such as bastion users, group owners, bastion admins, etc.
The fourth section is about the proper administration of the bastion itself. If you’re about to be the person in charge of managing the bastion for your company, you want to read that one carefully!
The fifth section is the complete reference of all the plugins, that are the commands used to interact with the bastion accounts, groups, accesses, credentials, and more.


%20(1).png "NTLMRecon : Enumerate Information From NTLM Authentication Enabled Web Endpoints")
.png "Pulsar : Data Exfiltration And Covert Communication Tool")
")