


Raiders is a framework designed to test authentication for web applications. While web proxies like ZAProxy and Burpsuite allow authenticated tests, they don’t provide features to test the authentication process itself, i.e. manipulating the relevant input fields to identify broken authentication.
Most authentication bugs in the wild have been found by manually testing it or writing custom scripts that replicate the behavior. Raider aims to make testing easier, by providing the interface to interact with all important elements found in modern authentication systems.
Features
Raider has the goal to support most of the modern authentication systems, and here are some features that other tools don’t offer:
- Unlimited authentication steps
- Unlimited inputs/outputs for each step
- Ability to conditionally decide the next step
- Running arbitrary operations when receiving the response
- Easy to write custom operations and plugins
Raider treats the authentication as a finite state machine. Each authentication step is a different state, with its own inputs and outputs. Those can be cookies, headers, CSRF tokens, or other pieces of information.
Each application needs its own configuration file for Raider to work. The configuration is written in Hylang. The language choice was done for multiple reasons, mainly because it’s a Lisp dialect embedded in Python.
Using Lisp was necessarily since sometimes the authentication can get quite complex, and using a static configuration file would’ve not been enough to cover all the details. Lisp makes it easy to combine code and data, which is exactly what was needed here.
By using a real programming language as a configuration file gives Raider a lot of power, and with great power comes great responsibility. Theoretically one can write entire malware inside the application configuration file, which means you should be careful what’s being executed, and not to use configuration files from sources you don’t trust. Raider will evaluate everything inside the .hy files, which means if you’re not careful you could shoot yourself in the foot and break something on your system.
The package is available in the Python Package Index, so to install the latest stable release of Raider just use the command pip3 install --user raider
Warning
Raider was developed on Python 3.9 and it wasn’t tested yet on older versions, so it might have incompatibility issues.
If you feel adventurous and want to build Raider from source, you can do so. You will need to do that anyways if you want to contribute to the development.
First start by clonning the repository with git clone https://github.com/DigeeX/raider.
Using a python virtual environment is recommended to avoid weird issues with python incompatibilities when working on the code. However you can still use pip3 install . in the project’s directory to install the package locally.
If you choose to use the virtual environment, install poetry since that’s how Raider was developed.
Once poetry is installed, you can prepare the virtual environment and switch to it to work with Raider:
cd raider
poetry install
poetry shell
And now you’re working inside the virtual environment, and Raider should be available here.
Architecture
Abstracting the authentication process
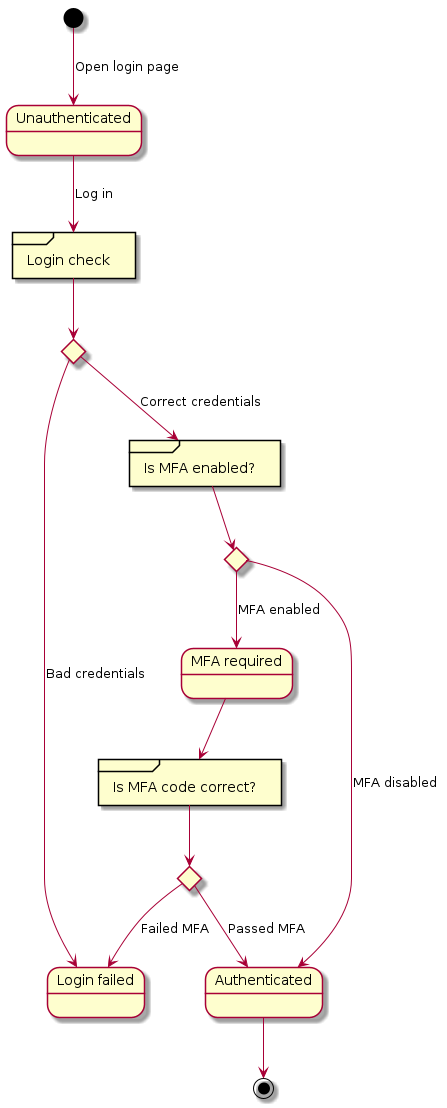
First let’s start by taking a closer look at how web authentication works. Every authentication process can be abstracted as a Finite State Machine.
On a high level, we start in the unauthenticated state, the user sends the application their credentials, optionally the multi-factor authentication (MFA) code, and if both checks pass, we reach the authenticated state. A typical modern web application will looks like the following in a diagram:
Basic concepts in Raider
Now let’s zoom in and look at the details. Instead of dealing with the states (Unauthenticated, Login failed, MFA required, and Authenticated), we define the concept of stages, which describes the information exchange between the client and the server containing one request and the respective response.
The example below shows a closer look of the authentication process for an imaginary web application:
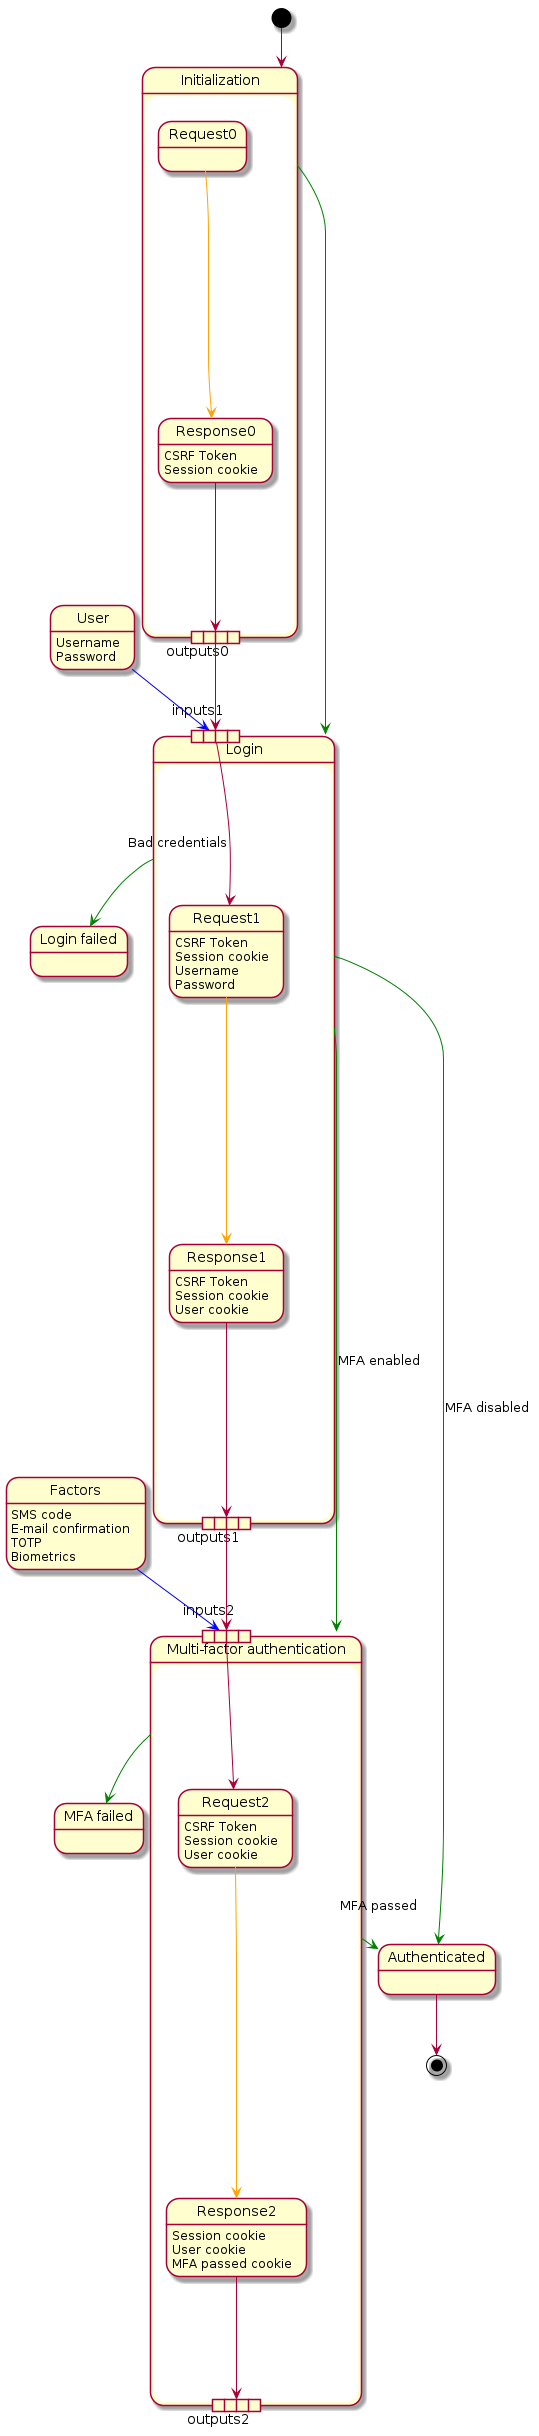
To describe the authentication process from the example defined above, we need three stages. The first one, Initialization, doesn’t have any inputs, but creates the Session cookie and the CSRF token as outputs.
Those outputs are passed to the next stage, Login, together with user credentials. A request is built with those pieces of information, and the new outputs are generated. In this case we have the new CSRF token, an updated session cookie, and a new cookie identifying the user: user cookie.
Depending on whether MFA is enabled or not, the third stage Multi-factor authentication might be skipped or executed. If it’s enabled, the outputs from the previous stage get passed as inputs to this one, the user is asked to input the next Factor, and a new cookie is set proving the user has passed the checks and is properly authenticated.
In Raider, stages are implemented using Flow objects. The authentication process consists of a series of Flows connected to each other. Each one accepts inputs and generates outputs. In addition to that, Flow objects implement Operations which can be used to run various actions upon receiving the response, but most importantly they’re used to control the authentication process by conditionally or unconditionally defining the next stage. So for example one can jump to stage X if the HTTP response code is 200 or to stage Y if it’s 403.
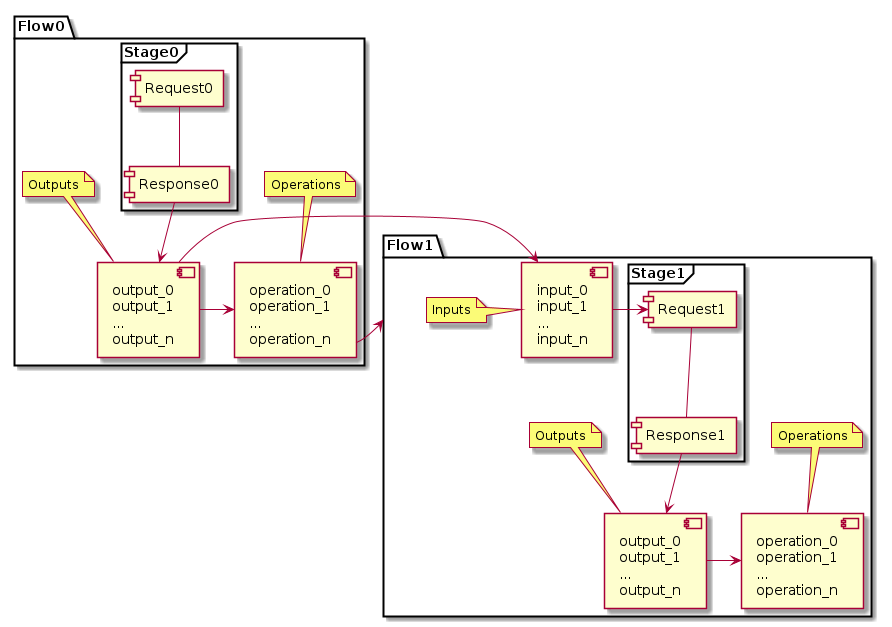
Inputs and outputs are often the same object, and you may want to update its value from one Flow to the next (for example the CSRF token changes for every stage). This was implemented in Raider using Plugins.
Plugins are pieces of code that can act as inputs for the HTTP requests to be sent, and/or as outputs from the HTTP responses. They are used to facilitate the information exchange between Flows. Raider provides the user the option to write new plugins with a small piece of hylang code.
Once the response is received, the Operations will be executed. The primary function of operations is to define which Flow comes next. But they can do anything, and Raider makes it easy to write new operations.
Tutorial
Preparation
Before you can use Raider, you have to set up the authentication inside hyfiles. To do that, you’ll probably need to use a web proxy (BurpSuite, ZAProxy, mitmproxy, etc…) to see the requests the application is generating, and identify all the important inputs and outputs for each request.
After the traffic was captured, there will probably be lots of HTTP requests that are irrelevant to the authentication. Start by removing all static files (.png, .js, .pdf, etc…). When you’re left with a fewer requests to deal with, it’s time to dive deeper and understand how the authentication works.
At this point we assume you already know the basics of Python and Hylang so this documentation will not cover information that can be found somewhere else.
This tutorial will show the authentication in use by Reddit at the time of writing this. It could be different in the future when you’re reading this, if they update the way authentication works or change the HTML structure, so you will have to do this all by yourself anyways.
The easiest way to start this is by going backwards starting with one authenticated request. This should be some kind of request that only works when the user is already authenticated. I choose the “unread_message_count” one for reddit, and the request looks like this:
GET https://s.reddit.com/api/v1/sendbird/unread_message_count HTTP/1.1
User-Agent: Mozilla/5.0 (X11; Linux x86_64; rv:89.0) Gecko/20100101 Firefox/89.0
Accept: application/json
Accept-Language: en-US,en;q=0.5
Content-Type: application/json
Origin: https://www.reddit.com
DNT: 1
Authorization: Bearer [REDACTED TOKEN]
Referer: https://www.reddit.com/
Connection: keep-alive
Host: s.reddit.com
As you can see from this, the only information we sent to this URL from our authentication is the Bearer token.
We define a new Flow that will check for the unread messages in hy:
(setv get_unread_messages
(Flow
:name “get_unread_messages”
:request (Request
:method “GET”
:headers [(Header.bearerauth access_token)]
:url “https://s.reddit.com/api/v1/sendbird/unread_message_count”)))
In Hy, setv is used to set up new variables. Here we created the variable get_unread_messages that will hold the information about this Flow. This will be hold in the _functions special variable which stores the Flows which aren’t affecting the authentication.
The only required parameters for Flow objects are the name and the request. The name is a string that is used for reference purposes, and the request contains the actual HTTP request definition as a Request object.
The Request object requires only the method and url. Other parameters are optional. We translate the original request into Raider config format, and to use the access token we need to define it in the request header. Since this is a bearer header, we use Header.bearerauth with the access_token which we will create later on.
Getting the access token
The next step would be to find out where is this token generated and how we can extract it. Searching for this token in previous responses, we can see it was first seen in a request to the main reddit page. It’s located inside the <script id=”data”> part of the response, and it looks like this:
[…] “session”:{“accessToken”:”[REDACTED_TOKEN]”,”expires”:”2021-06-23T19:30:10.000Z” […]
The easiest way to extract the token using Raider, is to use the Regex module. This module searches for the regex you supplied and returns the value of the first group that matches. The group is the string in between ( and ) characters. The final object I configured looks like this:
(setv access_token
(Regex
:name “access_token”
:regex “\”accessToken\”:\”([^\”]+)\””))
We are setting up the variable access_token to the Regex object, with the internal name access_token and that’ll return the value of the string between double quotes after the “accessToken” part.
Now we need to define the actual request that will get us this access token. To do this, we take a closer look to the actual request where this response was created:
GET https://www.reddit.com/ HTTP/1.1
User-Agent: Mozilla/5.0 (X11; Linux x86_64; rv:89.0) Gecko/20100101 Firefox/89.0
Accept: text/html,application/xhtml+xml,application/xml;q=0.9,image/webp,/;q=0.8
Accept-Language: en-US,en;q=0.5
DNT: 1
Upgrade-Insecure-Requests: 1
Connection: keep-alive
Cookie: csv=1; edgebucket=PPJTEvVRvoolrqFkYw; G_ENABLED_IDPS=google; loid=[REDACTED]; eu_cookie={%22opted%22:true%2C%22nonessential%22:false}; token_v2=[REDACTED]; reddit_session=[REDACTED]
Host: www.reddit.com
Now we can see there are several cookies being sent with this request. Most of them are irellevant here. To see which one is required for the request to succeed, we remove them one by one and see if we get the information we need inside the response. By doing this, I found out that the only cookie we need is reddit_session. As long as we supply it in the request, we do get the access_token in the response. With this information, we can now write the definition of the request:
(setv get_access_token
(Flow
:name “get_access_token”
:request (Request
:method “GET”
:url “https://www.reddit.com/”
:cookies [reddit_session])
:outputs [access_token]
:operations [(Print access_token)
(NextStage “get_unread_messages”)]))


